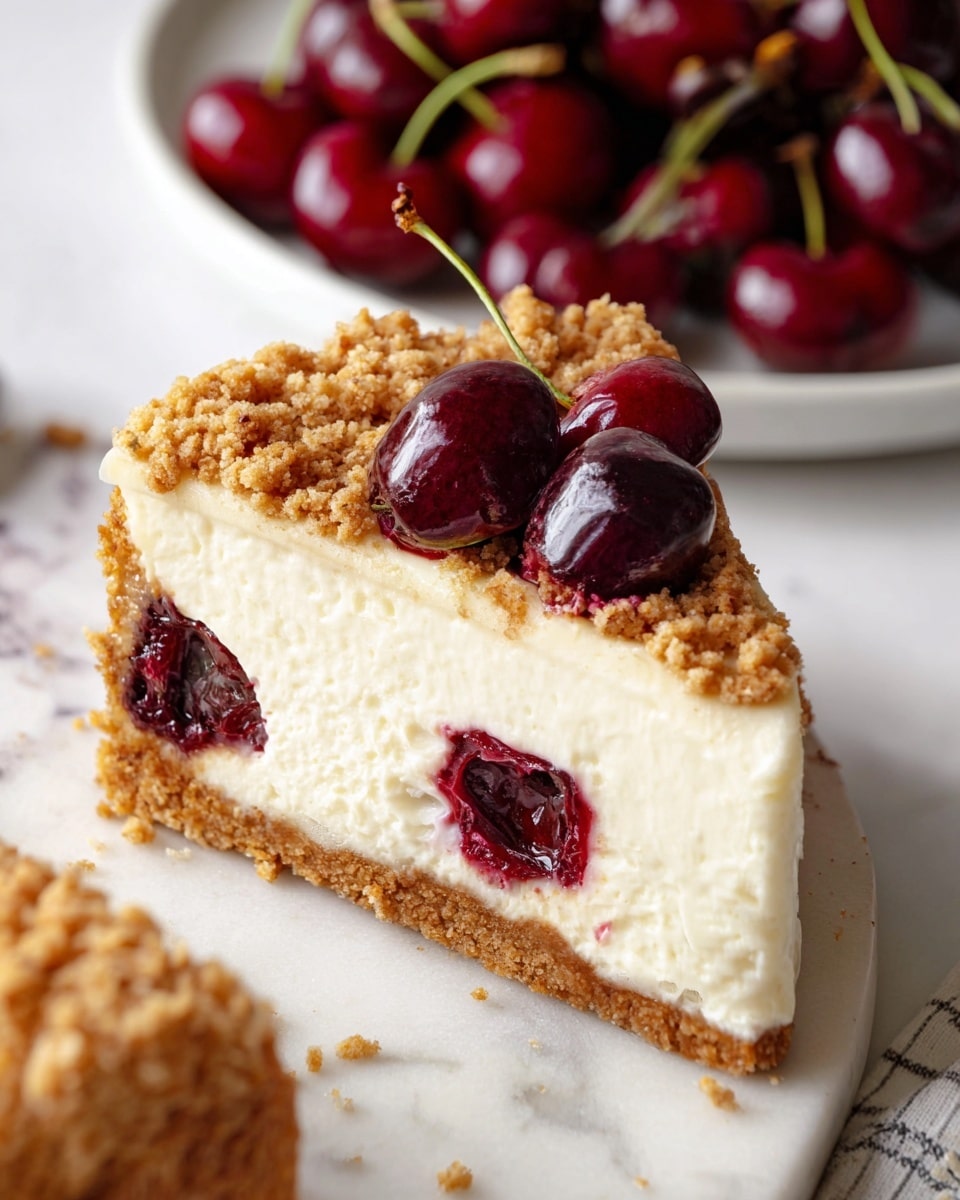
Cherry Crumble Cheesecake Recipe
I’m so excited to share this Cherry Crumble Cheesecake Recipe with you because it’s honestly one of those desserts that feels a little fancy but is totally doable at home. If you’ve ever been intimidated by cheesecake, this one’ll win you over with its familiar flavors and that irresistible cherry topping with a crunchy crumble. It’s perfect for special occasions or just when you want to treat yourself (and trust me, you’ll want to!).
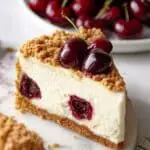
What I love most about this Cherry Crumble Cheesecake Recipe is how every layer works together—the buttery cookie crust, the creamy cheesecake, and that fresh cherry topping with just the right amount of crumble on top. When you cut into it, you get that satisfying mix of textures and flavors that keeps everyone coming back for seconds. Plus, with the detailed steps I’m about to share, you’ll have no trouble pulling off a beautiful, bakery-quality dessert right in your own kitchen.
Ingredients You’ll Need
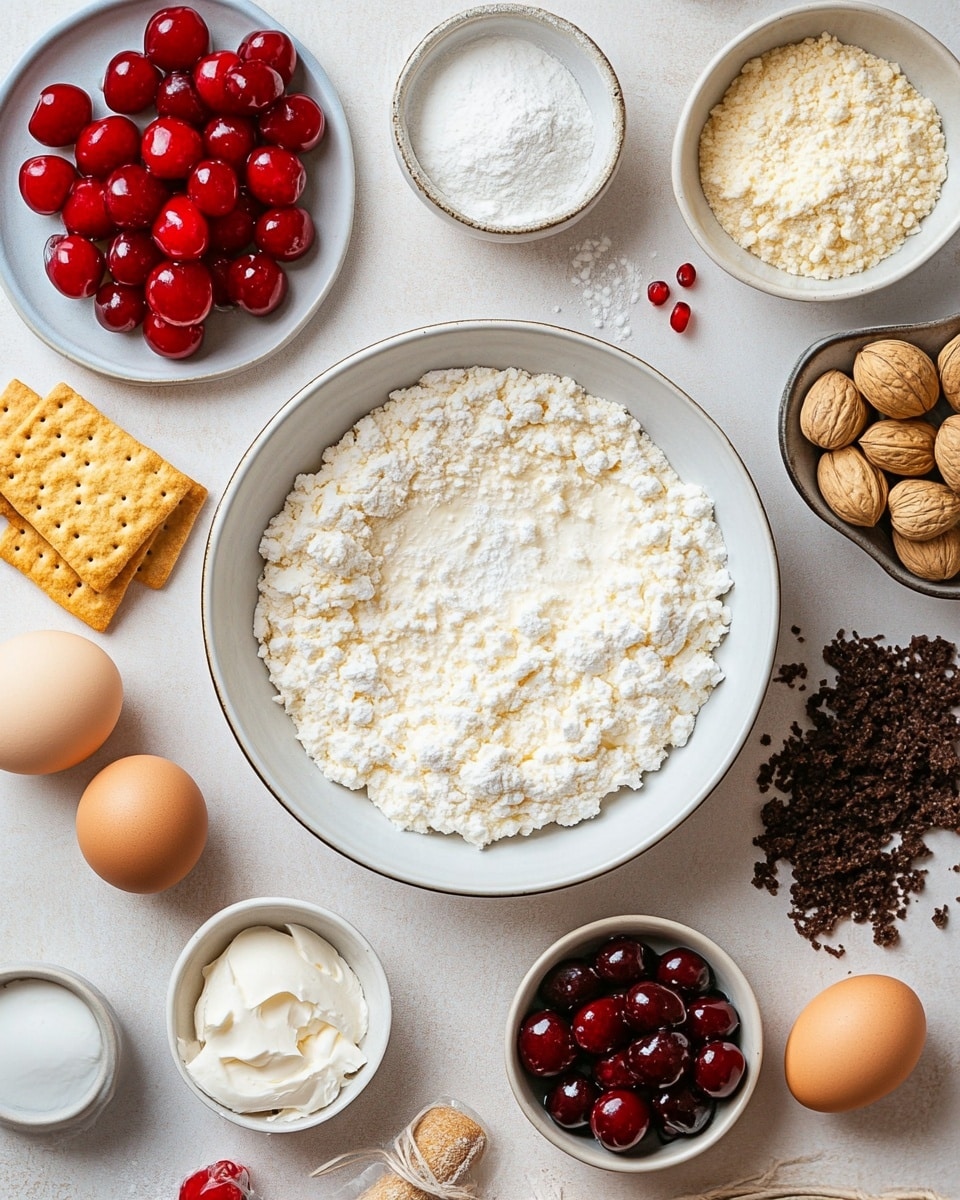
The magic in this recipe comes from classic ingredients that complement each other perfectly. When gathering your groceries, try to use fresh cherries if you can—they add such a vibrant flavor—and make sure your cream cheese and sour cream are at room temperature for the smoothest batter.
- Digestive or graham crackers: These give the crust a lovely buttery flavor. I usually pick whichever is available fresh, and crushing them finely helps the crust bind well.
- Granulated sugar: This sweetens both the crust and cherry topping lightly without overpowering.
- Butter: Use unsalted and melted for the crust, and softened for the crumble topping to get that perfect crumbly texture.
- Fresh pitted cherries: The star of the dessert—if fresh aren’t available, frozen can work but thaw and drain them first.
- All-purpose flour: It’s used in the cherry topping to thicken the juices and in the crumble for structure.
- Lemon juice: Just a bit brightens up the cherry topping beautifully.
- Dark brown sugar: Adds a rich, molasses-y depth to the crumble topping that’s just irresistible.
- Cream cheese (full fat): For the creaminess and tang in the cheesecake—let it warm to room temp to avoid lumps.
- Sour cream (14-18% fat): Adds extra moisture and a subtle tanginess to balance the sweetness.
- Cornstarch: Helps stabilize the cheesecake filling so it sets perfectly.
- Vanilla and almond extracts: These two together create a lovely aroma and flavor complexity in the cheesecake.
- Large eggs: These bind everything together—adding them slowly ensures a silky smooth batter.
Variations
One thing I love about this Cherry Crumble Cheesecake Recipe is how flexible it can be. I often tweak it based on the season or just what I’m craving. Feel free to personalize it with your favorite twists—you’ll find it’s quite forgiving.
- Swap the cherries: I’ve tried raspberries or mixed berries instead, and it’s just as delicious if not more vibrant! Just adjust the sugar slightly based on your fruit’s sweetness.
- Make it gluten-free: Use gluten-free cookies for the crust and gluten-free flour for the crumble to suit dietary needs.
- Less crumble, more topping: If you prefer a less crunchy topping, reduce the crumble amount or sprinkle just a bit for a hint of texture.
- Spiced twist: Adding a pinch of cinnamon or nutmeg to the crumble or crust gives a warm holiday feel—my go-to during colder months.
How to Make Cherry Crumble Cheesecake Recipe
Step 1: Get that Perfect Cookie Crust
Start by preheating your oven to 160ºC (325ºF). Crush your digestive or graham crackers with the sugar until they resemble fine sand—this helps the crust pack together without crumbling apart. Once you add the melted butter, blend it well so every crumb gets coated. Press the mixture evenly into the bottom and up the sides of a 9-inch springform pan; I find using the bottom of a flat glass really helps to pack it tightly. Bake for 10 minutes and then let it cool completely so it sets nicely before adding the cheesecake—not skipping this helps the crust stay crisp.
Step 2: Prepare Your Luscious Cherries and Crumble
While the crust is baking, pit and halve your cherries—this is the messy part but SO worth it! Toss them with sugar, flour, and lemon juice to help thicken the juices and add a little zing. Next, whip up your crumble by mixing flour and brown sugar, then cutting in softened butter with a fork until it looks like coarse crumbs. Setting these aside will make your cheesecake assembly smooth since they’re both ready to go.
Step 3: Dreamy, Creamy Cheesecake Filling
Beat your room temperature cream cheese on low for about a minute to get it smooth—if it’s too cold, you’ll end up with lumps. Add sugar and mix well, scraping the bowl sides to ensure even mixing. Combine sour cream and cornstarch separately, then fold it into the cream cheese along with vanilla and almond extracts for that lovely aroma. Add the eggs two at a time on low speed—patience here pays off, resulting in a silky batter without overmixing (which can crack your cheesecake when baking).
Step 4: Assemble and Bake With Care
Pour your cheesecake filling onto the cooled crust. Then gently spoon the cherries evenly over the batter—don’t stir! Finally, sprinkle the crumble topping on to add that satisfying crunch. Place the springform pan inside a larger cake pan and fill with hot water two-thirds of the way up to create a water bath, which helps everything bake evenly and prevents cracking. If you want to skip the water bath, wrap the springform securely with foil, but I’ve found the water bath method safer for the best texture. Bake for 1 hour and 25-35 minutes until the edges are set but the center still wobbles slightly.
Step 5: Cool and Chill for Best Results
After baking, turn off the oven but leave the door slightly open. Let the cheesecake cool inside for an hour to prevent sudden temperature changes that cause cracks. Then remove from the water bath and let cool at room temperature before placing it in the fridge to chill for at least 6 hours or overnight. This waiting game is tough but trust me—it’s when the flavors develop and the cheesecake firms up perfectly.
How to Serve Cherry Crumble Cheesecake Recipe
Garnishes
I love to keep it simple—a dusting of powdered sugar or a few fresh cherries on top works beautifully. Sometimes, I add a dollop of freshly whipped cream with a sprinkle of lemon zest for a little extra wow factor. The tanginess of whipped cream really cuts through the richness, giving you that perfect bite each time.
Side Dishes
This cheesecake pairs wonderfully with a cup of strong coffee or a refreshing herbal tea like chamomile. For brunch, I’ve served it alongside warm fruit compote or a light salad with citrus vinaigrette, balancing the dessert’s richness and making the meal feel a bit more special.
Creative Ways to Present
One fun way I’ve presented this recipe is in individual glass jars for parties—layering the crust, cheesecake filling, cherries, and crumble individually looks stunning and makes serving easy. You can also add edible flowers or crushed pistachios on top for a colorful finish that’s sure to impress guests.
Make Ahead and Storage
Storing Leftovers
Store any leftover cheesecake tightly wrapped in plastic wrap or in an airtight container in the fridge. I usually slice it first and place parchment paper layers between pieces so I can grab a slice anytime without sticking. It stays fresh and creamy for up to 4 days, but honestly, it rarely lasts that long in my house!
Freezing
Freezing this cheesecake works surprisingly well. I wrap individual slices tightly in plastic wrap then in foil or place them in airtight containers to avoid freezer burn. When you’re ready to enjoy, thaw in the fridge overnight. The texture remains creamy and the cherry crumble topping stays delightfully crisp-ish.
Reheating
I prefer to eat this cheesecake chilled, but if you want to warm it slightly, let slices sit at room temperature for about 15 minutes. Avoid microwaving directly as it can make the texture a bit grainy or soggy. Just a gentle warm-up lets the flavors bloom without losing that creamy magic.
FAQs
-
Can I use frozen cherries for the Cherry Crumble Cheesecake Recipe?
Yes! Frozen cherries work well if fresh aren’t available. Just make sure to thaw and drain them thoroughly to avoid excess moisture which can make the cheesecake soggy. Toss with sugar and flour as usual before adding on top.
-
How do I prevent cracks in my cheesecake?
Using a water bath during baking and allowing the cheesecake to cool slowly inside the oven with the door ajar are key to preventing cracks. Also, don’t overmix your batter or overbake it—the center should stay slightly wobbly when done.
-
Can I make the crust gluten-free?
Absolutely! Swap the digestive or graham crackers for your favorite gluten-free cookies. The texture and flavor will be just as lovely—just press firmly to make sure it holds together well.
-
How long does the Cherry Crumble Cheesecake keep in the fridge?
When stored in an airtight container or wrapped tightly, it stays fresh for up to 4 days. Make sure it’s kept chilled, and bring it to room temperature before serving for the best texture.
-
Can I prepare this cheesecake in advance?
Definitely! The cheesecake benefits from setting in the fridge overnight; this helps it firm up and develop deeper flavors. You can bake it a day ahead and serve the next day for best results.
Final Thoughts
This Cherry Crumble Cheesecake Recipe holds a special place in my heart because it brings together comforting, familiar flavors with a touch of elegance. It’s the perfect dessert to make when you want to impress without stress—a crowd-pleaser that tastes like you spent hours perfecting it. I encourage you to give this one a try; I’m sure you’ll love the process and the delicious results just as much as I do. Let me know how it goes because there’s nothing better than sharing homemade sweets with friends!
PrintCherry Crumble Cheesecake Recipe
This Cherry Crumble Cheesecake combines a buttery cookie crust with a luscious cream cheese filling, topped with fresh cherries and a delightful crumbly topping. Baked in a water bath for a smooth and creamy texture, this dessert is perfect for special occasions or a decadent treat.
- Prep Time: 45 minutes
- Cook Time: 1 hour 30 minutes
- Total Time: 8 hours 15 minutes
- Yield: 12 servings 1x
- Category: Dessert
- Method: Baking
- Cuisine: American
Ingredients
COOKIE CRUST:
- 250 g digestive or graham crackers
- 2 tablespoons granulated sugar
- 75 g butter
CHERRIES:
- 300 g fresh pitted cherries (about 350 g with pits)
- 1 tablespoon granulated sugar
- 1 tablespoon all-purpose flour
- 2 teaspoons lemon juice
CRUMBLE:
- 110 g all-purpose flour
- 80 g dark brown sugar
- 70 g butter, room temperature
CHEESECAKE:
- 800 g cream cheese, full fat, room temperature
- 250 g granulated sugar
- 200 g sour cream (14-18%), room temperature
- 1 ½ tablespoons cornstarch
- 1 ½ teaspoons vanilla extract
- ½ teaspoon almond extract
- 4 large eggs
Instructions
- Prepare Oven and Pan: Preheat the oven to 160ºC (325ºF) conventional oven. Line a 23 cm (9-inch) springform pan with parchment paper at the bottom.
- Make Cookie Crust: In a food processor, blend the digestive or graham crackers with granulated sugar until fine crumbs form. Melt the butter and add it to the processor, blending until combined.
- Form and Bake Crust: Press the cookie crumb mixture firmly into the base and up the sides of the springform pan using the bottom of a glass. Bake for 10 minutes, then let cool until just touchable. Keep the oven on.
- Prepare Cherry Topping: Halve and pit the cherries. In a small bowl, combine cherries, granulated sugar, flour, and lemon juice until no dry flour remains. Set aside.
- Prepare Crumble Topping: In another bowl, mix the flour and dark brown sugar. Add room temperature butter and mix with a fork until crumbly and fully combined. Set aside.
- Mix Cream Cheese: Using a hand mixer or stand mixer with a paddle attachment, beat the cream cheese for 1 minute on low speed. Add granulated sugar and continue mixing for another minute, scraping the bowl sides as needed.
- Add Sour Cream Mixture: In a small bowl, whisk together sour cream and cornstarch until smooth. Add to the cream cheese mixture along with almond and vanilla extracts. Mix on low speed until combined.
- Add Eggs: Add eggs two at a time, mixing on low speed until just combined after each addition. Scrape down the bowl sides and mix once more to fully incorporate ingredients.
- Assemble Cheesecake: Pour the batter into the springform pan over the baked crust. Evenly distribute the cherry mixture on top, then sprinkle the crumble topping over the cherries.
- Prepare Water Bath: Boil water in a kettle. Place the springform pan inside a 25 cm (10 inch) cake pan. Put that cake pan into a larger roasting pan and fill with hot water to reach two-thirds up the sides of the cake pan. This prevents water from leaking into the crust.
- Alternative Water Bath Seal: If not using the roasting pan, tightly wrap the springform pan with a triple layer of aluminum foil to protect against water leakage before placing in water bath.
- Bake Cheesecake: Bake for 1 hour and 25-35 minutes at 160ºC (325ºF) until the edges are set but the center is still slightly wobbly.
- Cool in Oven: Turn off the oven and slightly open the door. Leave the cheesecake inside to cool for 1 hour slowly.
- Remove from Water Bath: Take the springform pan out of the water bath and remove any foil if used. Transfer the cheesecake to a wire rack and let cool to room temperature for about 1 hour.
- Chill Cheesecake: Refrigerate the cheesecake for at least 6 hours, preferably overnight, to fully set before serving.
Notes
- Make sure the cream cheese and sour cream are at room temperature for a smoother batter without lumps.
- Press the crust firmly and evenly to avoid crumbling when sliced.
- Baking in a water bath prevents cracks and ensures a creamy texture.
- Use fresh cherries if possible for best flavor; frozen can be used but drain excess liquid.
- The cheesecake is best prepared a day ahead to enhance flavor and texture.
- If aluminum foil is used, ensure it is tightly wrapped to avoid water seeping into the pan.
- Allow the cheesecake to cool gradually in the oven to prevent sudden temperature changes that could cause cracking.
Keywords: Cherry Crumble Cheesecake, cheesecake recipe, cherry cheesecake, crumble topping, baked cheesecake, dessert, springform pan cheesecake