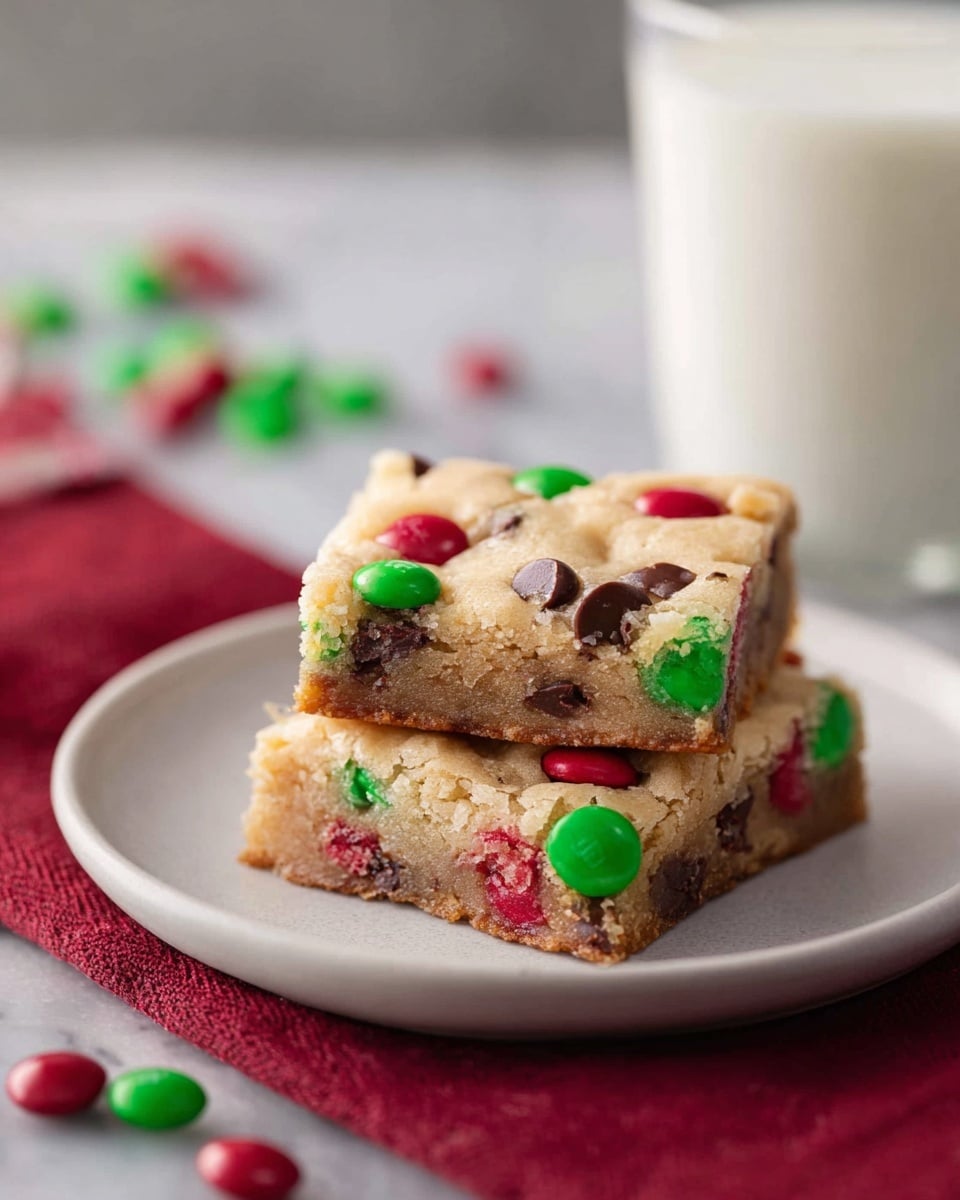
M&M Cookie Bars Recipe
If you’re anything like me, there’s nothing quite like the nostalgia of a classic cookie with a colorful twist. This M&M Cookie Bars Recipe is one of those sweet treats that never fails to bring smiles around my kitchen table. What makes it so special? The chewy, buttery base packed with melty mini chocolate chips and vibrant M&M candies is pure joy in every bite. These bars are perfect for casual snacking, bake sales, or when you want to bring a little fun to a potluck.
What really sold me on this M&M Cookie Bars Recipe is how easy it is to whip up—no rolling out dough or fiddly shapes, just press it into a pan and bake. Plus, the bars hold together beautifully, making them ideal for packing in lunchboxes or sharing with friends. I guarantee once you try this recipe, it’ll become your go-to crowd-pleaser for parties or a quick dessert fix.
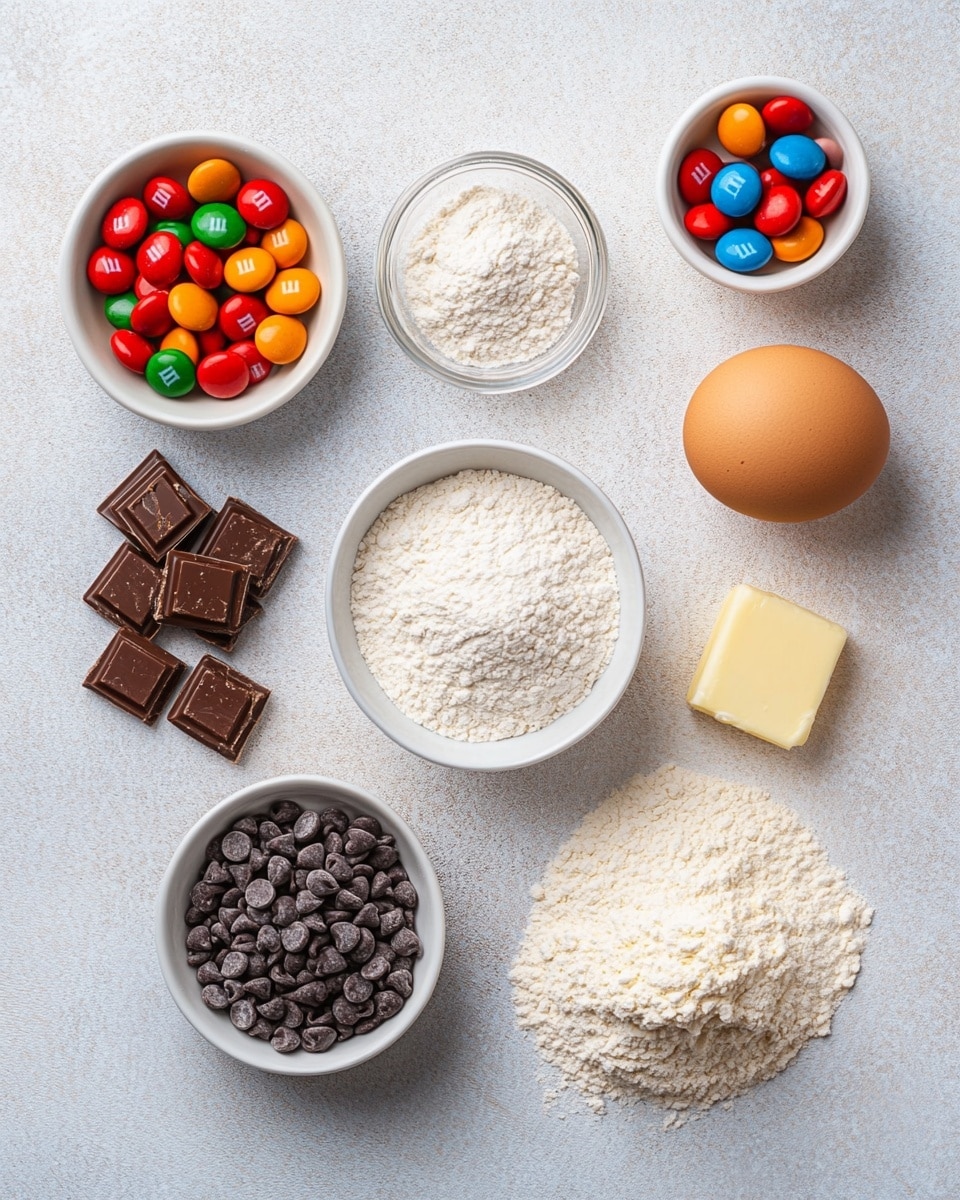
Ingredients You’ll Need
These ingredients come together to create a buttery, chewy cookie bar base with pops of chocolate and colorful crunch from the M&Ms. With pantry staples and a few fun extras, you’ll have these bars ready in no time.
- All-purpose flour: The sturdy foundation for structure; don’t swap this for whole wheat as the texture will change.
- Baking powder: Helps give the bars a light lift without making them cakey.
- Baking soda: Works with the brown sugar for tender, chewy edges.
- Salt: Enhances all the sweetness and balances flavors.
- Butter (room temperature): Use real butter for richness and that perfect melt-in-your-mouth texture.
- Granulated sugar: Adds crispness and sweetness.
- Light brown sugar: Gives a lovely caramel undertone and extra chewiness.
- Eggs: Binds everything and provides moisture.
- Vanilla extract: For that warm, inviting aroma.
- M&M candies (heaping cup): The star players—colorful and sweet little pockets of joy.
- Mini chocolate chips: Melts into little pockets of gooey chocolate surprises.
Variations
I love how versatile this M&M Cookie Bars Recipe is—once you nail the basics, customizing it to your taste is half the fun. Whether you swap mix-ins or adjust for dietary needs, these bars can be your kitchen playground.
- Add nuts: I like folding in chopped walnuts or pecans for extra crunch and a hint of earthy flavor.
- Swap out the chips: Peanut butter or white chocolate chips work wonderfully if you’re craving something different.
- Make it gluten-free: Try using a 1:1 gluten-free flour blend to accommodate gluten sensitivities; just check baking times as they might vary slightly.
- Seasonal twist: Around the holidays, I swap M&Ms for red and green ones or add a sprinkle of peppermint extract for festive flair.
How to Make M&M Cookie Bars Recipe
Step 1: Get Your Oven and Pan Ready
Start by preheating your oven to 350°F (175°C). Then, line a 9×13-inch baking pan with parchment paper—this little step saves you a mess and makes removing the bars super easy. Pro tip: Let the parchment overhang the sides of the pan so you can pull the whole batch out without fuss.
Step 2: Mix Your Dry Ingredients
In a medium bowl, sift together the all-purpose flour, baking powder, baking soda, and salt. I like to whisk them a bit just to combine evenly. Having your dry ingredients ready helps make the next steps smooth and more enjoyable.
Step 3: Cream Butter and Sugars
In a large mixing bowl or stand mixer, beat together your room temperature butter, granulated sugar, and light brown sugar until the mixture is light and fluffy. This usually takes about 3 to 4 minutes at medium speed. You’ll know it’s ready when you see the mixture lighten in color and become creamy—that’s the magic starting point for tender bars.
Step 4: Add Eggs and Vanilla
Beat in the eggs one at a time, making sure each is fully incorporated before adding the next. Then pour in the vanilla extract. Mixing well here ensures your bars develop that wonderful rich flavor we all crave.
Step 5: Combine with Dry Ingredients and Mix-ins
Gradually add the flour mixture to the wet ingredients, mixing just until combined—don’t overdo it or your bars might turn out tough. Once the dough is just mixed, fold in the mini chocolate chips and M&M candies carefully so they’re evenly distributed but not crushed.
Step 6: Press and Bake
Press the cookie dough evenly into your prepared pan, smoothing the top with a spatula or your clean hands. Bake in your preheated oven for 22 to 35 minutes. I recommend checking at 22 minutes by inserting a toothpick in the center—if it comes out clean or with just a few crumbs, they’re ready. Avoid overbaking to keep your bars soft and chewy.
Step 7: Cool and Slice
Once baked, remove from the oven and let the bars cool completely in the pan. To take them out easily, pull up using the parchment paper edges you left hanging over the sides. Then slice into squares and get ready to enjoy—you’ll want to have a big glass of milk nearby!
How to Serve M&M Cookie Bars Recipe
Garnishes
I usually serve these bars just as they are because the colors and chocolate chips speak for themselves, but if I’m feeling fancy, I’ll dust a little powdered sugar over the top or drizzle some melted chocolate. It adds a nice visual touch and makes them feel a little more special without much extra effort.
Side Dishes
These bars are a dessert on their own, but pairing them with a scoop of vanilla ice cream or a dollop of whipped cream instantly turns them into an indulgent treat. For afternoon snack time, I love serving them with a cup of coffee or cold milk. The creamy drinks balance the sweetness perfectly.
Creative Ways to Present
For birthdays or special occasions, I’ve arranged the M&M Cookie Bars Recipe in colorful tiers on a dessert tray, sprinkled extra M&Ms around the edges for a festive look. You can also use cookie cutters to shape the bars before serving for a fun twist. It’s a simple way to give a kid-friendly party extra charm.
Make Ahead and Storage
Storing Leftovers
I store leftover bars in an airtight container at room temperature, and they stay moist and tasty for about 3 to 4 days—if they last that long! Using parchment layers between stacked bars prevents sticking and keeps things neat.
Freezing
Freezing is a great option. Once your bars have cooled completely, I cut them into squares and freeze them in a single layer on a baking sheet, then transfer to a freezer-safe container or zip-top bag. They keep well for up to 3 months and thaw really quickly on the counter when snack cravings strike.
Reheating
If you want that fresh-baked warmth, I pop a bar or two in the microwave for about 15 seconds—just enough to soften the chocolate without making the bar too hot or chewy. Alternatively, a few minutes in a low oven (around 300°F) wrapped in foil works beautifully too.
FAQs
-
Can I use regular-sized M&Ms instead of mini M&Ms?
Yes, you can substitute regular M&Ms if that’s what you have on hand, but I recommend chopping them roughly so they distribute more evenly throughout the bars and don’t create large chocolate pockets.
-
How do I prevent my M&M Cookie Bars from being too soft or gooey?
Make sure you bake the bars long enough—start testing at 22 minutes with a toothpick. If it comes out with wet batter, give it a few more minutes. Also, don’t under-measure your flour; measuring properly keeps the texture balanced.
-
Can I prepare the dough ahead of time?
Absolutely! You can make the cookie dough 2 to 3 days ahead and store it covered in the refrigerator. This makes last-minute baking a breeze—just press into the pan and bake when you’re ready.
-
What’s the best way to cut the bars without them crumbling?
Waiting for the bars to cool completely is key. For cleaner cuts, I recommend chilling them in the fridge for 30 minutes before slicing. Use a sharp knife and wipe it clean between cuts to keep edges neat.
-
Can I make this recipe dairy-free?
Yes, swap the butter for a dairy-free alternative like coconut oil or a vegan butter substitute. Make sure your M&Ms and chocolate chips are also dairy-free. The texture will be slightly different but still delicious.
Final Thoughts
This M&M Cookie Bars Recipe holds a special place in my heart because it combines ease, fun, and that unbeatable homemade cookie flavor all in one pan. Whether you’re making it for kids, friends, or a late-night snack, I’m confident you’ll love how these bars come together—and disappear! Give it a try and let me know how your batch turned out; I’m always excited to hear about new twists and personal touches.
PrintM&M Cookie Bars Recipe

Delicious and colorful M&M Cookie Bars that combine soft, chewy cookie dough with crunchy M&M candies and mini chocolate chips. These bars are easy to make and perfect for sharing at parties, potlucks, or as a fun dessert treat.
- Prep Time: 10 minutes
- Cook Time: 25 minutes
- Total Time: 35 minutes
- Yield: 20 servings 1x
- Category: Dessert
- Method: Baking
- Cuisine: American
Ingredients
Dry Ingredients
- 3 cups all-purpose flour
- 3/4 teaspoon baking powder
- 3/4 teaspoon baking soda
- 3/4 teaspoon salt
Wet Ingredients
- 1 cup butter, room temperature
- 3/4 cup granulated sugar
- 1 cup light brown sugar
- 2 eggs
- 2 teaspoons vanilla extract
Mix-ins
- 1 heaping cup M&M candies
- 1/2 cup mini chocolate chips
Instructions
- Preheat Oven: Preheat your oven to 350 degrees Fahrenheit to prepare for baking your cookie bars.
- Prepare Pan: Line a 9 x 13-inch baking pan with parchment paper and set aside to prevent sticking and ensure easy removal.
- Mix Dry Ingredients: In a medium bowl, combine the all-purpose flour, baking powder, baking soda, and salt. Set this mixture aside for later.
- Cream Butter and Sugars: In a large mixing bowl or using a stand mixer, beat together the room temperature butter, granulated sugar, and light brown sugar until the mixture becomes creamy and well combined.
- Add Eggs and Vanilla: Add the eggs and vanilla extract to the creamed mixture and mix until fully incorporated.
- Combine Dry and Wet Ingredients: Gradually add the dry ingredient mixture to the wet ingredients, mixing until just combined without overmixing.
- Add Mix-ins: Stir in the mini chocolate chips and M&M candies evenly throughout the dough.
- Press Dough into Pan: Transfer the dough into the prepared baking pan and press it down into an even layer for uniform baking.
- Bake: Bake the bars in the preheated oven for 22 to 35 minutes, or until a toothpick inserted into the center comes out clean, indicating they are fully baked.
- Cool and Cut: Remove the pan from the oven and let the bars cool completely. Once cooled, lift the bars out using the parchment paper edges and cut into squares for serving.
Notes
- Make Ahead Instructions: The cookie dough can be prepared and stored in the refrigerator for 2-3 days before baking.
- Freezing Instructions: After baking and cooling, cut the bars into squares and store them in a freezer-safe container or bag for up to 3 months. The cookie dough can also be frozen for up to 3 months for future use.
- Recipe Variations: Add chopped walnuts or pecans for a nutty crunch. Substitute mini chocolate chips with peanut butter or white chocolate chips as preferred.
Keywords: M&M Cookie Bars, cookie bars, easy dessert, chocolate chip cookie bars, party dessert, colorful cookies