Butterfinger Pie Recipe
Let me tell you, this Butterfinger Pie Recipe is a total showstopper whenever I whip it up. It’s that perfect combination of creamy, peanut buttery goodness with little crunchy bursts of Butterfinger bars that make every bite a delightful surprise. Plus, it comes together in no time, which is perfect for those moments when you want something sweet but don’t want to spend hours in the kitchen.
Whether you’re bringing it to a casual family gathering or treating yourself after a long day, this pie’s got all the right vibes. It tastes indulgent without being overwhelming, and best of all, you don’t need to be a pro baker to nail it. Trust me, once you try this Butterfinger Pie Recipe, it’ll be your go-to for parties and quick dessert cravings alike.
Ingredients You’ll Need
Each ingredient in this Butterfinger Pie Recipe works so well together to build a luscious, creamy filling with that perfect crispy candy crunch. When shopping, look for quality peanut butter and fresh Butterfinger bars to maximize flavor.
- Cream cheese: Room temperature is key for easy mixing and a velvety texture.
- Creamy peanut butter: Go for smooth to keep the pie silky without any lumps.
- Vanilla extract: Pure vanilla elevates the flavors beautifully here.
- Powdered sugar: Helps sweeten and smooth out the peanut butter and cream cheese.
- Butterfinger bars: Crush them just right — not too fine, so you still get those satisfying crunchy bits.
- Cool Whip: Thawed and ready to fold in for that light, airy finish.
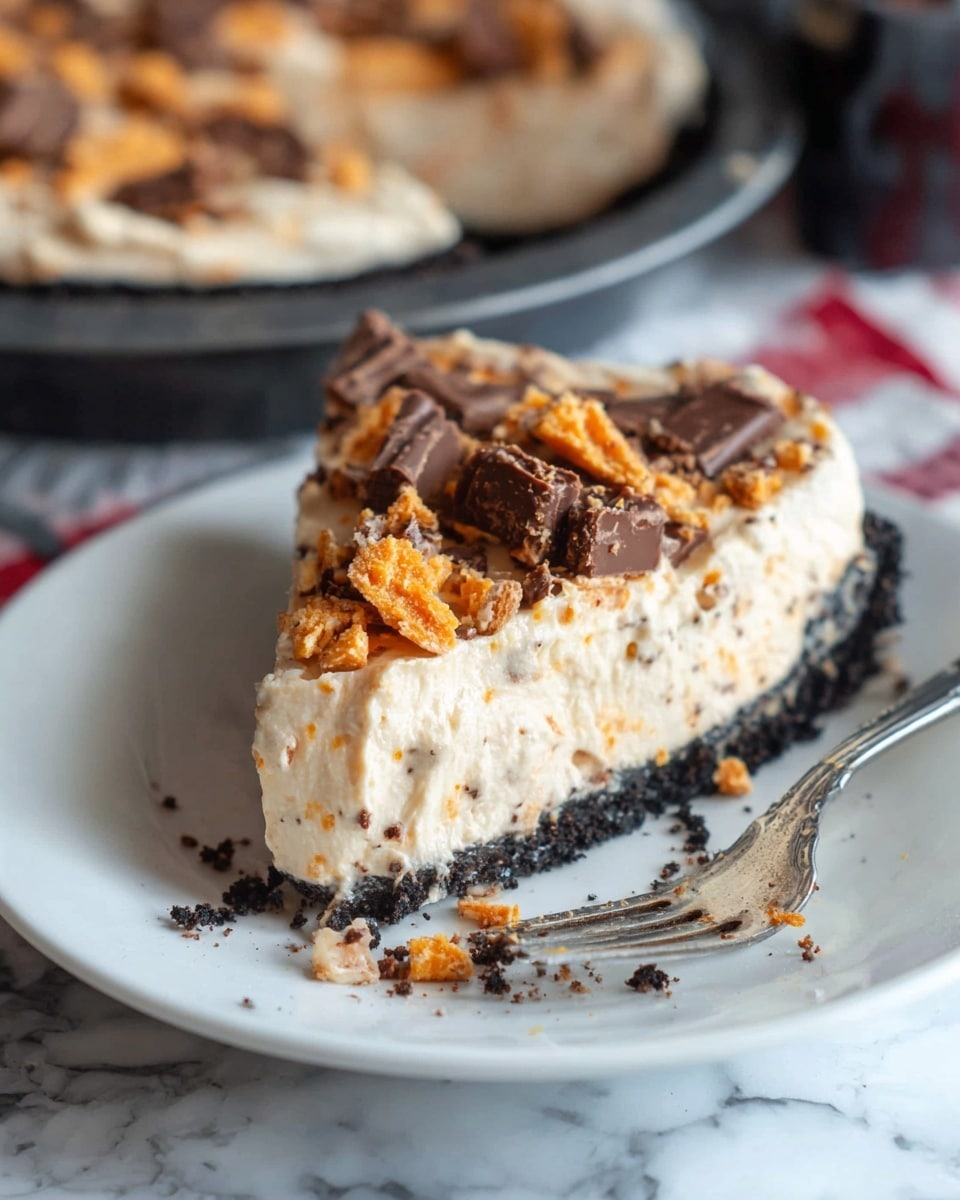
- Store-bought Oreo or chocolate graham cracker crust: Using a premade crust saves you time and adds that chocolatey base I love.
Variations
I love customizing this Butterfinger Pie Recipe depending on the season or mood. It’s super forgiving, so feel free to mix it up and make it your own!
- Peanut Butter Swap: If you’re allergic or just want a twist, try almond or cashew butter instead—I’ve done it, and it’s delicious but a little less classic.
- Chocolate Lovers: Stir in mini chocolate chips or drizzle melted chocolate over the top for extra richness.
- Crunch Factor: Try mixing in some chopped pecans or walnuts with the Butterfinger pieces for a nutty crunch.
- Sugar-Free Version: Use a sugar-free powdered sugar alternative and a no-sugar-added crust for a lighter option.
How to Make Butterfinger Pie Recipe
Step 1: Cream Together the Bases
Start by putting the cream cheese and peanut butter into a large mixing bowl. Make sure your cream cheese has softened to room temperature—it makes the blending so much easier and you won’t get any pesky lumps. Add the vanilla extract, then beat everything with an electric mixer until the mixture is smooth and creamy. This step is really the key to getting that luscious, melt-in-your-mouth texture, so don’t rush it!
Step 2: Sweeten Up and Mix
Next, add in the powdered sugar gradually. Beat it well to incorporate completely; you want the filling to be smooth and nicely balanced between sweet and salty. Keep the beaters going for a good couple of minutes to get a perfectly fluffy mixture. It’s one of those small steps that really makes a difference.
Step 3: Fold in the Crunch
Now comes the fun part—gently folding in the crushed Butterfinger bars. Don’t overmix here; you want to keep those little crunchy chunks intact for texture. Tearing or stirring too hard can crush the candy too much and you’ll lose that wonderful contrast in each bite.
Step 4: Add the Cool Whip for Lightness
Carefully fold in the thawed Cool Whip to keep the filling airy and light. Make sure your Cool Whip is fully thawed so it blends evenly. If you fold it too aggressively, you might deflate the mixture, so use a gentle hand here. The filling should look smooth but fluffy.
Step 5: Assemble and Chill
Spread the filling evenly into your premade Oreo or chocolate graham cracker crust. Then sprinkle the reserved Butterfinger pieces on top for an extra pop of crunch and visual appeal. Now, here’s the important part—refrigerate your pie for at least 4 hours (overnight is even better) so all the flavors meld beautifully and the texture firms up perfectly.
How to Serve Butterfinger Pie Recipe

Garnishes
I like to keep garnishes simple but fun—extra crushed Butterfinger bars on top always get compliments! Sometimes, I add a drizzle of chocolate syrup or a few dollops of whipped cream to make it feel special. Fresh raspberries on the side add a nice tart contrast if you want to brighten up the richness.
Side Dishes
This pie is quite rich on its own, so I often serve it with simple sides like fresh fruit or a light vanilla ice cream to balance things out. For gatherings, a coffee or milk pairing always wins—especially if you’re serving it as an after-dinner treat.
Creative Ways to Present
For parties, I’ve done mini individual pies in tartlet pans using the same recipe and they were a huge hit. It’s a cute way to let guests grab-and-go without needing to slice. Another fun trick is serving the pie in clear glass dishes so everyone can admire those layers and candied Butterfinger chunks. It instantly ups the wow-factor.
Make Ahead and Storage
Storing Leftovers
Any leftovers I keep well wrapped in the fridge, usually covered with plastic wrap or stored in an airtight container to prevent the crust from getting soggy. It lasts nicely for about 3-4 days, and honestly, the flavors often improve after a day or two in the fridge.
Freezing
I’ve frozen this pie wrapped tightly in foil and stored in a freezer-safe container. When ready to eat, let it thaw overnight in the fridge. The texture holds up surprisingly well, though the Cool Whip might be a little softer after thawing. Freezing is great if you want to prep ahead for a special occasion.
Reheating
This pie is best enjoyed chilled, so reheating isn’t usually necessary. If you want to warm a slice just a touch, I suggest letting it sit at room temperature for 10-15 minutes rather than microwaving, to keep that creamy texture intact.
FAQs
-
Can I use homemade pie crust instead of store-bought?
Absolutely! A homemade chocolate graham cracker or Oreo crust can add a personal touch and fresh flavor. Just make sure to bake and cool it completely before adding the filling to prevent sogginess.
-
What if I can’t find Butterfinger bars?
If Butterfinger bars are hard to find, try substituting with a similar peanut butter and candy bar like Reese’s Fast Break or chopped peanut brittle to keep that sweet, crunchy texture.
-
Can I make this pie dairy-free?
For a dairy-free version, swap the cream cheese and Cool Whip for coconut-based alternatives. Keep in mind the texture will be slightly different but still delicious.
-
How long does the Butterfinger Pie stay fresh in the fridge?
It stays fresh for about 3-4 days when stored properly in an airtight container. After that, the crust may start to soften, making the texture less crisp.
-
What’s the best way to crush Butterfinger bars?
I like to put the bars in a sealed plastic bag and gently crush them with a rolling pin. This way, you control how chunky or fine the pieces become, and it keeps your kitchen clean.
Final Thoughts
I honestly can’t recommend this Butterfinger Pie Recipe enough—it’s one of those desserts that feels fancy but is so easy to make. Every time I bring it to a gathering, I get asked for the recipe, and I love sharing it because it’s truly foolproof. Give it a try next time you want to whip up a crowd-pleaser with minimal effort—you won’t regret it!
PrintButterfinger Pie Recipe
This indulgent Butterfinger Pie features a creamy peanut butter and cream cheese filling swirled with crushed Butterfinger candy bars, all set in a crunchy Oreo or chocolate graham cracker crust. Smooth, sweet, and delightfully crunchy, it’s the perfect make-ahead dessert for any occasion.
- Prep Time: 15 minutes
- Cook Time: 0 minutes
- Total Time: 4 hours 15 minutes
- Yield: 8 servings 1x
- Category: Dessert
- Method: No-Cook
- Cuisine: American
Ingredients
Filling
- 1 (8-ounce) package cream cheese, room temperature
- 1/2 cup creamy peanut butter
- 2 teaspoons vanilla extract
- 1 1/2 cups powdered sugar
- 1 (12.5-ounce) bag fun-sized Butterfinger bars, crushed (reserve 2 bars to sprinkle on top)
- 1 (8-ounce) container Cool Whip, thawed
Crust
- 1 store-bought Oreo or chocolate graham cracker crust
Instructions
- Prepare the Creamy Base: Place the cream cheese and peanut butter in a large mixing bowl. Add vanilla extract and beat with an electric mixer on medium speed until the mixture is smooth and creamy.
- Add Sweetness: Gradually beat in the powdered sugar until fully incorporated and the mixture remains smooth without lumps.
- Incorporate Crushed Butterfingers: Gently fold in the crushed Butterfinger candy bars, reserving two bars for garnishing the top. Ensure the pieces are evenly distributed throughout the filling.
- Add the Whipped Topping: Carefully fold in the thawed Cool Whip, combining it with the filling mixture to retain a light and fluffy texture.
- Assemble the Pie: Spread the prepared filling evenly into the store-bought Oreo or chocolate graham cracker crust. Sprinkle the reserved crushed Butterfingers over the surface for an attractive finish and extra crunch.
- Chill to Set: Refrigerate the pie for at least 4 hours to allow it to firm up and for the flavors to meld perfectly before serving.
Notes
- For best results, ensure cream cheese is softened to room temperature before mixing to avoid lumps.
- This pie can be made up to one day in advance and stored covered in the refrigerator.
- To vary the flavor, substitute Oreos with a chocolate graham cracker crust or use regular-sized Butterfinger bars chopped finely.
- Keep the pie refrigerated and consume within 3 days for optimal freshness.
Keywords: Butterfinger Pie, Peanut Butter Pie, No-Bake Pie, Cream Cheese Dessert, Easy Pie Recipe