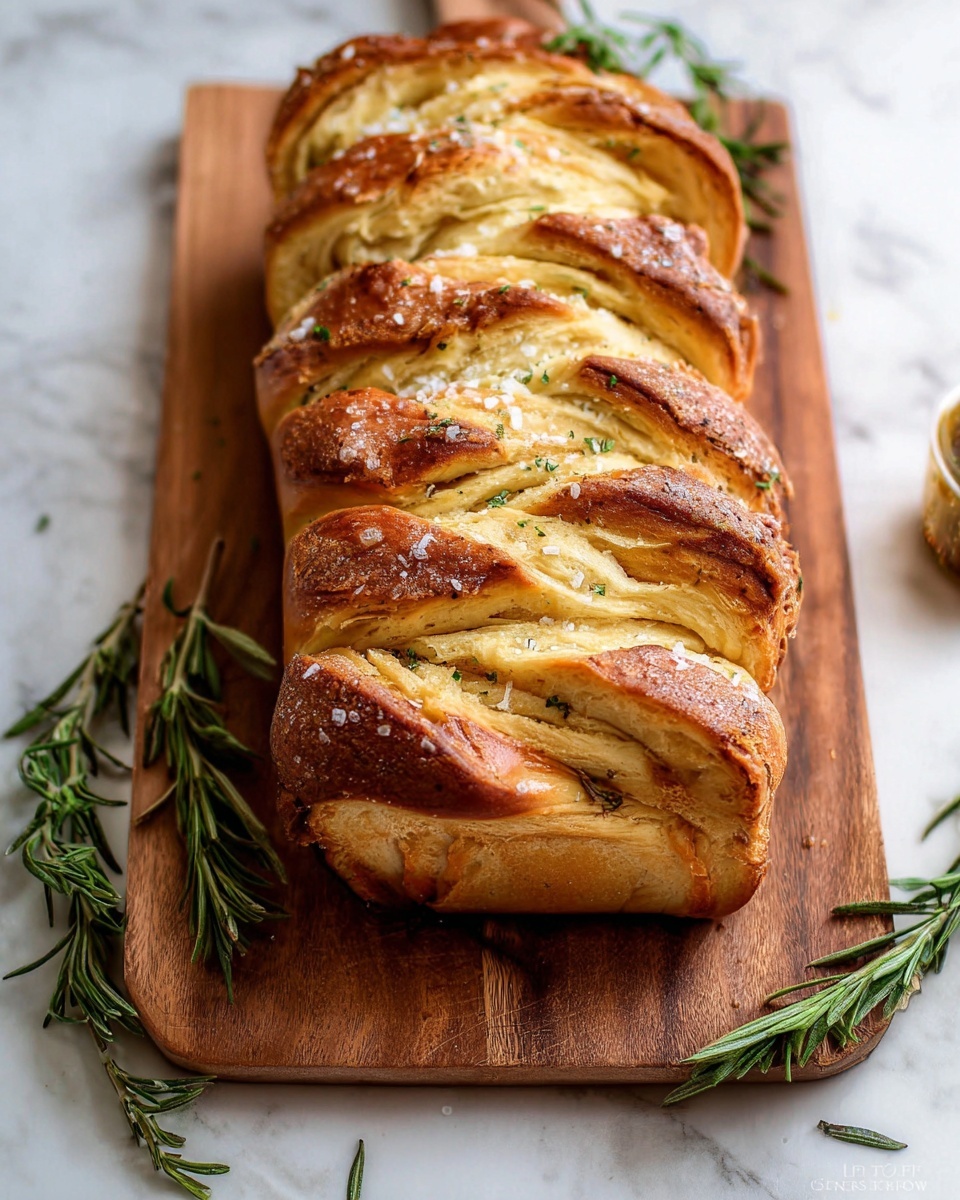
Rosemary Garlic Pull Apart Bread Recipe
If you’re on the hunt for a recipe that’s as comforting as it is delicious, this Rosemary Garlic Pull Apart Bread Recipe is going to become your new best friend in the kitchen. Imagine warm, soft bread layered with fragrant rosemary, garlicky butter, and melty cheese that you can simply pull apart — perfect for sharing or savoring all by yourself. It’s one of those recipes that fills the house with cozy, inviting smells and instantly gets everyone gathered around the table.
What makes this Rosemary Garlic Pull Apart Bread Recipe a standout for me is its versatility and the fun way it encourages communal eating. Whether you’re pairing it with a hearty soup on a chilly evening or serving it as a show-stopping appetizer at your next get-together, you’ll find it impresses without fuss. Plus, it’s straightforward enough that even if you’re new to yeast breads, you’ll have great success with it — I’ve been there, and trust me, you can do this!
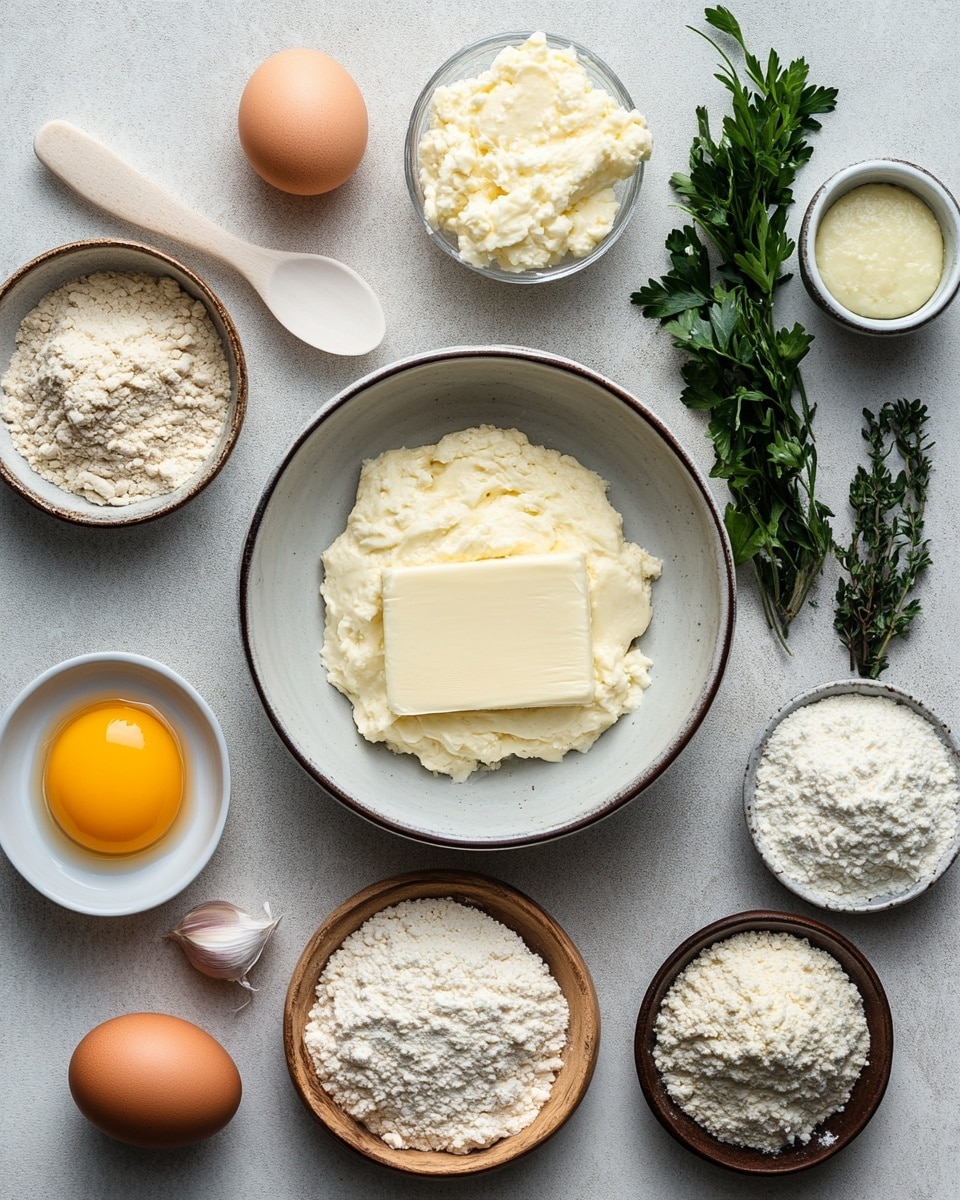
Ingredients You’ll Need
Each ingredient in this recipe was chosen to create the perfect balance of flavor and texture — soft, tender bread packed with fresh herbs, garlic, and melty cheese. Here’s a little shopping guide to set you up for success before you start mixing your dough.
- Platinum Yeast from Red Star: This yeast makes the dough rise beautifully with a subtle flavor, but if you don’t have this brand, any active dry yeast will work.
- Granulated sugar: Helps feed the yeast and adds a touch of sweetness that balances the savory flavors.
- Whole milk: Using whole milk makes the bread richer and softer compared to water or lower-fat milk.
- Unsalted butter: Softened butter adds moisture and richness—key for both the dough and the garlic filling.
- Large egg: Adds structure and helps bind the dough together for a tender crumb.
- All-purpose flour: The backbone of your bread, spooned and leveled for accuracy to keep the dough just right.
- Salt: Essential for flavor balance. Don’t skip or reduce it too much.
- Garlic powder: Adds concentrated garlic flavor in the dough without overpowering it.
- Fresh rosemary: Finely chopped for that fragrant herbal punch. Dried rosemary can be substituted but fresh really shines here.
- Fresh parsley: A bright, fresh addition to the butter filling that complements the rosemary beautifully.
- Garlic cloves: Minced fresh garlic brings a lively, zesty kick to the filling. Garlic powder works in a pinch but fresh is best.
- Shredded cheese: I like parmesan or mozzarella, but feel free to mix it up with white cheddar or your favorite cheese blend.
- Optional coarse or flaky sea salt: For sprinkling on top to add crunch and highlight all those layers of flavor.
Variations
I love how this Rosemary Garlic Pull Apart Bread Recipe lends itself to easy customization, so play around with the flavors to make it your own. Don’t hesitate to swap herbs or cheeses depending on what’s in your fridge or the season.
- Herbs: I’ve tried swapping rosemary with thyme or oregano for a different twist that’s just as delicious. Fresh basil also works brilliantly if you want a summer vibe.
- Cheese blends: Mixing mozzarella with provolone or pepper jack kicked things up with some heat and creaminess.
- Garlic intensity: For bigger garlic lovers, doubling the minced garlic in the filling adds a serious punch without overpowering the bread.
- Dietary tweaks: Use a dairy-free butter alternative and a plant-based cheese to make it vegan-friendly, just keep an eye on dough consistency since moisture levels can differ.
How to Make Rosemary Garlic Pull Apart Bread Recipe
Step 1: Wake Up the Yeast and Mix the Dough
Start by proofing your yeast with warm whole milk and a little sugar—this gets the yeast nice and active, so your bread rises beautifully. Keep your milk around 110°F (warm to the touch but not hot) to avoid killing the yeast. After about 5-10 minutes, you’ll see a frothy layer on top—this means your yeast is ready to go! If it doesn’t foam, your yeast may be old, so it’s best to start fresh.
Next, add the softened butter, egg, flour, salt, garlic powder, and chopped rosemary. I recommend starting your mixer on low just until everything comes together into a soft, slightly sticky dough. If it feels too wet or clings too much to the sides, sprinkle in a bit more flour, but don’t go overboard—you want a tender dough, not dry.
Step 2: Knead the Dough to Perfection
Kneading is where the magic happens, developing that gluten structure your bread needs for a soft, chewy texture. If you’re using a stand mixer, switch to the dough hook and knead for about 5 minutes. Kneading by hand works just as well—flour your surface lightly, and knead until the dough feels smooth and elastic.
Here’s a trick: try the “windowpane test” by stretching a small piece of dough until it becomes thin enough to see light through without tearing. If it passes, you’re good to go! If not, knead a bit more. Remember, the dough should still be a little tacky but not sticky.
Step 3: First Rise — Let the Dough Puff Up
Shape your dough into a ball and pop it into a greased bowl. Cover it snugly with plastic wrap or foil. Find a warm spot in your kitchen—near a sunny window, inside your oven with just the light on, or on top of the fridge works great. Let it rise until doubled in size, which usually takes about 60-90 minutes depending on your kitchen’s temperature.
Step 4: Prepare the Flavorful Filling
While the dough’s rising, whisk together your softened butter, fresh parsley, minced garlic, salt, and some extra rosemary for that punch of herbal goodness. This butter mix is the heart of why this bread tastes amazing—make sure your butter is soft enough to spread easily. If you prepare this ahead of time, keep it covered at room temperature so it’s ready to spread when your dough is.
Step 5: Shape the Pull Apart Pieces and Add Cheese
Once your dough has had its beauty sleep, punch it down to release the air and divide it into 12 equal pieces. Each piece should be about the size of a golf ball. Using floured hands, gently flatten each ball into a 4-inch circle. Don’t stress about perfect circles here — rustic shapes work perfectly! Spread about 1-2 teaspoons of that buttery herb mixture on each piece, then sprinkle with a tablespoon of shredded cheese. Fold each circle in half and arrange them in your greased loaf pan, round side up like little pillows ready to puff up.
Step 6: Second Rise and Bake
Cover your loaf again and give it about 45 minutes to puff up — this second rise is crucial for that soft pull-apart texture. Meanwhile, preheat your oven to 350°F and adjust the rack to the lower third to help bake the bread evenly.
Bake for about 50 minutes until the top is golden and inviting. If it starts browning too fast, gently tent with aluminum foil to prevent burning. Don’t be surprised to see melted butter bubbling at the edges — that buttery goodness soaks right into the bread as it bakes.
Step 7: Finish and Cool
Once out of the oven, I love brushing some melted butter on top and sprinkling a few grains of flaky sea salt for a perfect finishing touch. Cool your loaf for about 10 minutes before popping it out of the pan and serving. Warm, melty, and fragrant – that’s the sweet spot!
How to Serve Rosemary Garlic Pull Apart Bread Recipe
Garnishes
I usually keep the garnishes simple—just a brush of melted butter and a sprinkle of flaky sea salt to highlight the garlic and rosemary flavors. Sometimes I add a few fresh rosemary sprigs on the serving platter for a little rustic charm and an extra hint of aroma.
Side Dishes
My go-to sides are always soups like tomato basil or creamy mushroom, and hearty salads with tangy vinaigrettes to cut through the richness of the bread. It also pairs wonderfully with pasta dishes or a simple charcuterie board for a casual evening.
Creative Ways to Present
For special occasions, I like to bake the bread in a bundt pan instead of a loaf pan, which creates a stunning ring of pull-apart pieces perfect for parties. Another fun touch is serving the bread warm right in the pan surrounded by small bowls of dipping olive oil mixed with herbs, or marinara sauce for dipping.
Make Ahead and Storage
Storing Leftovers
I wrap leftover rosemary garlic pull apart bread tightly in plastic wrap or store it in an airtight container at room temperature for up to 2 days. The crust tends to lose some crispness after that, so I try to eat it fresh when possible. Refrigeration extends life up to a week, but make sure it’s well wrapped to keep it from drying out.
Freezing
I’ve frozen this bread successfully by wrapping it tightly in plastic wrap and then aluminum foil before placing it in the freezer. When you want to enjoy again, thaw it overnight in the fridge, then warm up in the oven — just make sure it’s completely thawed for the best texture.
Reheating
To reheat, I pop the bread in a 300°F oven for 10-15 minutes. This method brings back that soft interior and crunchy crust beautifully. If you’re in a rush, the microwave works in a pinch but the crust won’t stay as crisp.
FAQs
-
Can I use dried rosemary instead of fresh in the Rosemary Garlic Pull Apart Bread Recipe?
Yes, you absolutely can substitute dried rosemary if fresh isn’t available. Use about two teaspoons dried in place of one tablespoon fresh to avoid overpowering the bread. Since dried herbs are more concentrated, it’s a good idea to crush them slightly between your fingers before adding to release their oils and flavor.
-
What if I don’t have a stand mixer for the Rosemary Garlic Pull Apart Bread Recipe?
No worries! This recipe works perfectly by hand, too. Use a large mixing bowl to combine ingredients and knead the dough on a lightly floured surface for about 8-10 minutes until smooth and elastic. I find kneading by hand gets me closer to the dough’s feel, so it’s worth trying if you have the time.
-
Can I make the Rosemary Garlic Pull Apart Bread Recipe ahead of time?
Definitely! You can prepare the dough and do the first rise the day before. After the dough has risen once, punch it down, shape the pieces, fill, and place in the loaf pan. Cover and refrigerate overnight. The next day, allow it to come to room temperature and rise again before baking. This makes the baking process quicker when you’re short on time.
-
What cheese works best in this Rosemary Garlic Pull Apart Bread Recipe?
I recommend using shredded parmesan, mozzarella, or white cheddar, as they melt beautifully and complement the herbs and garlic nicely. You can mix cheeses for extra flavor and gooeyness. Avoid super hard cheeses that don’t melt well or very soft cheeses that may make the filling too wet.
-
How do I prevent my bread from browning too much on top?
If you notice the top browning too quickly during baking, just tent a piece of aluminum foil loosely over the loaf for the remainder of the bake time. This protects the crust from burning while allowing the bread to cook through.
Final Thoughts
This Rosemary Garlic Pull Apart Bread Recipe has been a labor of love and one of my absolute favorite ways to impress family and friends without breaking a sweat. Its combination of herbs, garlic, buttery richness, and gooey cheese creates a sensory experience that makes any meal feel special. I hope when you try it, you’ll feel that same joy in sharing something homemade and delicious — whether it’s a casual weeknight or a festive occasion. Give it a go, and don’t be surprised if it quickly becomes one of your go-to recipes!
PrintRosemary Garlic Pull Apart Bread Recipe

This Rosemary Garlic Pull Apart Bread is a flavorful, soft, and cheesy loaf perfect for sharing. With fresh rosemary and garlic blended into the dough and a rich, buttery filling layered with cheese, it bakes up golden and tender with pull-apart sections to enjoy piece by piece. Ideal as a side for dinners or a savory snack, this homemade bread combines aromatic herbs and melted cheese for irresistible, comforting flavors.
- Prep Time: 3 hours
- Cook Time: 50 minutes
- Total Time: 3 hours 50 minutes
- Yield: 1 loaf (12 pull-apart pieces) 1x
- Category: Bread
- Method: Baking
- Cuisine: American
Ingredients
Dough:
- 2 teaspoons Platinum Yeast from Red Star
- 1 Tablespoon granulated sugar
- 3/4 cup (180ml) whole milk, warmed to about 110°F (43°C)
- 3 Tablespoons (43g) unsalted butter, softened to room temperature
- 1 large egg
- 2 and 1/3 cups (291g) all-purpose flour (spooned & leveled), plus more as needed
- 1 teaspoon salt
- 1 teaspoon garlic powder
- 1 Tablespoon finely chopped fresh rosemary (or 2 teaspoons dried)
Filling:
- 5 Tablespoons (71g) unsalted butter, extra soft
- 1 Tablespoon finely chopped fresh parsley (or 2 teaspoons dried)
- 2 garlic cloves, minced or 1/2 teaspoon garlic powder
- 1/4 teaspoon salt
- 3/4 cup (95g) shredded parmesan, mozzarella, or white cheddar cheese (or your favorite shredded cheese)
Optional Topping:
- 1 Tablespoon (14g) unsalted butter, melted
- Coarse or flaky sea salt for sprinkling
Instructions
- Make the dough: In a stand mixer bowl fitted with the dough hook or paddle attachment, combine yeast and sugar. Warm milk until about 110°F (43°C) and pour over yeast mixture. Whisk gently and cover loosely with a clean kitchen towel; let sit 5-10 minutes until frothy.
- Add dough ingredients: To the yeast mixture, add softened butter, egg, flour, salt, garlic powder, and rosemary. Mix on low speed until dough comes together and pulls from sides, about 3 minutes. Add more flour if dough is too sticky, a tablespoon at a time. Dough will be soft but manageable.
- Knead the dough: Switch to the dough hook and knead on medium speed 5 more minutes, or knead by hand on a lightly floured surface 5 minutes until dough is soft, elastic, and passes the windowpane test. Add flour sparingly to prevent the dough from becoming dry.
- First rise: Shape dough into a ball, place in a greased bowl, cover with plastic wrap or foil. Let rise in a warm spot until doubled in size, about 60-90 minutes.
- Prepare filling and pan: While dough rises, grease a 9×5-inch loaf pan. In a medium bowl, mix extra soft butter with parsley, garlic, salt until well combined. Set aside at room temperature.
- Assemble bread: Punch down risen dough and turn onto a lightly floured surface. Divide into 12 equal pieces (~1/4 cup each). Flatten each into a 4-inch circle. Spread 1-2 teaspoons of filling on each circle, sprinkle 1 tablespoon cheese on each, fold in half, and place folded sides up in prepared pan layered closely.
- Second rise: Cover assembled dough with plastic wrap or foil and let rise again in a warm place until puffy, about 45 minutes.
- Preheat oven: Adjust oven rack to lower third and preheat oven to 350°F (177°C).
- Bake the bread: Bake uncovered for about 50 minutes until golden brown, tenting with foil if top browns too quickly. Butter may melt and seep around edges during baking—it will absorb back into the bread.
- Add optional topping: Remove from oven, brush top with melted butter and sprinkle with sea salt if desired. Cool bread in pan on a wire rack for 10 minutes.
- Serve and store: Remove bread from pan and serve warm. Leftovers can be stored covered at room temperature up to 2 days or refrigerated up to 1 week. Reheat in a 300°F (149°C) oven for 10-15 minutes or microwave briefly to restore softness.
Notes
- Use softened butter for the filling to make spreading easier; if refrigerated, let it come to room temperature before using.
- If dough is sticky during kneading, add flour a tablespoon at a time—too much flour will make the bread dry.
- Perform the windowpane test to ensure dough is kneaded properly for optimal texture.
- Letting bread cool slightly in the pan helps it hold together while slicing or pulling apart.
- If top browns too fast during baking, tent with aluminum foil to prevent burning.
- Reheat leftovers in the oven to regain a soft interior and crispy exterior.
Keywords: rosemary garlic bread, pull apart bread, cheesy bread, homemade bread, savory bread, yeast bread