Valentine’s Day Chocolate Bark Recipe
If you’re looking for a sweet, simple treat that screams Valentine’s Day, you’re going to love this Valentine’s Day Chocolate Bark Recipe. It’s one of those no-fuss desserts that feels special with its stunning pink and white swirls and festive candy toppings, perfect for impressing your sweetheart or just indulging yourself. I love how easy it is — you don’t need any fancy tools, and it comes together quickly, making it a great last-minute gift or party snack.
What’s really fun about this Valentine’s Day Chocolate Bark Recipe is how customizable it is. I often find myself experimenting with different toppings depending on what I have on hand. Plus, since there’s no baking involved, it’s an inviting project you can enjoy even if you normally shy away from more complicated desserts. Trust me, once you try this, it’ll become your go-to for a festive sweet fix.
Ingredients You’ll Need
This recipe balances rich dark chocolate with sweet white chocolate and a pop of pink candy melts to create an irresistible visual and flavor contrast. When shopping, I recommend picking good quality chocolate that melts smoothly—trust me, it makes a big difference in texture.
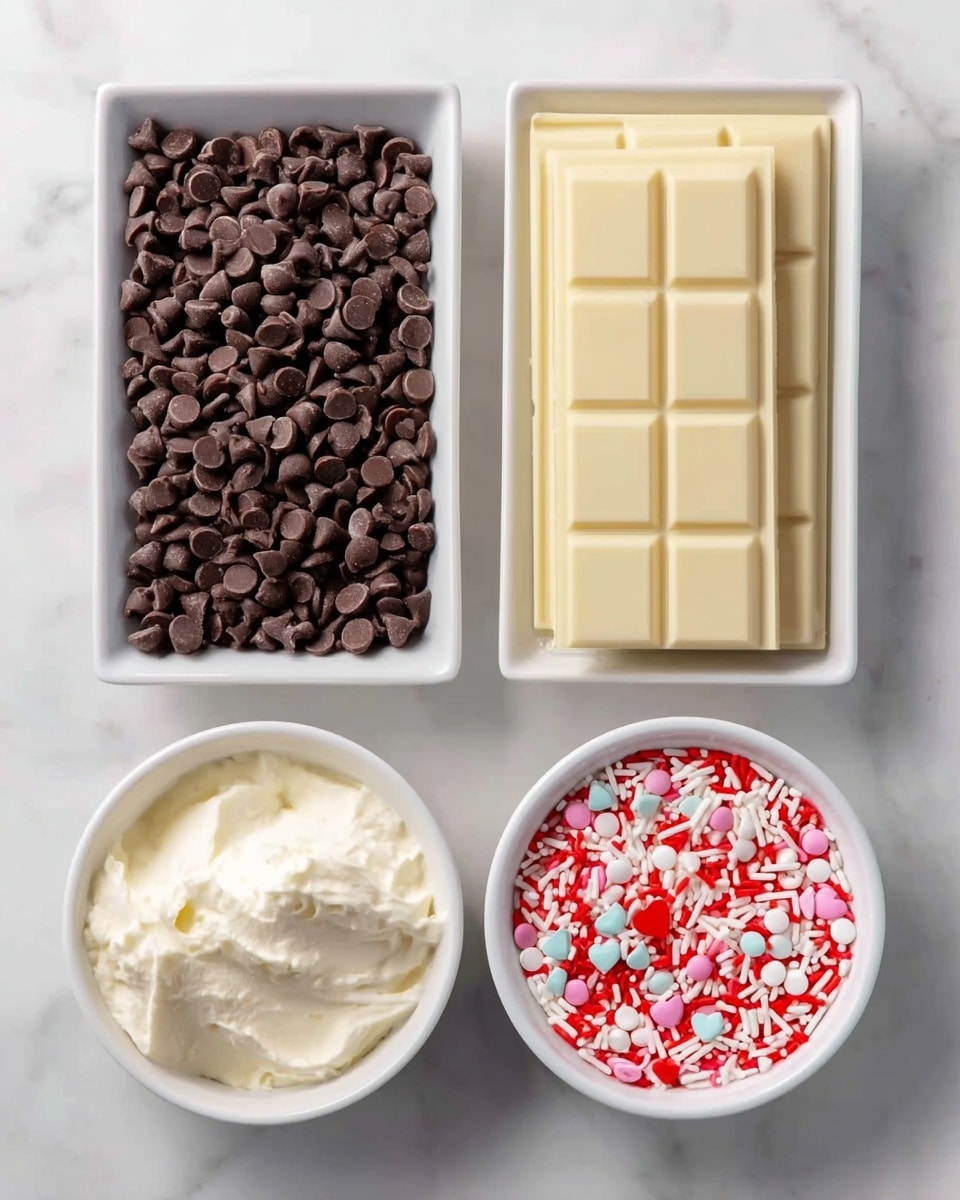
- Dark chocolate chips: I prefer semi-sweet for that perfect balance of bitter and sweet, and chips melt nicely without seizing.
- White chocolate baking bars: These melt more evenly than chips, which helps create a smooth second layer.
- Pink candy melts: Available in most craft sections, these add that essential rosy Valentine’s vibe and are super easy to melt.
- Valentine’s Day candy: Heart-shaped candies or themed chocolates make your bark instantly festive. Pick favorites or nostalgic sweets for a personal touch.
- Valentine’s Day sprinkles: Adds fun texture and color contrast — don’t skimp on these; they make the bark pop!
Variations
I love how flexible this Valentine’s Day Chocolate Bark Recipe is—don’t hesitate to tweak it to your liking or dietary needs. Whether you want it nutty, fruity, or dairy-free, there are simple ways to personalize it.
- Nutty variation: I often sprinkle chopped toasted almonds or pistachios on top for a nice crunch and contrast against the creamy chocolate.
- Fruit twist: Dried raspberries or freeze-dried strawberries add tartness and depth—plus they enhance the pink theme perfectly.
- Dairy-free option: Swap out traditional white chocolate for vegan white chocolate chips and use dairy-free candy melts, so it stays luscious and inclusive.
- Extra decadent: Mix in some sea salt flakes on top to highlight the chocolate’s richness in a sophisticated way.
How to Make Valentine’s Day Chocolate Bark Recipe
Step 1: Prepare Your Workspace and Pan
First things first, line a half sheet baking pan with parchment paper, leaving some overhang on the edges — this little trick makes lifting the bark out a breeze once it’s set. Set it aside while you melt your chocolates.
Step 2: Melt the Dark Chocolate
Put your dark chocolate chips in a microwave-safe bowl and heat in 30-second bursts, stirring well after each session. Resist the urge to rush – chocolate can be stubborn, but stirring frequently keeps it smooth and prevents burning. I usually take about a minute to minute and a half total here. Once melted, spread it evenly on your lined pan with a spatula. Let it rest for about 10 minutes until it’s almost set but still has a bit of give when you touch it.
Step 3: Melt White Chocolate and Pink Candy Melts
Break your white chocolate bars into chunks and melt them the same way, with short bursts and active stirring. Meanwhile, melt the pink candy melts separately – these can be a bit sensitive so use slightly shorter increments and stir until perfectly smooth.
Step 4: Add White Chocolate and Create Your Swirls
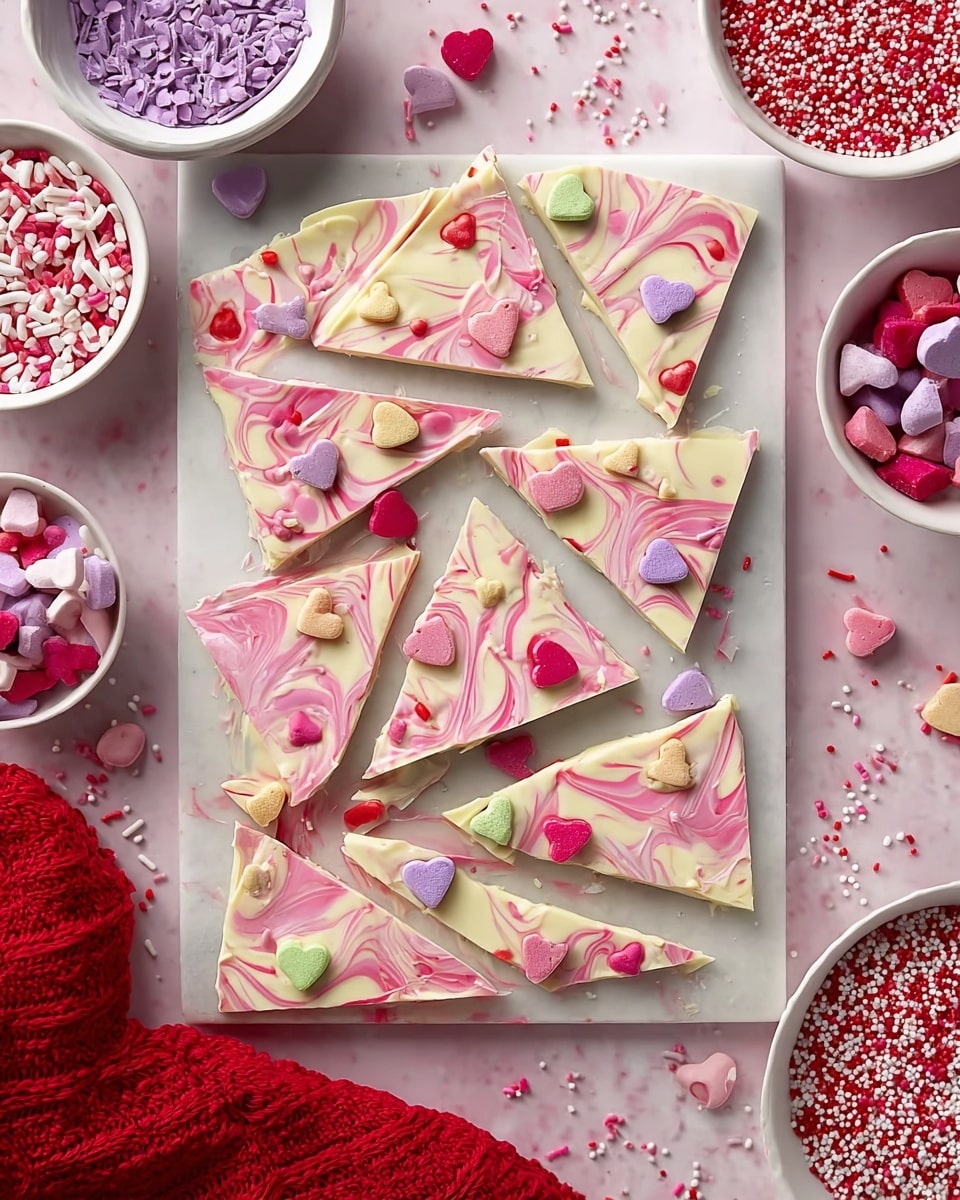
Quickly pour the melted white chocolate over the dark layer, spreading it carefully but fast–it sets up quickly! Then drizzle your melted pink candy melts on top in thin ribbons. Now, grab a toothpick and gently swirl through the pink and white layers to create that marbled Valentine’s magic, but be gentle so you don’t dig down into the dark chocolate layer.
Step 5: Add Toppings and Let It Set
Before the chocolate sets, sprinkle your Valentine’s Day candy pieces and sprinkles all over. This is where you get to be creative with your favorite festive toppings! Let it cool completely at room temperature for about 30 minutes or until it’s fully firm. Then break into pieces and get ready to enjoy.
How to Serve Valentine’s Day Chocolate Bark Recipe
Garnishes
I usually keep it simple with extra Valentine’s Day sprinkles or edible glitter on the side for guests to add if they want a little extra sparkle. Little heart-shaped candies on top are my favorite because they give this lovely homemade touch that looks almost too pretty to eat.
Side Dishes
This chocolate bark pairs beautifully with a cup of rich coffee or a glass of red wine if you’re serving it as part of a romantic dessert spread. For a cozy gathering, I like serving it alongside fresh berries or even some simple vanilla ice cream to balance the chocolate’s sweetness.
Creative Ways to Present
For gifting, I’ve wrapped pieces in cellophane bags tied with a pink ribbon or placed them in small decorative boxes lined with tissue paper. Another fun idea is to arrange broken bark pieces on a pretty platter alongside rose petals for a Valentine’s Day party centerpiece.
Make Ahead and Storage
Storing Leftovers
Store your leftover chocolate bark in an airtight container at room temperature or in the fridge if your kitchen is warm. I usually keep mine in a cool, dry place, and it stays fresh for about two weeks—perfect for nibbling over several days.
Freezing
If you want to keep it longer, I’ve successfully frozen pieces wrapped tightly in plastic wrap and stored in freezer bags. When you’re ready to enjoy, just thaw at room temperature for 10-15 minutes to avoid condensation making it sticky.
Reheating
Chocolate bark isn’t really meant to be reheated since it’s best enjoyed as a chilled or room temperature treat. If it softens too much, just pop it in the fridge to firm back up. No microwaving needed!
FAQs
-
Can I use regular chocolate bars instead of chips?
Absolutely! Regular chocolate bars can work but may need more careful chopping and stirring to melt evenly. Chocolate chips tend to be formulated for melting, so they give a smoother result with less risk of burning.
-
How thin should I spread the layers?
I aim for about 1/4 inch thickness per layer—it’s thick enough to hold the candy toppings without breaking but thin enough to enjoy several pieces in one serving.
-
Can I substitute the pink candy melts with colored white chocolate?
You can, but candy melts are specially made to melt smoothly and harden with a nice sheen. Colored white chocolate can be trickier since it often thickens or darkens when melted. If you want to experiment, just melt carefully over low heat and stir constantly.
-
Is this recipe kid-friendly?
Definitely! Kids love helping drizzle and swirl the chocolate, plus the colorful sprinkles and candies make it a fun activity. Just watch them near the microwave and melted chocolate to keep things safe.
-
How long does it take for the bark to set?
At room temperature, it usually takes about 30 minutes to set completely, but if your kitchen is warm, you can pop it in the fridge for 10-15 minutes to speed things up.
Final Thoughts
This Valentine’s Day Chocolate Bark Recipe is one of my absolute favorites for a reason: it combines simplicity, beauty, and taste all in one sweet package. Whether you’re gifting it to someone special or treating yourself, it’s a delightful project that makes the holiday feel that much more cozy and heartfelt. Give it a try—you might find it becomes a much-anticipated tradition in your kitchen, just like it has in mine!
PrintValentine’s Day Chocolate Bark Recipe

Celebrate Valentine’s Day with this delightful Chocolate Bark recipe featuring layers of smooth dark and white chocolate, accented with pink candy melts and festive Valentine’s Day candies and sprinkles for a visually stunning and delicious treat.
- Prep Time: 10 minutes
- Cook Time: 15 minutes
- Total Time: 55 minutes
- Yield: 6 servings 1x
- Category: Dessert
- Method: No-Cook
- Cuisine: American
- Diet: Vegetarian
Ingredients
Chocolate Layers
- 1½ cups dark chocolate chips
- 12 ounces (3 4-ounce bars) white chocolate baking bars
- ¾ cup pink candy melts
Decorations
- ¼ cup Valentine’s Day candy (such as heart-shaped candies or themed chocolates)
- 2 tablespoons Valentine’s Day sprinkles
Instructions
- Prepare the pan: Line a half sheet baking pan with parchment paper, leaving an overhang on the sides for easy removal of the bark later. Set aside.
- Melt dark chocolate: Place the dark chocolate chips in a microwave-safe bowl and heat for 30 seconds. Stir well, then continue heating in 15-20 second increments, stirring thoroughly each time until fully melted and smooth.
- Spread dark chocolate: Pour the melted dark chocolate onto the prepared parchment paper and spread evenly in a thin layer using a spatula.
- Allow to set: Let the dark chocolate rest at room temperature for about 10 minutes until mostly set but still slightly soft.
- Melt white chocolate: Break the white chocolate bars into a microwave-safe bowl. Heat for 30 seconds, stir well, then continue heating in short increments with frequent stirring until completely smooth.
- Melt pink candy melts: In a separate microwave-safe bowl, heat the pink candy melts starting with 30 seconds, then continue heating in 15-20 second increments, stirring well each time until smooth and melted.
- Layer white chocolate: Pour the melted white chocolate over the dark chocolate layer and spread quickly, as it will harden fast.
- Drizzle pink melts: Before the white chocolate sets, drizzle the melted pink candy melts over the surface.
- Create marbled pattern: Use a toothpick to gently swirl through the pink and white layers to create a marbled effect, being careful not to disturb the dark chocolate layer beneath.
- Add decorations: While the chocolate is still warm, sprinkle the Valentine’s Day candy and sprinkles evenly over the top.
- Cool and set: Allow the bark to cool at room temperature for about 30 minutes until completely hardened.
- Serve: Once fully set, break or cut the bark into pieces and enjoy.
Notes
- Use high-quality chocolate for better flavor and texture.
- Ensure frequent stirring while melting chocolate to avoid burning.
- You can refrigerate the bark to speed up the setting process, but room temperature cooling preserves the best texture.
- Customize decorations based on preference or other holidays.
- Handle the bark gently while swirling to maintain distinct layers.
Keywords: Valentine’s Day, Chocolate Bark, White Chocolate, Dark Chocolate, Candy Melts, Festive Dessert, No-Bake