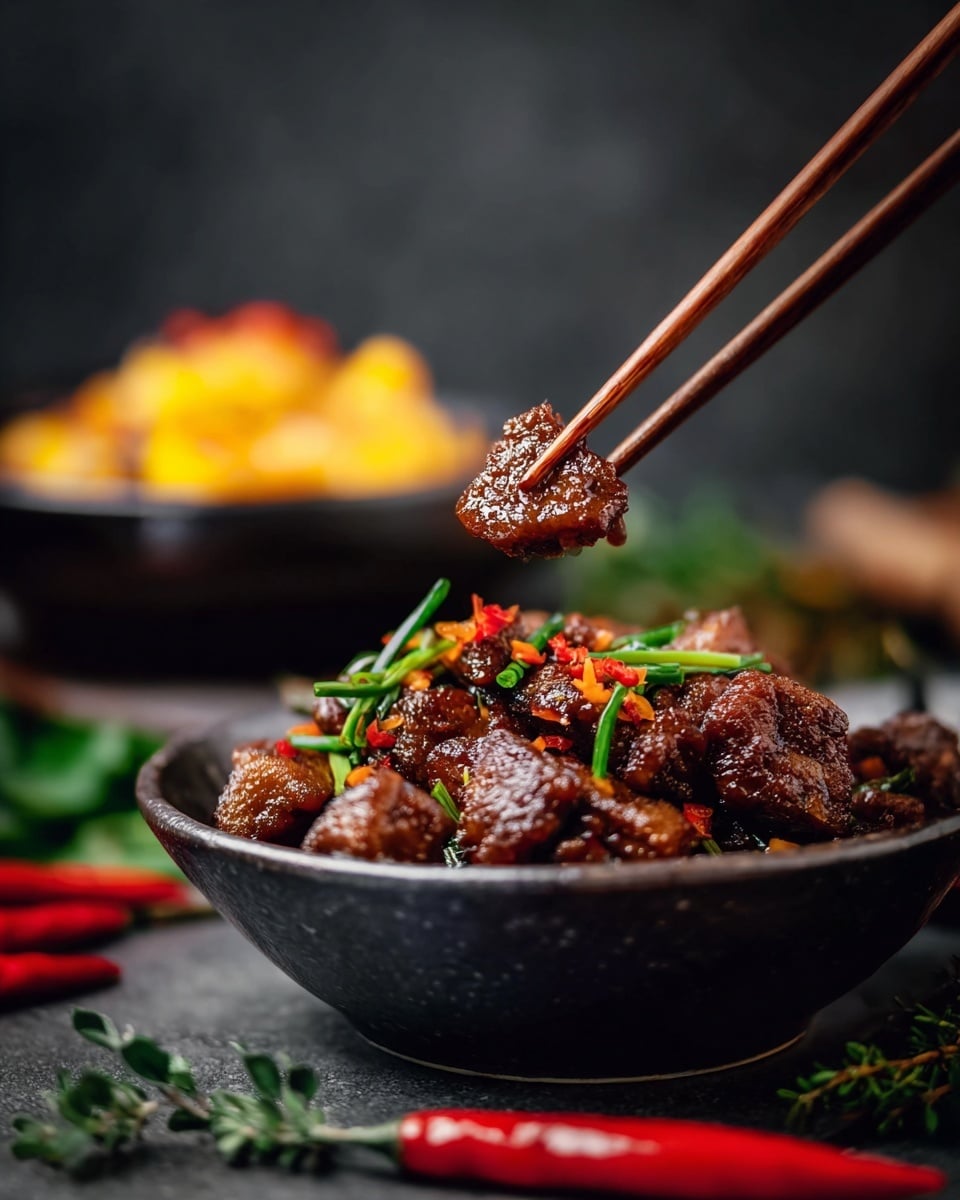
Sticky Chinese Pork Belly Recipe
If you’re anything like me, you know that sometimes you just want a dish that’s comfortingly rich, packed with flavor, and absolutely melt-in-your-mouth. That’s exactly what this Sticky Chinese Pork Belly Recipe delivers—and trust me, once you make it, it’s going to become a go-to in your dinner rotation. The combination of slow-cooked pork belly, infused with fragrant spices, and then glazed to sticky perfection just hits the spot every time.
What I especially love about this Sticky Chinese Pork Belly Recipe is how it transforms a simple piece of pork belly into something magical with just pantry staples and a bit of patience. It’s perfect for cozy weekends, festive dinners, or whenever you want to impress without stressing—the sauce is wonderfully sticky and rich, clinging beautifully to every bite, and the hint of ginger and chilli adds just the right kick.
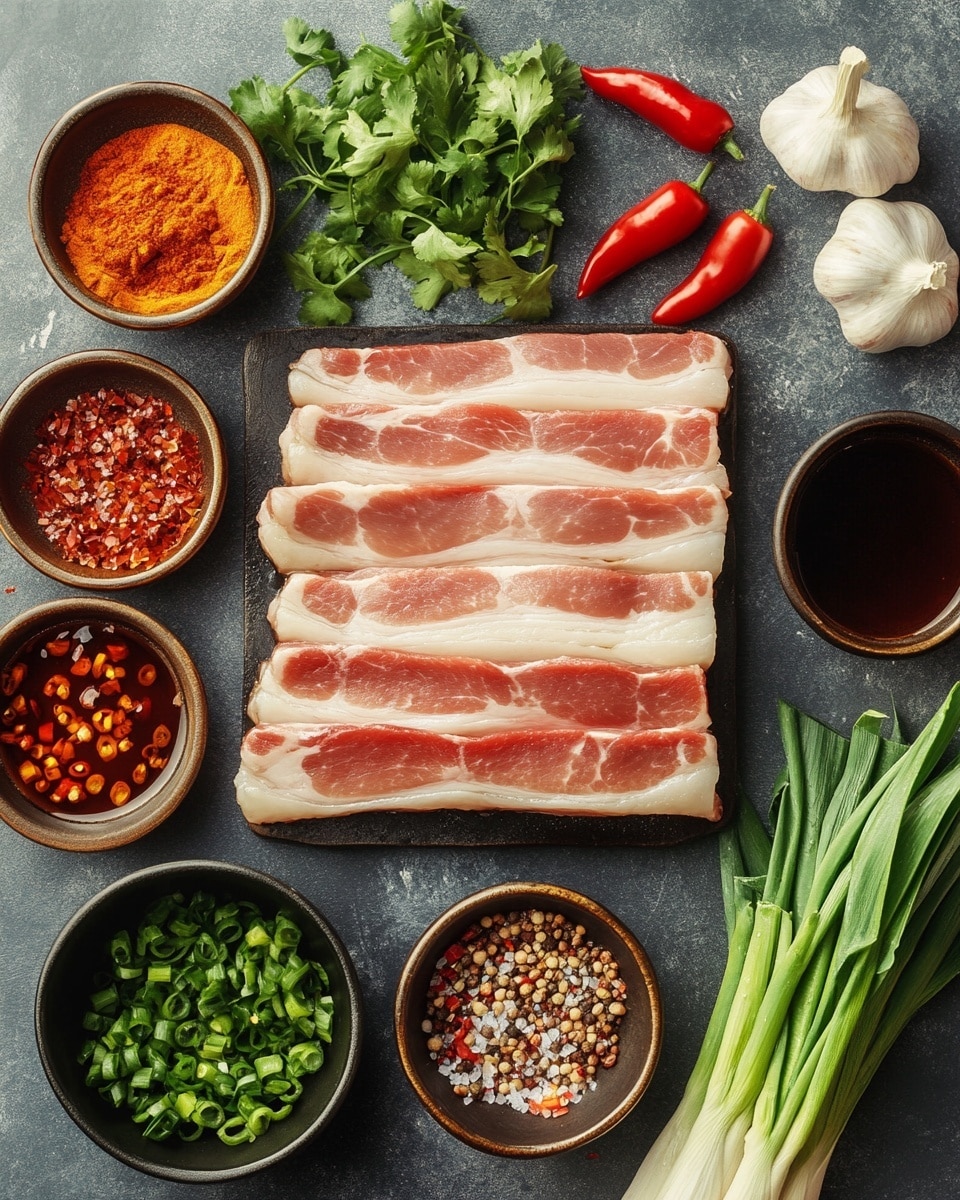
Ingredients You’ll Need
These ingredients blend beautifully to build layers of flavor that balance sweet, salty, and spicy notes. Grab fresh ginger and spring onions for the best aromatic punch, and don’t skip the dark soy sauce—it’s key for that deep color and umami depth.
- Rindless pork belly slices: Aim for thick, meaty slices around the length of your index finger; this gives you tender, juicy chunks once slow-cooked.
- Chicken stock: Use hot stock to help tenderize the pork during slow cooking and infuse flavor.
- Ginger: Fresh ginger adds warmth and brightness, essential for cutting through pork’s richness.
- Garlic: Adds depth and a subtle kick—rough chop is perfect as it’ll soften gently.
- Rice wine: Adds mild sweetness and lifts the soy flavors.
- Caster sugar: Balances savory and helps caramelize the pork’s surface.
- Vegetable oil: For creating that perfect glaze without overpowering flavors.
- Salt and pepper: Simple seasoning to enhance everything.
- Red chilli: Fresh chopped chilli brings a fresh, spicy punch to the glaze.
- Honey: The sticky, shiny sweetness that makes the pork belly irresistible.
- Brown sugar: Intensifies caramel notes and adds chewiness to the glaze.
- Dark soy sauce: Rich, robust soy used for deep color and umami.
- Lemongrass paste: Adds citrusy brightness, giving the dish a fresh lift.
- Spring onions: For garnish, adding freshness and crunch.
Variations
One of my favorite things about this Sticky Chinese Pork Belly Recipe is how easy it is to make it your own. Whether you love heat, extra sweetness, or want to scale it down for a lighter meal, this recipe flexes beautifully to your tastes.
- Extra spicy: Add more fresh chilli or even a dash of chili oil during the glaze step. I remember one dinner party where guests raved over the little heat punch I snuck in!
- Less sugar: If you’re watching sweetness, reduce the honey and brown sugar by half—still delicious but lighter.
- Herbal twist: Substitute lemongrass paste with a splash of lime juice and fresh coriander for a zesty variation.
- Slow cooker adaptation: If you’re short on stovetop time, this recipe works wonders in a slow cooker too—just adjust timing to 6-8 hours on low.
How to Make Sticky Chinese Pork Belly Recipe
Step 1: Prep and Slow Cook the Pork Belly
Start by cutting your pork belly into finger-length pieces—this helps the pork cook evenly and soak up all that lovely stock. Pop the chopped pork into a large pot with hot chicken stock, minced ginger, garlic, rice wine, and caster sugar. Bring it to a gentle simmer, then cover and let it slowly cook on low heat for about 2 hours. The pork will become incredibly tender, practically falling apart but still shaped enough for that beautiful glaze later. The key here is low and slow so the fat renders out slowly, keeping the meat juicy.
Step 2: Prepare the Sticky Glaze
While the pork is cooking, whisk together your glaze ingredients—vegetable oil, minced ginger, chilli, honey, brown sugar, dark soy sauce, and lemongrass paste. This magical combo gets brushed on to add that sticky sweetness and shine later. I always taste the glaze before combining with the pork; if it’s too salty, add a little extra honey or sugar. Remember, it should be a balanced syrupy consistency that clings well.
Step 3: Glaze and Caramelize
Once your pork is melt-in-your-mouth tender, remove it from the stock and pat it dry gently—this helps the glaze stick better. Heat a frypan, then add the pork with the glaze and cook it over medium heat. Keep turning and spooning the sticky glaze over the pork until it’s thick, shiny, and just starting to caramelize around the edges. This step is where the magic really happens, so don’t rush! A minute or two each side is usually perfect to get that sticky, finger-licking finish.
How to Serve Sticky Chinese Pork Belly Recipe
Garnishes
I love to sprinkle chopped spring onions and some extra fresh red chilli over the top—it adds a lovely crunch and fresh bite that balances the richness of the pork. Plus, the colors make the dish pop on your plate, which always impresses guests (and our eyes eat first, right?).
Side Dishes
Sticky Chinese Pork Belly is perfect over steamed jasmine rice to soak up the luscious glaze. On the side, I like quick stir-fried greens like bok choy or Chinese broccoli—that fresh, slightly bitter note cuts through the pork beautifully. Sometimes, I serve it with simple cucumber salad too, for a refreshing crunch.
Creative Ways to Present
For special occasions, I’ve plated this sticky pork belly on a banana leaf with edible flowers and a scattering of toasted sesame seeds. It looks stunning and feels festive without adding much fuss. Another trick I love is serving the pork belly as part of an Asian-style sharing platter with steamed buns and pickled vegetables—it’s always a crowd-pleaser.
Make Ahead and Storage
Storing Leftovers
I usually pop any leftovers into an airtight container in the fridge—they keep well for up to 3 days. The pork tends to soak up the sauce even more overnight, making for an even tastier lunch the next day (if you can resist eating it all at dinner!).
Freezing
This Sticky Chinese Pork Belly Recipe freezes beautifully. Just cool completely, then portion and freeze in freezer-safe bags or containers. When you want to enjoy it again, thaw overnight in the fridge and reheat gently on the stove—no loss of flavor or texture in my experience.
Reheating
To reheat, I recommend warming gently in a non-stick pan over low heat, adding a splash of water or stock if needed to keep it moist. Resist microwaving if you want to maintain that perfect sticky glaze shine—it tends to dry out otherwise. Another favorite is reheating in the oven wrapped in foil at 150°C (300°F) for 15-20 minutes.
FAQs
-
Can I use pork belly with the rind on for this recipe?
You can, but it’s best to score the rind well to help the flavors penetrate, and be prepared for a chewier texture. Rindless pork belly is easier to eat and better for achieving that tender, sticky finish, which is why I recommend it here.
-
Is there a vegetarian alternative to Sticky Chinese Pork Belly Recipe?
While the flavor comes largely from the pork fat and slow cooking, you can try using thick slices of eggplant or tofu, glazing them similarly after roasting or pan-frying to get some stickiness and sweetness. It’s a different experience but still tasty!
-
How long does it take to make this recipe?
The slow cooking step takes about 2 hours, but actual hands-on time is short. Most of the cooking is unattended simmering, meaning you can prep other things or relax as it cooks.
-
Can I make this recipe spicier?
Absolutely! Add more fresh chilli or chili flakes during the glazing step, or serve with extra chili sauce on the side. I love doing this when serving to friends who enjoy some serious heat.
Final Thoughts
This Sticky Chinese Pork Belly Recipe is one of those dishes that feels like a warm hug after a long day—rich, luscious, and packed with flavor that stays with you. I hope you give it a try; whether you’re cooking for family, friends, or just yourself, it’s guaranteed to impress without needing fancy ingredients or techniques. Plus, it’s so rewarding watching that sticky, shiny glaze come together—you’ll love the whole cooking process as much as the eating!
PrintSticky Chinese Pork Belly Recipe

This Sticky Chinese Pork Belly recipe features slow-cooked, tender pork belly slices simmered in a flavorful broth and finished with a rich, sticky glaze made from dark soy sauce, honey, and brown sugar. The dish balances sweet, savory, and aromatic flavors, enhanced by ginger, garlic, and lemongrass, creating a mouthwatering meal perfect for sharing. It’s served garnished with fresh spring onions and chopped red chillies for an added kick.
- Prep Time: 15 minutes
- Cook Time: 4 to 6 hours
- Total Time: 4 hours 15 minutes to 6 hours 15 minutes
- Yield: 4 servings 1x
- Category: Main Course
- Method: Slow Cooking
- Cuisine: Chinese
Ingredients
Slow Cooked Pork Belly
- 1 kg (2.2 lbs) rindless pork belly slices chopped in half (each piece approx. the length of your index finger)
- 1 litre (4 1/4 cups) hot chicken stock
- 1 thumb sized piece of ginger, peeled and minced (or 1 tbsp ginger puree)
- 3 cloves garlic, peeled and roughly chopped
- 1 tbsp rice wine
- 1 tbsp caster sugar
Glaze
- 2 tbsp vegetable oil
- Pinch of salt and pepper
- 1 thumb-sized piece of ginger, peeled and minced
- 1 red chilli, finely chopped
- 2 tbsp honey
- 2 tbsp brown sugar
- 3 tbsp dark soy sauce
- 1 tsp lemongrass paste
To Serve
- Chopped spring onions
- Chopped red chillies
Instructions
- Prepare the Pork Belly: Chop the rindless pork belly slices in half so each piece is about the length of your index finger. This ensures even cooking and tender results.
- Slow Cook the Pork Belly: In a slow cooker or a large pot suitable for slow cooking, combine the pork belly with hot chicken stock, minced ginger, chopped garlic, rice wine, and caster sugar. Cover and cook on low heat for approximately 4-6 hours until the pork is tender and infused with flavor.
- Prepare the Glaze: While the pork is cooking, mix together the vegetable oil, salt, pepper, minced ginger, finely chopped red chilli, honey, brown sugar, dark soy sauce, and lemongrass paste to create the sticky glaze.
- Finish the Pork Belly: Once the pork is tender, remove the pieces from the cooking liquid and pat slightly dry. Heat a pan or skillet over medium heat and add the sticky glaze mixture. Cook until the glaze is bubbling and thickened slightly.
- Glaze the Pork: Add the cooked pork belly slices to the pan with the glaze. Toss or spoon the glaze over the pork until each piece is well coated and sticky, about 3-5 minutes, allowing the glaze to caramelize and cling to the pork belly.
- Serve: Transfer the sticky glazed pork belly onto a serving plate. Garnish generously with chopped spring onions and chopped red chillies for a fresh, spicy contrast.
Notes
- For even richer flavor, marinate pork belly in the rice wine and ginger for 1 hour before slow cooking.
- If you don’t have a slow cooker, a low oven (around 150°C/300°F) can be used with a covered baking dish for 3-4 hours.
- Adjust the amount of chilli to your heat preference or omit if you want a milder dish.
- Serve with steamed jasmine rice or stir-fried greens for a complete meal.
- Leftover pork belly can be refrigerated for up to 3 days and reheated gently to preserve texture.
Keywords: sticky pork belly, slow cooked pork, Chinese pork belly, glazed pork, pork belly recipe