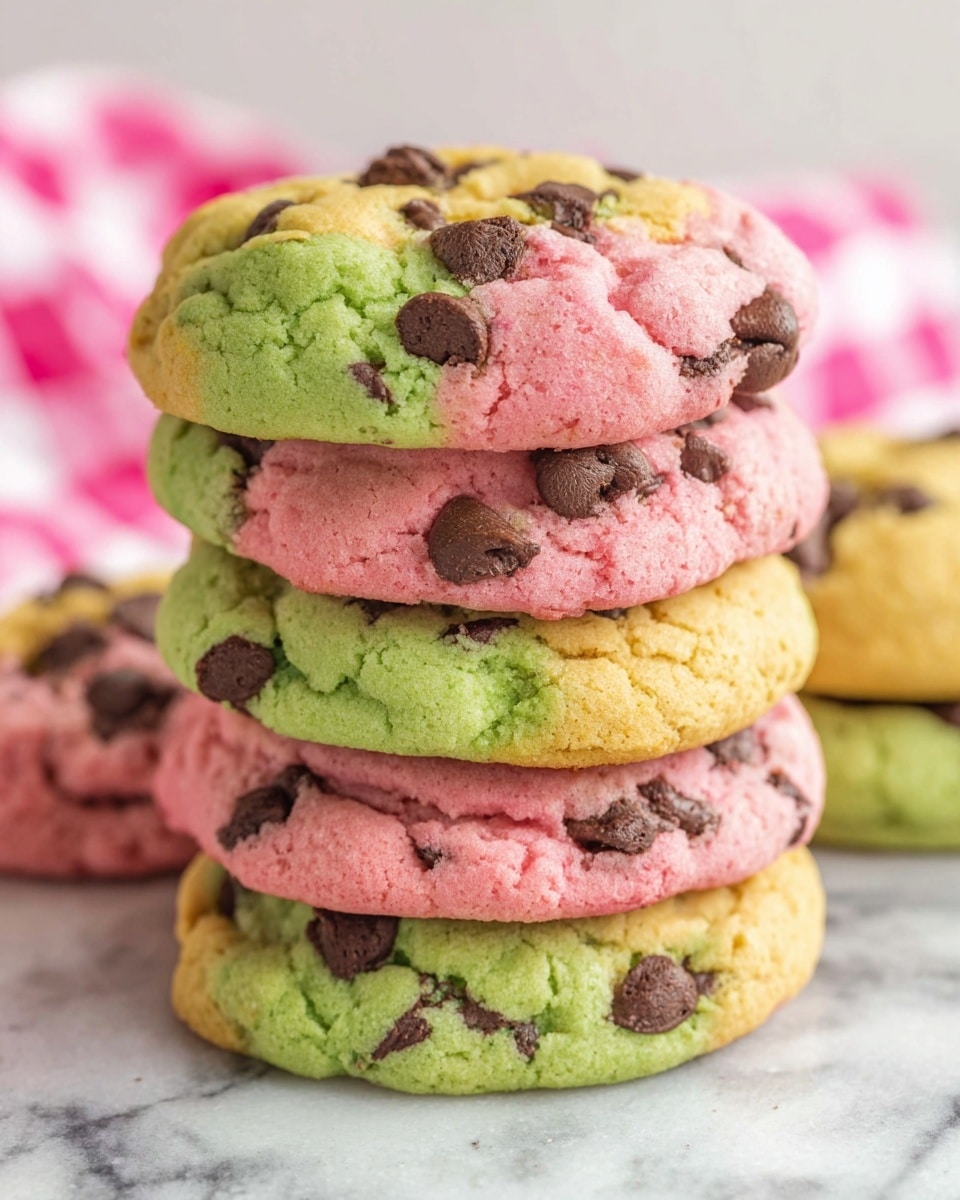
Spring Marble Chocolate Chip Cookies Recipe
There’s something truly joyful about colorful cookies that bring a bit of sunshine to your kitchen, and that’s exactly what this Spring Marble Chocolate Chip Cookies Recipe does. It’s not just about flavor—though these cookies deliver rich buttery goodness with melty chocolate chips—but also about a fun twist that feels fresh and festive. If you’re looking for a cookie recipe that brightens up your baking routine and pleases both kids and adults alike, this one’s a winner.
I first made these during the early days of spring, and honestly, the marbled pastel colors mixed with the classic chocolate chip taste made my kitchen feel like a celebration. Whether you’re baking for a family gathering, a casual afternoon treat, or a spring holiday like Easter, these cookies bring a playful, homemade vibe that’s hard to beat. Plus, the recipe is straightforward, so even if you don’t consider yourself a baker, you’ll find yourself enjoying the process—and the results!
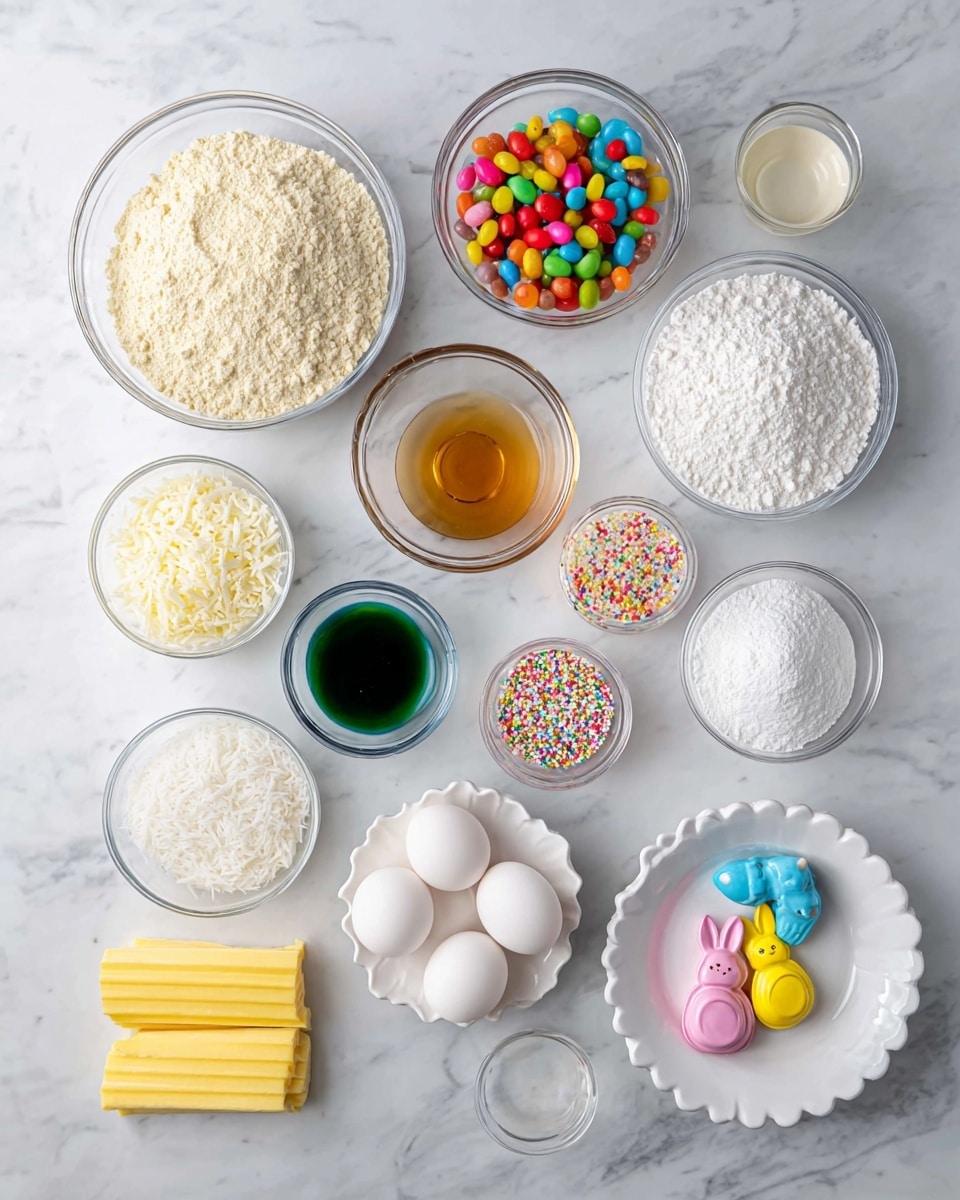
Ingredients You’ll Need
These ingredients come together beautifully to create a perfectly soft and chewy cookie base with colorful swirls and lots of chocolate chips. When shopping, I recommend using quality butter and chocolate chips—those small details really shine through.
- Softened Butter (Sweet Cream, Salted): Brings richness and creates a tender crumb; salted butter adds just a hint of savory balance.
- Granulated Sugar: Essential for that classic cookie crunch and sweetness.
- Brown Sugar (packed): Adds moisture and a subtle caramel flavor—don’t skip this for soft cookies.
- Eggs: The key to binding everything together and creating structure.
- Vanilla Extract: Enhances overall flavor, making the cookies taste homemade and comforting.
- Baking Soda: Helps the cookies rise and spread to just the right thickness.
- Salt: Balances sweetness and lifts flavors.
- All-Purpose Flour: The sturdy base that holds the dough together; measure carefully for the right texture.
- Nestle Toll House Chocolate Chips: Classic choice with melty, semi-sweet chocolate that complements the dough perfectly.
- Wilton Color Right Food Coloring: Adds those cheerful spring hues—yellow, pink, and green—making these cookies stand out.
Variations
I love making this Spring Marble Chocolate Chip Cookies Recipe my own by swapping in different colors or adding mix-ins—it’s a great way to keep it fresh and tailored to your taste or the season.
- Variation: Sometimes I use pastel blue or lavender food coloring instead of green for a softer palette—perfect for baby showers or Mother’s Day.
- Variation: For a nutty crunch, I’ve added chopped toasted pecans or walnuts to one color portion of the dough, which gives it a fun texture contrast.
- Variation: If you want a healthier twist, swapping half the all-purpose flour for whole wheat flour adds a subtle nutty flavor and boosts fiber.
- Variation: For a gluten-free version, a 1:1 gluten-free flour blend works well—just watch baking times closely as they can vary.
How to Make Spring Marble Chocolate Chip Cookies Recipe
Step 1: Cream the Butter and Sugars
Start by beating your softened butter together with both the granulated sugar and brown sugar. I like to use my stand mixer for this because it gets fluffy faster, but a hand mixer works just fine. Make sure it’s light and creamy, about 2-3 minutes—this step is crucial as it creates the perfect texture for your cookies.
Step 2: Add Eggs and Vanilla
Next up, add your eggs one at a time, mixing well after each addition. Then pour in the vanilla extract. You’ll want the batter nice and fluffy—this makes the cookies tender and flavorful. If it looks a bit curdled here, don’t worry; that’s normal.
Step 3: Mix in Dry Ingredients
Sprinkle in the baking soda and salt, then give it another quick mix. Now, add your flour gradually—about half a cup at a time—mixing just until you don’t see any dry spots. Don’t overmix at this point; this keeps your cookies from turning tough.
Step 4: Divide and Color Your Dough
Now for the fun part. Divide your dough evenly into three bowls. Using Wilton Color Right Food Coloring, tint each portion yellow, pink, and green. I find gel colors give the brightest hues without affecting dough texture. Don’t be shy about getting the colors as vibrant as you like!
Step 5: Add Chocolate Chips to Each Portion
Stir in a good amount of chocolate chips into each colored dough bowl. This way, every bite from every color gets that delightful chocolate surprise. I usually eyeball it, but roughly half to three-quarters of a cup per portion works well.
Step 6: Shape and Bake
Take about 2 ounces from each color and gently combine to make a single cookie ball with the three colors marbled together. Place them on a lined cookie sheet and lightly press down each ball. Bake at 350°F for 8-9 minutes or until edges are golden but centers still look soft. Trust me on the timing here—cookies continue to cook on the sheet after you remove them.
How to Serve Spring Marble Chocolate Chip Cookies Recipe
Garnishes
I like keeping garnishes simple because these cookies are already a feast for the eyes! But if I’m feeling fancy, I sprinkle a pinch of flaky sea salt on top right after baking—it offsets the sweetness perfectly and adds a gourmet touch.
Side Dishes
These cookies go wonderfully with a cold glass of milk or a cup of your favorite tea—green tea especially brightens the flavors. For brunch or an afternoon gathering, I pair them with fresh fruit or a light yogurt parfait for a balanced spread.
Creative Ways to Present
If I’m gifting these or serving during a party, I arrange them in small nests of shredded pastel paper in clear cellophane bags tied with ribbon matching the cookie colors. It’s such a cheerful presentation and always gets compliments. Plus, layering the cookie colors on a white platter looks stunning on any table.
Make Ahead and Storage
Storing Leftovers
I always keep leftover cookies in an airtight container at room temperature—this preserves their softness for up to 5 days. Adding a slice of bread to the container helps keep them moist longer. It’s a little trick I picked up that works wonders.
Freezing
If you want to prepare dough ahead of time, freezing works great! I portion the marbled dough into balls on a baking sheet, freeze until firm, then transfer to a freezer bag. When you’re ready, you can bake them straight from frozen—just add a couple extra minutes to the bake time.
Reheating
For leftovers, I like to warm cookies in a 300°F oven for about 5 minutes to get that fresh-from-the-bakery softness back. Avoid microwaving if you can—it tends to toughen the cookie after it cools.
FAQs
-
Can I use different types of chocolate chips in the Spring Marble Chocolate Chip Cookies Recipe?
Absolutely! While semi-sweet chocolate chips like Nestle Toll House are classic and reliable, you can use white chocolate, milk chocolate, or even mini chips for a different twist. Just keep the quantity roughly the same to maintain the dough balance.
-
What type of food coloring works best for the marbled effect?
I recommend gel food coloring because it provides vibrant colors without thinning the dough. Liquid food coloring can make the dough too soft and affect the baking results.
- How do I prevent the colors from blending too much?
To maintain distinct color swirls, gently combine the different colored doughs only enough to marble them; avoid excessive mixing. Chilling the dough balls before baking can also help the shape and color hold better.
- Can I make these cookies vegan?
Converting this recipe to vegan involves swapping butter with vegan margarine or coconut oil and replacing eggs with flaxseed or chia egg alternatives. Just keep in mind that texture and flavor might slightly differ from the classic version.
- How do I know when the Spring Marble Chocolate Chip Cookies are done baking?
Look for golden edges but still a slightly soft center when you take them out of the oven. The cookies will continue to firm up as they cool on the baking sheet, so it’s better to underbake slightly than overbake.
Final Thoughts
Making this Spring Marble Chocolate Chip Cookies Recipe always feels like a small but joyful celebration in my kitchen. The combination of classic chocolate chip flavor with playful spring colors never fails to bring smiles around the table, and that’s why I keep this recipe handy all season long. I hope you’ll try it, enjoy the process as much as I do, and share these delightful treats with your favorite people. Happy baking, friend!
PrintSpring Marble Chocolate Chip Cookies Recipe

Spring Marble Chocolate Chip Cookies are colorful, soft-baked treats perfect for celebrating the season. These cookies feature a fun marble effect created by dividing the dough into three portions and tinting each with vibrant pastel food coloring. Loaded with classic Nestle Toll House chocolate chips, they offer a delightful combination of rich chocolate flavor and festive spring hues. Easy to prepare and bake, these cookies bring a cheerful touch to any occasion or holiday gathering.
- Prep Time: 10 minutes
- Cook Time: 10 minutes
- Total Time: 20 minutes
- Yield: 18 cookies 1x
- Category: Dessert
- Method: Baking
- Cuisine: American
Ingredients
Cookie Dough
- 1 cup Softened Butter (Sweet Cream, Salted)
- 1 cup Granulated Sugar
- 1/2 cup Brown Sugar (packed)
- 2 Eggs
- 2 teaspoons Vanilla Extract
- 1 teaspoon Baking Soda
- 1/2 teaspoon Salt
- 2 3/4 cups All-Purpose Flour
Add-ins and Coloring
- 1 Bag Nestle Toll House Chocolate Chips (approximately 12 oz)
- Wilton Color Right Food Coloring (yellow, pink, and green)
Instructions
- Cream the Sugars and Butter: In a large mixing bowl or stand mixer, beat the softened butter, granulated sugar, and brown sugar together until the mixture is light and fluffy, ensuring a smooth base for the cookie dough.
- Add Eggs and Vanilla: Incorporate the eggs and vanilla extract into the creamed mixture, continuing to mix until the batter becomes well combined and airy.
- Mix Baking Soda and Salt: Stir in the baking soda and salt to distribute evenly throughout the dough, aiding in the leavening and enhancing flavor.
- Add Flour Gradually: Gradually add the all-purpose flour, mixing in batches to ensure the dough is fully combined without overmixing, resulting in a tender cookie texture.
- Divide Dough into Portions: Separate the completed dough evenly into three portions to enable coloring each segment differently for the marble effect.
- Color the Dough: Using Wilton Color Right food coloring, tint one portion yellow, another pink, and the last green. Knead the color into each dough portion thoroughly to achieve vibrant, consistent hues.
- Mix in Chocolate Chips: Add chocolate chips evenly to each colored dough portion and fold them in gently to distribute the chips throughout each colored dough.
- Form Marble Cookie Balls: Take a combination of the colored doughs (yellow, pink, and green), forming a 2-ounce cookie dough ball that incorporates all three colors for a marbled look.
- Prepare for Baking: Place each formed dough ball onto a prepared cookie sheet and gently press down slightly to flatten, preparing them for even baking.
- Bake Cookies: Bake in a preheated 350°F (175°C) oven for 8-9 minutes or until the cookies are golden brown around the edges. Remove from the oven and allow to cool slightly before serving.
Notes
- You can substitute food coloring brands or use natural colorings like beet juice or turmeric for a natural dye option.
- Ensure butter is softened, not melted, for proper creaming with sugars.
- Do not overbake; cookies will firm up as they cool.
- Feel free to substitute semi-sweet or dark chocolate chips based on preference.
- Store cookies in an airtight container to keep them fresh for up to 5 days.
Keywords: marble cookies, chocolate chip cookies, spring cookies, colorful cookies, easy cookie recipe, holiday cookies