Hot Cocoa Melting Mugs Recipe
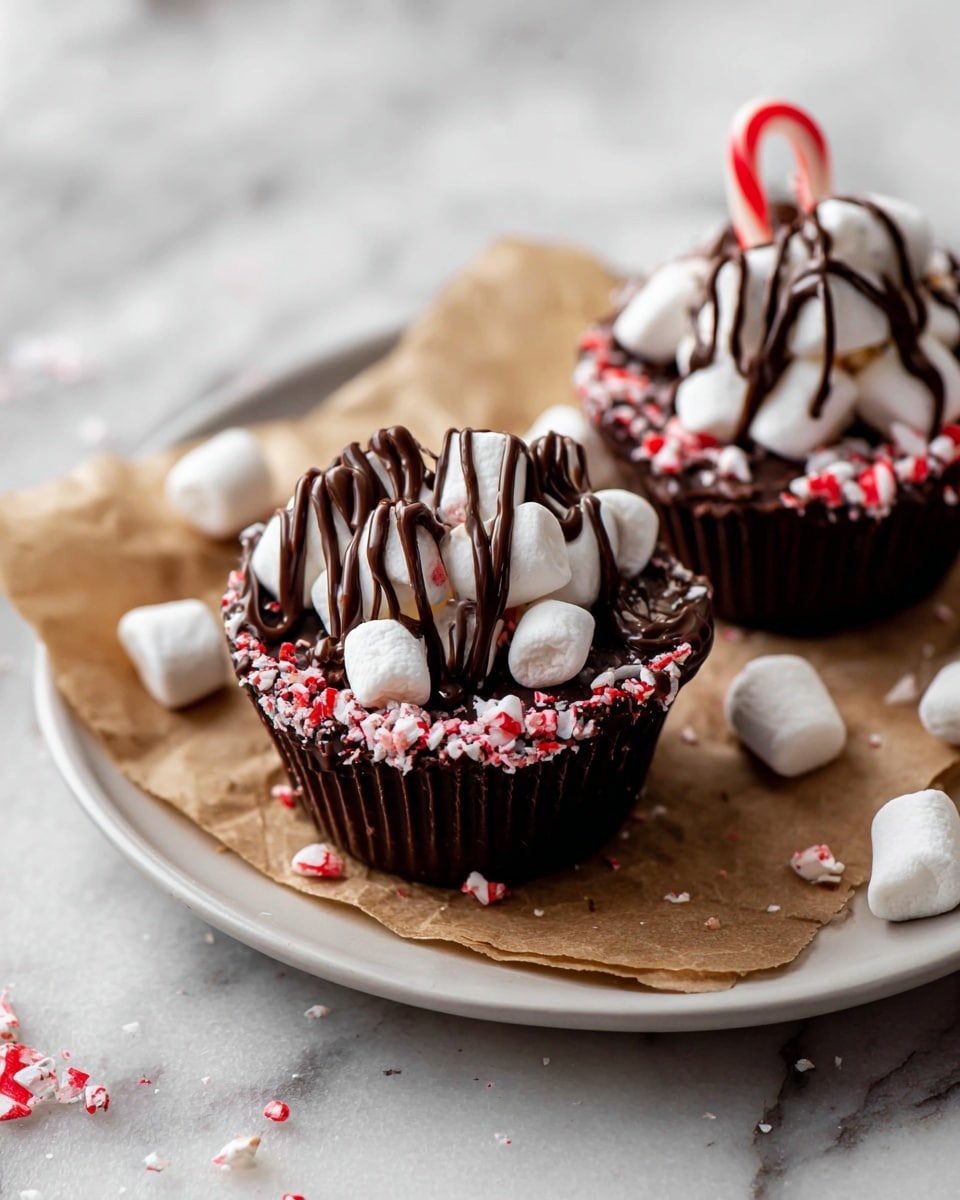
If there’s one cozy treat that instantly brings warmth and smiles, it’s this Hot Cocoa Melting Mugs Recipe. Imagine the fun of sipping on rich, homemade hot chocolate straight from a chocolate cup that slowly melts in your hands — yeah, it’s as deliciously charming as it sounds. It’s perfect for chilly evenings, holiday gatherings, or whenever you want a little indulgence wrapped up in a playful little package.
What makes this Hot Cocoa Melting Mugs Recipe extra special is not just the deep chocolate flavor or the creamy warmth, but the experience itself. You get to watch the chocolate cup soften, swirl it with milk, and indulge in gooey marshmallows or your favorite toppings. Trust me, once you try this, it becomes your go-to for impressively simple homemade hot chocolate moments.
Ingredients You’ll Need
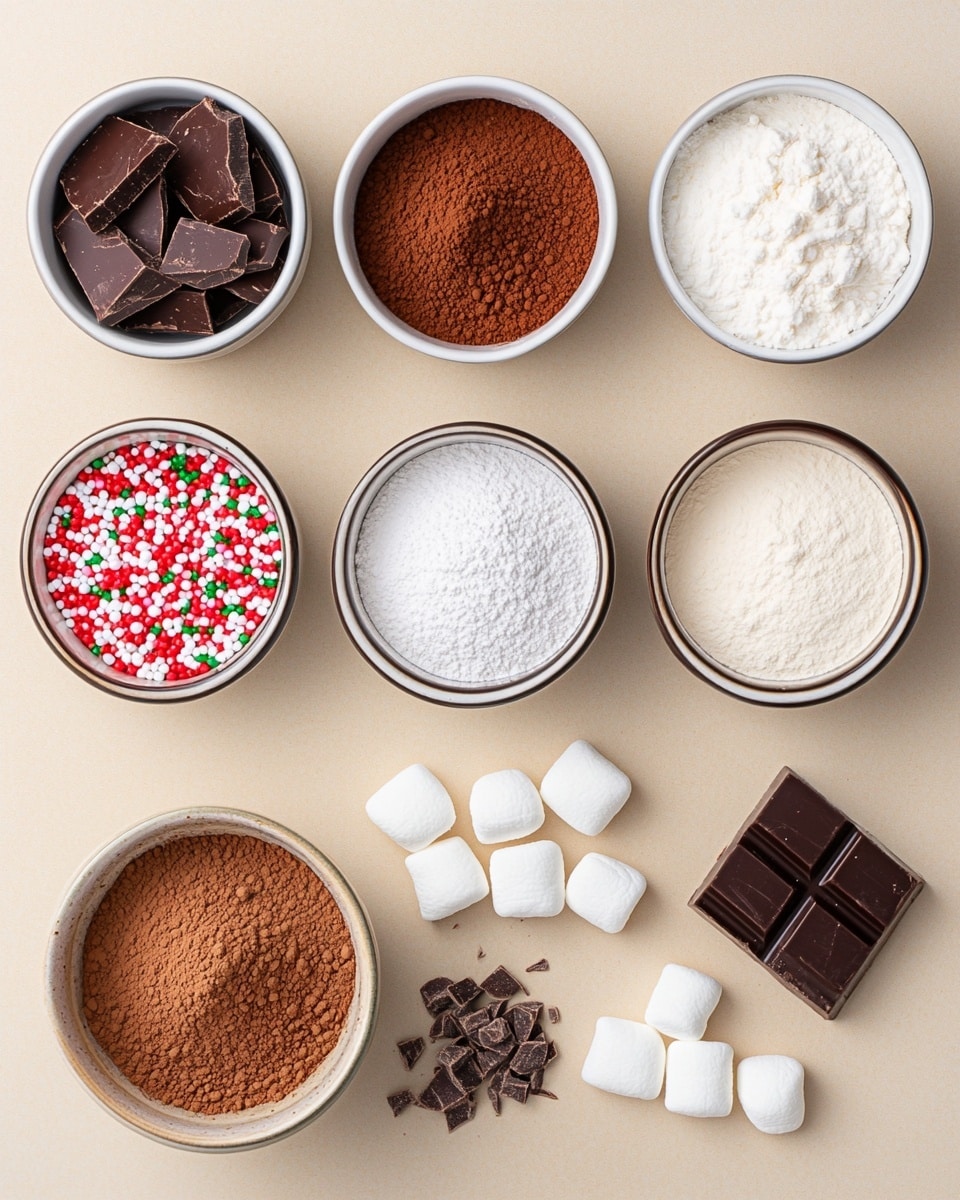
These ingredients team up perfectly to create a smooth, sweet, and richly chocolatey hot cocoa base plus those delightful melting mugs. You’ll want to pick good-quality semi-sweet chocolate for the cups to ensure they melt nicely and taste fantastic.
- Instant milk powder: This adds creamy richness without needing heavy cream — super convenient and shelf-stable.
- Powdered sugar: For sweetness that dissolves beautifully, giving your cocoa a smooth finish.
- Unsweetened cocoa powder: The backbone of that deep chocolate flavor, so choose a good-quality one for best taste.
- Pinch of salt: Just a little to balance the sweetness and bring out the chocolate notes.
- Semi-sweet chocolate: This is what you’ll melt to form your melting mugs — finely chop for even melting.
- Festive sprinkles and/or crushed candy canes: Optional but adds a fun, seasonal flair to decorate the rims of your chocolate cups.
- Mini marshmallows: Because, honestly, what’s hot cocoa without them?
- Candy canes: Great for stirring and adding a peppermint twist.
- Whole milk: The liquid that brings your cocoa to life — creamy and comforting.
- Water: Helps the cocoa mix melt smoothly; combined with milk controls the richness.
Variations
I love switching things up with this Hot Cocoa Melting Mugs Recipe depending on the season or mood. You should totally make it your own — it’s simple to tweak and still lets you keep that melting magic experience.
- Spiced Up: Add a pinch of cinnamon or cayenne to the cocoa mix for a cozy warmth. One winter, I tried this with cinnamon and it gave such a beautiful depth — my guests kept asking for the recipe!
- Vegan Version: Use coconut milk or almond milk instead of whole milk, and swap the semi-sweet chocolate for a dairy-free chocolate. I’ve done this often for friends who’re dairy-free, and it’s delightful.
- Minty Twist: Crush extra candy canes inside the cocoa mix for a refreshing minty hit. It’s especially festive and perfect for holidays.
- Extra Decadent: Stir in a tablespoon of cream or add a dollop of whipped cream on top — because sometimes, more is more!
How to Make Hot Cocoa Melting Mugs Recipe
Step 1: Prepare Your Chocolate Mugs
Start by finely chopping your semi-sweet chocolate — smaller pieces melt more evenly and smoothly. Line a silicone or parchment paper-lined tray with small, mug-shaped molds or mini cups (you can use silicone muffin liners shaped round). Gently melt the chocolate in a double boiler or microwave, stirring frequently to avoid burning. Then, spoon the melted chocolate into the molds, coating inside surfaces evenly to create a nice thick shell.
Pop these into the fridge for 15-20 minutes until fully set. You can decorate the rims by brushing a little melted chocolate on the edge and sprinkling festive sprinkles or crushed candy canes right before chilling — it adds a fun texture and flavor bonus.
Step 2: Mix the Cocoa Base
While your chocolate mugs chill, mix the instant milk powder, powdered sugar, unsweetened cocoa powder, and a pinch of salt in a bowl. Give it a good whisk so everything is well distributed. This dry mix is the secret to that smooth, sweet, and intensely chocolatey hot cocoa you’re about to enjoy. Feel free to prepare this mix ahead of time — it stores well.
Step 3: Heat and Combine Liquids
In a small saucepan, combine equal parts whole milk and water (½ cup each per melting mug). Warm gently over medium heat until just steaming — no need to boil! Pour the hot liquid into a large mug or heat-safe bowl. Gradually whisk in your cocoa powder mix until it dissolves completely and the mixture is silky smooth.
Step 4: Assemble and Enjoy
Remove your solid chocolate mugs from the fridge carefully, peeling them out of their molds if needed. Place one on a small plate or coaster, then slowly pour your warm cocoa inside. You’ll start to see the chocolate cup melt slightly, mixing with the hot drink to create a cozy, chocolatey swirl. Top with mini marshmallows and add a candy cane for stirring — it’s as much fun to look at as it is to sip.
How to Serve Hot Cocoa Melting Mugs Recipe
Garnishes
I’m a sucker for classic mini marshmallows — they melt just enough without disappearing entirely, giving you little pockets of gooey sweetness in each sip. I also love dusting a pinch of cinnamon or cocoa powder over the top for a hint of extra flavor. For a festive touch, crushed candy canes around the rim add color and a peppermint zing.
Side Dishes
Cookies and hot cocoa go together like old friends. I personally pair this with soft gingerbread cookies or buttery shortbread — the kind you can dunk right into your melting mug. If you’re feeling fancy, a slice of rich brownies or biscotti also works beautifully.
Creative Ways to Present
For special occasions, I like to serve these Hot Cocoa Melting Mugs Recipe drinks on rustic wooden trays lined with crumpled parchment paper. Add some fairy lights or pine sprigs for a winter wonderland vibe. One party, I even did a “build your own cocoa mug” station with various toppings and colored sugars — everyone loved the interactive twist!
Make Ahead and Storage
Storing Leftovers
If you happen to have leftover dry cocoa mix, store it in an airtight jar or container at room temperature — it stays fresh for weeks. The chocolate mugs, though, are best kept refrigerated in a sealed container to avoid moisture or odors. I usually assemble the mugs fresh for the best melt effect, but you can prep the chocolate cups ahead and keep them chilled for a day or two.
Freezing
I’ve experimented with freezing the chocolate mugs, and while it’s possible, the texture changes a bit once thawed — sometimes they get a little softer or less glossy. If you plan to freeze, wrap them tightly in plastic wrap and place in a freezer bag. Thaw in the fridge before use, but honestly, I prefer to enjoy them fresh from the fridge for the best melting magic.
Reheating
If you have leftover hot cocoa (without the chocolate mug), reheat gently on the stove or microwave in short bursts, stirring often to avoid scorching. Once reheated, pour it into a fresh chocolate cup or serve as is with marshmallows. To keep the melt effect special, I avoid storing the fully assembled drinks.
FAQs
-
Can I make the chocolate mugs ahead of time?
Absolutely! You can prepare the chocolate mugs a day or two in advance and keep them refrigerated. Just make sure to store them in an airtight container to prevent moisture buildup, which can dull their shine and texture.
-
What’s the best chocolate to use for the melting mugs?
Semi-sweet chocolate with a good cocoa content (around 60%) works best because it melts evenly without becoming too sweet or too bitter. Finely chop it for smooth melting, and avoid chocolate chips with stabilizers that can affect the texture.
-
Can I use milk alternatives in this recipe?
Yes! Feel free to swap whole milk with almond, oat, coconut, or soy milk. Keep in mind that the texture and flavor will vary slightly, but it still makes for a delicious hot cocoa experience.
-
What if I don’t have a chocolate mold for the mugs?
No worries—silicone muffin liners or even small ramekins can work as substitutes. Just make sure the chocolate is thick enough on the sides for easy peeling or serving without breaking.
-
How do I avoid the chocolate from melting too fast when serving?
Serve the hot cocoa in the chocolate mugs immediately after pouring the warm drink. Also, chilling the mugs well before use helps them hold their shape longer. If the chocolate melts too fast, pouring slightly cooler milk/water mixture can slow the melting without sacrificing taste.
Final Thoughts
This Hot Cocoa Melting Mugs Recipe has become one of my favorite winter traditions — it’s a simple way to add a dash of magic to an ordinary day. I hope you’ll enjoy making and sharing it just as much as I do, especially when you see the delight on friends’ faces as their chocolate mugs slowly melt into gooey, warm goodness. Give it a try and make yourself a cup of happiness in a chocolate shell!
PrintHot Cocoa Melting Mugs Recipe

This Hot Cocoa Melting Mugs Recipe offers a fun and festive way to enjoy rich, creamy hot chocolate. Using homemade melting chocolate cups filled with a delectable hot cocoa mix, mini marshmallows, and candy canes, this recipe creates an interactive and cozy beverage perfect for winter gatherings or holiday celebrations.
- Prep Time: 20 minutes
- Cook Time: 0 minutes
- Total Time: 20 minutes
- Yield: 4 melting mugs 1x
- Category: Beverage
- Method: No-Cook
- Cuisine: American
Ingredients
Hot Cocoa Mix
- ¼ cup (20g) instant milk powder
- ¼ cup (30g) powdered sugar
- 2 tablespoons unsweetened cocoa powder
- Pinch of salt
Mug Shaped Melting Cups
- 6 ounces (170g) semi-sweet chocolate (about 1 cup finely chopped)
- Festive sprinkles and/or crushed candy canes (optional, for decorating the rims)
- Mini marshmallows (quantity as preferred)
- Candy canes (quantity as preferred)
For Serving
- ½ cup (120mL) whole milk per melting mug (total 2 cups for 4 mugs)
- ½ cup (120mL) water per melting mug (total 2 cups for 4 mugs)
Instructions
- Prepare the Hot Cocoa Mix: In a bowl, combine the instant milk powder, powdered sugar, unsweetened cocoa powder, and a pinch of salt. Stir well until all ingredients are evenly mixed to create the hot cocoa powder blend.
- Make the Melting Cups: Melt the semi-sweet chocolate using a double boiler or microwave in short bursts, stirring frequently until smooth. Carefully coat the inside of silicone mug-shaped molds evenly with the melted chocolate, then chill in the refrigerator until fully hardened. Repeat layering if needed to ensure thick walls.
- Decorate the Melting Cups: If desired, dip the rims of the hardened chocolate cups into festive sprinkles or crushed candy canes for an eye-catching holiday touch. Let set until firm.
- Fill the Melting Cups: Spoon a portion of the prepared hot cocoa mix into each chocolate cup. Add mini marshmallows and candy canes on top as desired.
- Serve with Warm Liquids: Heat the milk and water together until hot but not boiling. Pour ½ cup of the warm milk-water mixture over each melting cup to melt the chocolate cup and dissolve the cocoa mix, stirring gently to combine.
- Enjoy Immediately: Serve the hot cocoa mugs right away while the chocolate is melting and the drink is warm for the ultimate cozy indulgence.
Notes
- Finely chopping the chocolate ensures it melts evenly and smoothly when forming the cups.
- Silicone molds shaped like mugs work best for creating melting chocolate mugs.
- You can customize the amount of mini marshmallows and candy canes to your preference.
- Use whole milk for a creamier texture; substitute with your preferred milk alternative if desired.
- Serve immediately after pouring hot liquid to enjoy the melting cup effect at its best.
Keywords: hot cocoa, melting mugs, chocolate cups, festive drinks, holiday beverage, hot chocolate recipe