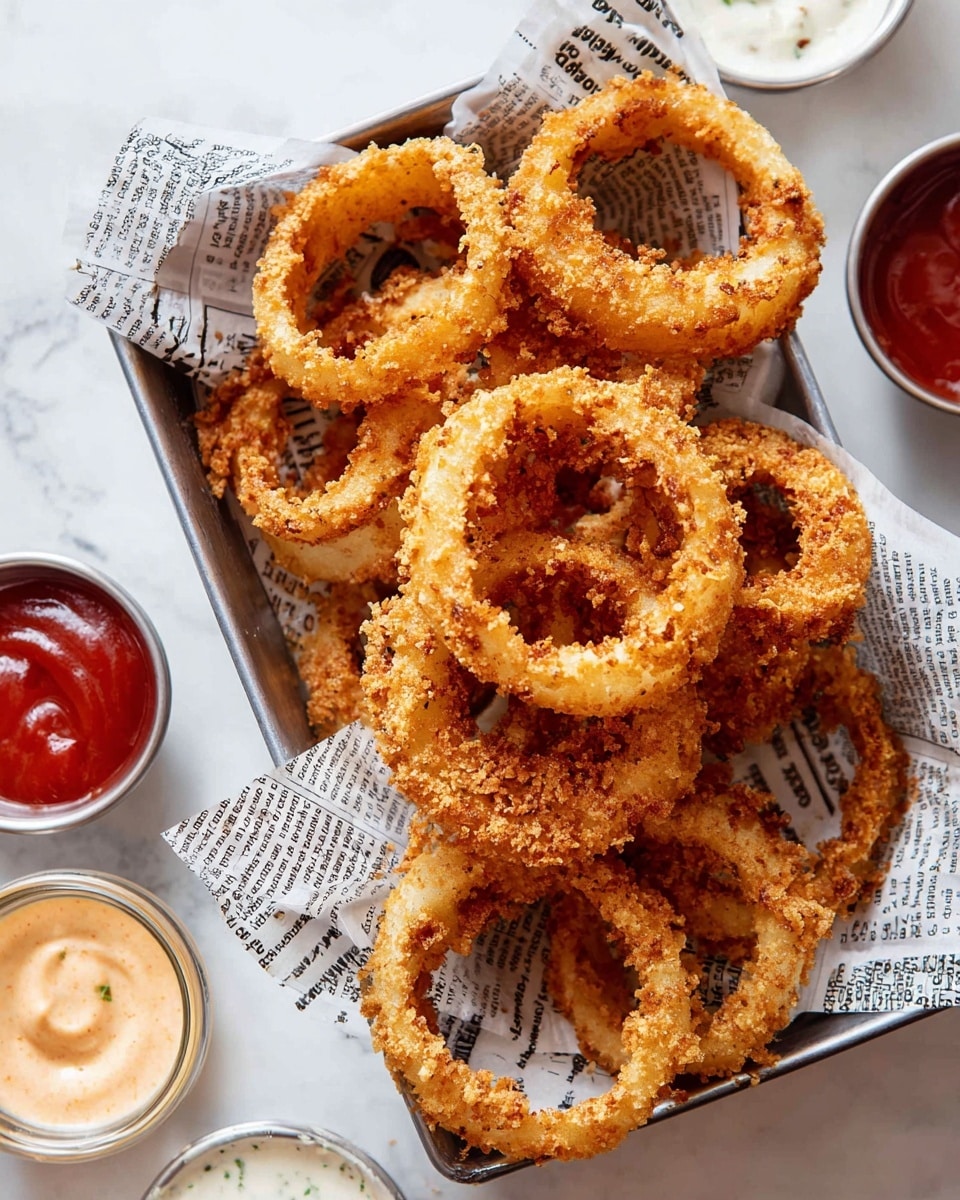
Fried Homemade Onion Rings Recipe
If you love crispy, golden-brown onion rings, you’re going to absolutely enjoy this Fried Homemade Onion Rings Recipe. There’s something so satisfying about biting into freshly fried onion rings with a perfect crunch and a tender, sweet onion center. Whether it’s game day, a backyard barbecue, or just a lazy weekend snack, these onion rings never fail to impress both family and friends.
I remember the first time I made these at home—it was way easier than I thought, and the flavor? Way better than store-bought or frozen versions. Using buttermilk and a mix of spices in the batter really makes the difference. Trust me, once you try this Fried Homemade Onion Rings Recipe, you’ll want to make them again and again!
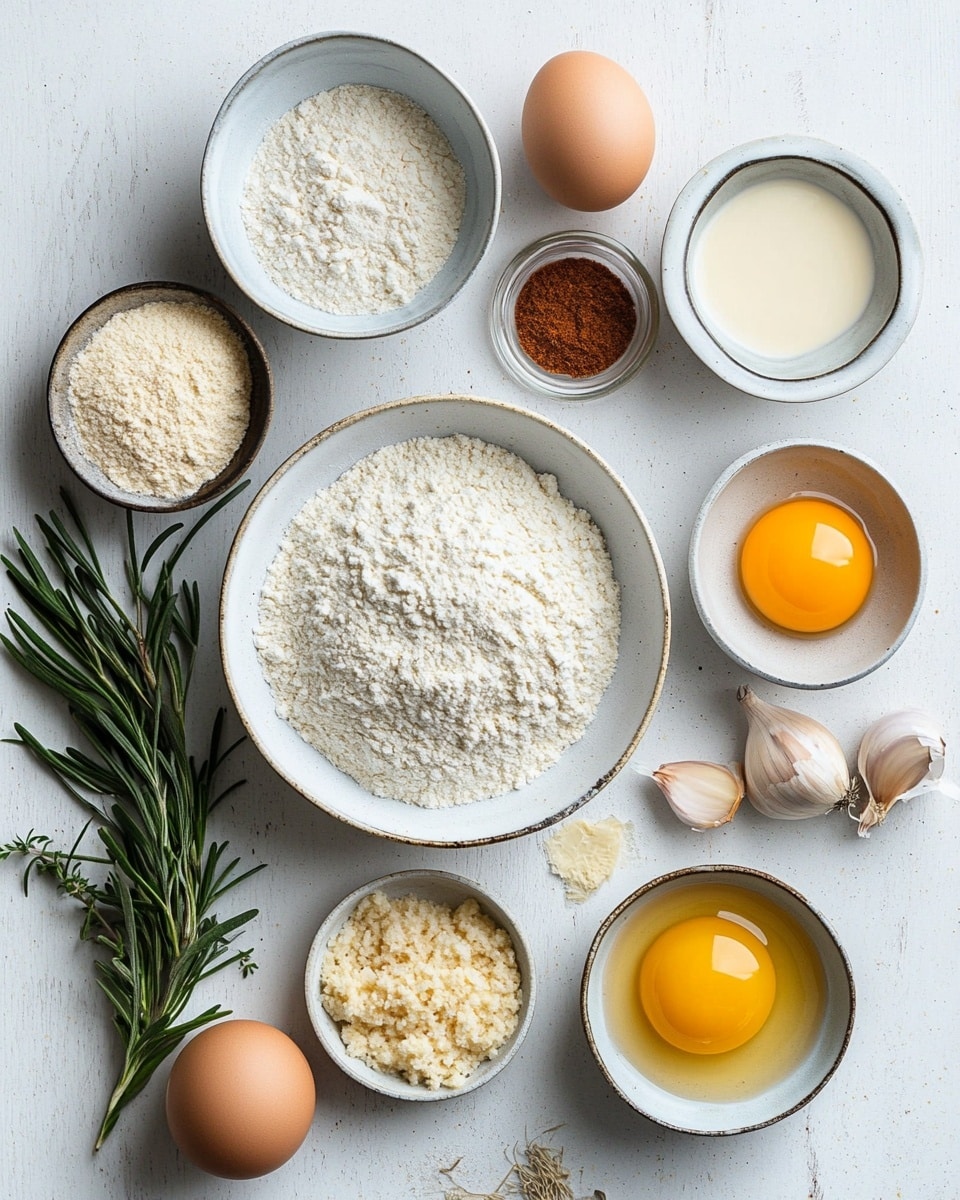
Ingredients You’ll Need
These ingredients come together to create the perfect balance of crispy coating and juicy onion inside. Shopping’s simple—most are pantry staples, but I’ll share tips to get the best results.
- Onion: I prefer sweet or yellow onions sliced into 1/2-inch thick rings for the right texture and sweetness.
- Buttermilk: This tenderizes the onion and helps the batter stick beautifully.
- Egg: Acts as a binder to make sure the coating adheres well.
- All-purpose flour: The base for your batter, providing structure.
- Cornstarch: Adds extra crispiness to the coating; don’t skip it!
- Smoked paprika: Gives a subtle smoky flavor, which I find adds depth.
- Salt: Essential for seasoning and bringing all flavors together.
- Black pepper: Adds a gentle heat to balance the sweetness.
- Garlic powder: Just a little kick of umami that elevates the whole recipe.
- Panko bread crumbs: Use these for the crunchiest coating—regular breadcrumbs tend to be too dense.
- Oil for frying: Canola, vegetable, or peanut oil works best because of their high smoke points.
Variations
One of the best parts about this Fried Homemade Onion Rings Recipe is how easy it is to tweak based on what you love or what’s on hand. I often play around with the seasoning and sometimes the coating for fun.
- Spicy kick: I like adding a pinch of cayenne pepper or chili powder to the batter for a little heat, especially for game nights.
- Gluten-free version: Swap all-purpose flour and panko with chickpea flour and gluten-free breadcrumbs—I’ve tried this for friends, and it works great without losing crunch.
- Herb-infused: Adding dried herbs like oregano or thyme into the breading gives a lovely twist for a more aromatic onion ring.
- Beer batter: Sometimes I swap the buttermilk for beer, which creates lighter, airier onion rings—perfect for summer parties.
How to Make Fried Homemade Onion Rings Recipe
Step 1: Prep Your Onions and Batter
Start by slicing a large sweet or yellow onion into thick 1/2-inch rings—thinner rings tend to fall apart during frying, so I always go a bit thicker. In a bowl, whisk together the buttermilk and egg until smooth. In another dish, mix your flour, cornstarch, smoked paprika, salt, pepper, and garlic powder to ensure even seasoning throughout the coating.
Step 2: Coat Those Rings Perfectly
Dip each onion ring first in the buttermilk mixture, letting the excess drip off, then dredge it in the seasoned flour mixture. For extra crunch, I like to double-dip: after the dry coating, dunk them back into the buttermilk briefly and then cover them with panko breadcrumbs. This double layer ensures the crispiest exterior after frying.
Step 3: Fry Until Golden and Crispy
Heat about 2 inches of your chosen oil in a deep pan or skillet to 350°F (175°C). If you don’t have a thermometer, test by dropping a small bit of batter into the oil—it should sizzle immediately. Fry the rings in batches to avoid crowding the pan (which can make the oil temperature drop). Cook each batch for about 2-3 minutes, flipping once, until golden brown. Drain on a wire rack or paper towels to keep them crisp, and don’t forget to season immediately with a pinch of salt!
How to Serve Fried Homemade Onion Rings Recipe
Garnishes
I usually keep it simple with some chopped fresh parsley or a sprinkle of smoked paprika for a pop of color and extra flavor. A little squeeze of lemon also brightens the whole dish—trust me, it’s worth trying!
Side Dishes
These onion rings pair beautifully with classic burgers, BBQ ribs, or even alongside a crisp salad if you want to keep things lighter. One of my favorite combos is with homemade spicy mayo or a cool ranch dip—perfect for dunking!
Creative Ways to Present
For special occasions, I like to serve these Fried Homemade Onion Rings Recipe stacked tall on a platter, with little bowls of different dipping sauces scattered around. It makes a fun, interactive experience, and guests love trying all the dips!
Make Ahead and Storage
Storing Leftovers
If you have leftovers, I recommend saving them in an airtight container lined with paper towels to absorb moisture. Refrigerate for up to 2 days, but know they’re best fresh.
Freezing
I’ve frozen these before by laying them out on a baking sheet so they didn’t touch, freezing until firm, then transferring to a zipped bag. You can keep them frozen for up to a month, which is great for quick snacks later.
Reheating
To bring back that crispy texture, I always reheat frozen or refrigerated onion rings in the oven or an air fryer at 375°F for 5-7 minutes. Microwaving will make them soggy, so avoid that if you can!
FAQs
-
Can I use different types of onions for this Fried Homemade Onion Rings Recipe?
Absolutely! While I prefer sweet or yellow onions for their balance of sweetness and mildness, white onions or even red onions can work too. Just keep in mind that some varieties are sharper in flavor or have a slightly different texture, so adjust your taste preferences accordingly.
-
Is it necessary to use buttermilk in this recipe?
Buttermilk helps tenderize the onions and adds a subtle tanginess that lifts the coating flavor. If you don’t have buttermilk on hand, you can make a quick substitute by adding a tablespoon of vinegar or lemon juice to a cup of milk and letting it sit for 5 minutes.
-
Can I bake these instead of frying?
Yes, baking is possible but won’t give quite the same crunch as frying. To bake, place the coated onion rings on a greased baking sheet, spray lightly with oil, and bake at 425°F for 15-20 minutes, flipping halfway through. For best results, use an air fryer if you have one.
-
How do I know when the oil is at the right temperature?
Using a thermometer is the easiest way to monitor the temperature, aiming for around 350°F. If you don’t have one, drop a small bit of batter into the oil—if it sizzles and floats immediately, the oil is ready. Too hot and it will brown too quickly; too cool and the onion rings may be greasy.
-
Can I make the batter ahead of time?
I recommend mixing the dry and wet ingredients separately and combining just before frying to keep the batter fresh and ensure crispiness. The coated onion rings can be prepared a little ahead but fry them right after for best results.
Final Thoughts
This Fried Homemade Onion Rings Recipe holds a special place in my kitchen—it’s not just a snack, but a showstopper that brings everyone to the table smiling. I love sharing these with friends and watching the crispy rings disappear in minutes. Give it a try soon, and I’m sure it’ll become your go-to recipe whenever you want something crispy, comforting, and just a little bit special.
PrintFried Homemade Onion Rings Recipe

Crispy and flavorful homemade fried onion rings coated in a seasoned batter and crunchy panko bread crumbs. This recipe combines buttermilk and egg for a tender, flavorful batter with smoked paprika and garlic powder adding a smoky and savory touch. Perfect as a classic side or snack, these onion rings are fried to golden perfection using canola, vegetable, or peanut oil for an irresistible crunch.
- Prep Time: 15 minutes
- Cook Time: 10 minutes
- Total Time: 25 minutes
- Yield: 4 servings 1x
- Category: Appetizer
- Method: Frying
- Cuisine: American
Ingredients
Onions
- 1 large sweet or yellow onion, sliced into 1/2-inch thick rings
Batter
- 1 cup buttermilk
- 1 large egg
- 1/2 cup all-purpose flour
- 1 Tablespoon cornstarch
- 1 teaspoon smoked paprika
- 1 teaspoon salt
- 1/2 teaspoon black pepper
- 1/2 teaspoon garlic powder
Coating
- 1 cup panko bread crumbs
For Frying
- Oil for frying (canola oil, vegetable oil, or peanut oil)
Instructions
- Prepare the onions: Slice the onion into 1/2-inch thick rings, separating each ring carefully to maintain their shape.
- Mix the batter: In a bowl, whisk together the buttermilk and egg until combined. In another bowl, sift together the flour, cornstarch, smoked paprika, salt, black pepper, and garlic powder.
- Coat the onion rings: Dip each onion ring first into the buttermilk and egg mixture, then dredge in the seasoned flour mixture. Return the rings to the buttermilk mixture to moisten them again, then coat thoroughly with panko bread crumbs for an extra crunchy exterior.
- Heat the oil: In a deep frying pan or deep fryer, heat the oil over medium-high heat to 350°F (175°C) ensuring enough oil to fully submerge the onion rings.
- Fry the onion rings: Carefully place the coated onion rings into the hot oil in batches, frying until golden brown and crispy, about 2 to 3 minutes per batch. Avoid overcrowding the pan to maintain oil temperature and crispiness.
- Drain and serve: Remove the onion rings with a slotted spoon and place on a paper towel-lined plate to drain excess oil. Serve immediately while hot and crispy.
Notes
- Use fresh onions for the best texture and flavor.
- Maintaining the oil temperature at 350°F is crucial for crispy, non-greasy onion rings.
- For an extra kick, add cayenne pepper or chili powder to the batter.
- Panko breadcrumbs provide a lighter, crunchier coating compared to regular breadcrumbs.
- The double-dip in buttermilk and flour mixture helps the breadcrumbs adhere better and enhances crispiness.
Keywords: fried onion rings, homemade onion rings, crispy onion rings, buttermilk onion rings, panko onion rings, appetizer, snack