Festive Chocolate Christmas Candy Recipe
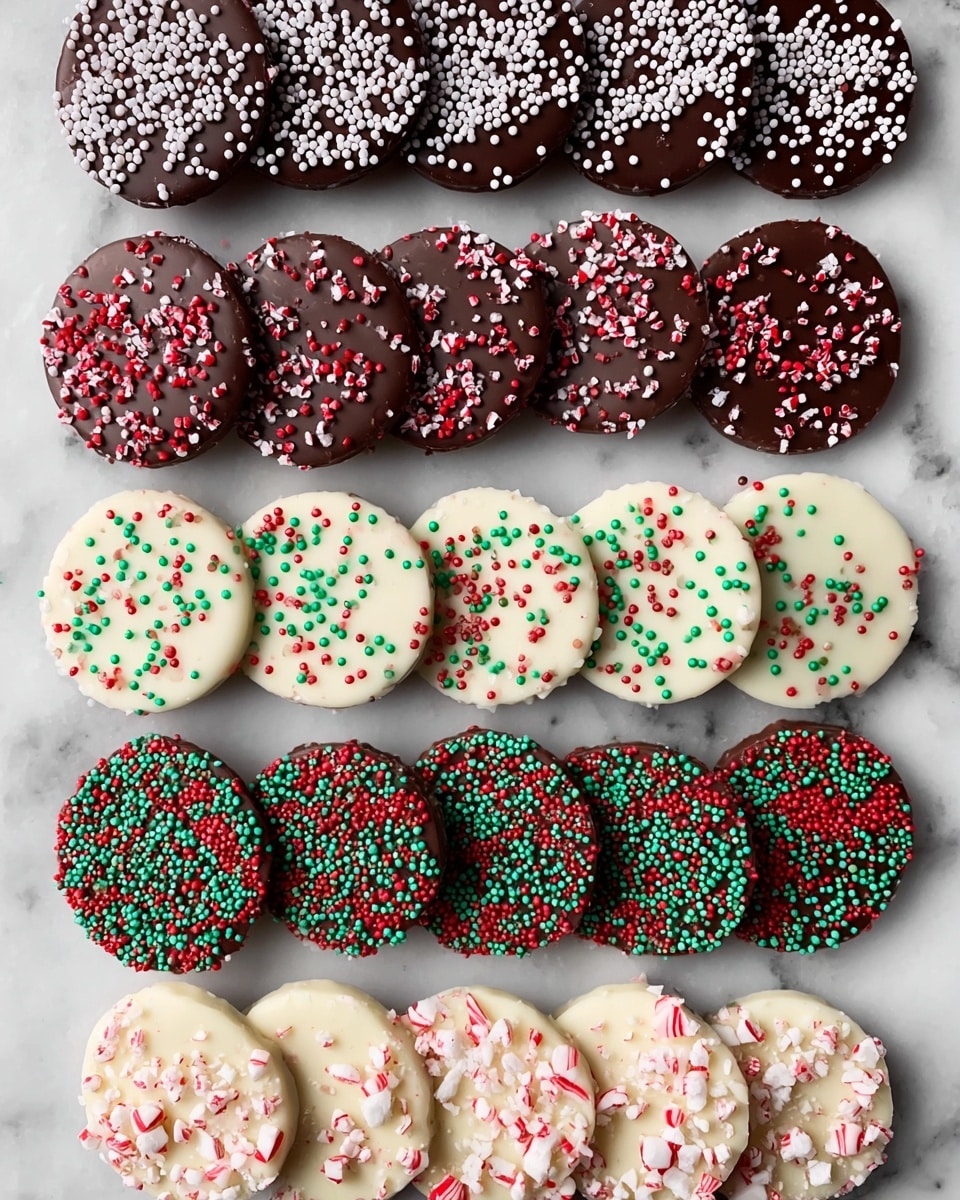
If you’re looking for a festive treat that’s both simple to make and absolutely delightful to share, this Festive Chocolate Christmas Candy Recipe is your go-to. I’ve made this candy every year for holiday gatherings, and it’s always a hit with friends and family. The combination of silky semi-sweet chocolate and creamy white chocolate, topped with colorful sprinkles and crushed candy canes, really captures the spirit of Christmas in each bite.
What makes this Festive Chocolate Christmas Candy Recipe special is how quick it comes together without skimping on flavor or festivity. It’s perfect when you need that last-minute homemade gift or a sweet addition to your holiday dessert table. Trust me, once you try it, you’ll want to keep some packaged up for yourself too—the balance of crunchy candy canes and smooth chocolates is downright addictive.
Ingredients You’ll Need
For this recipe, the ingredients are straightforward yet thoughtfully chosen to make sure each chocolate piece melts in your mouth with just the right crunch and color pop. Keep an eye out for high-quality melting wafers because they make the process easier and the texture smoother.
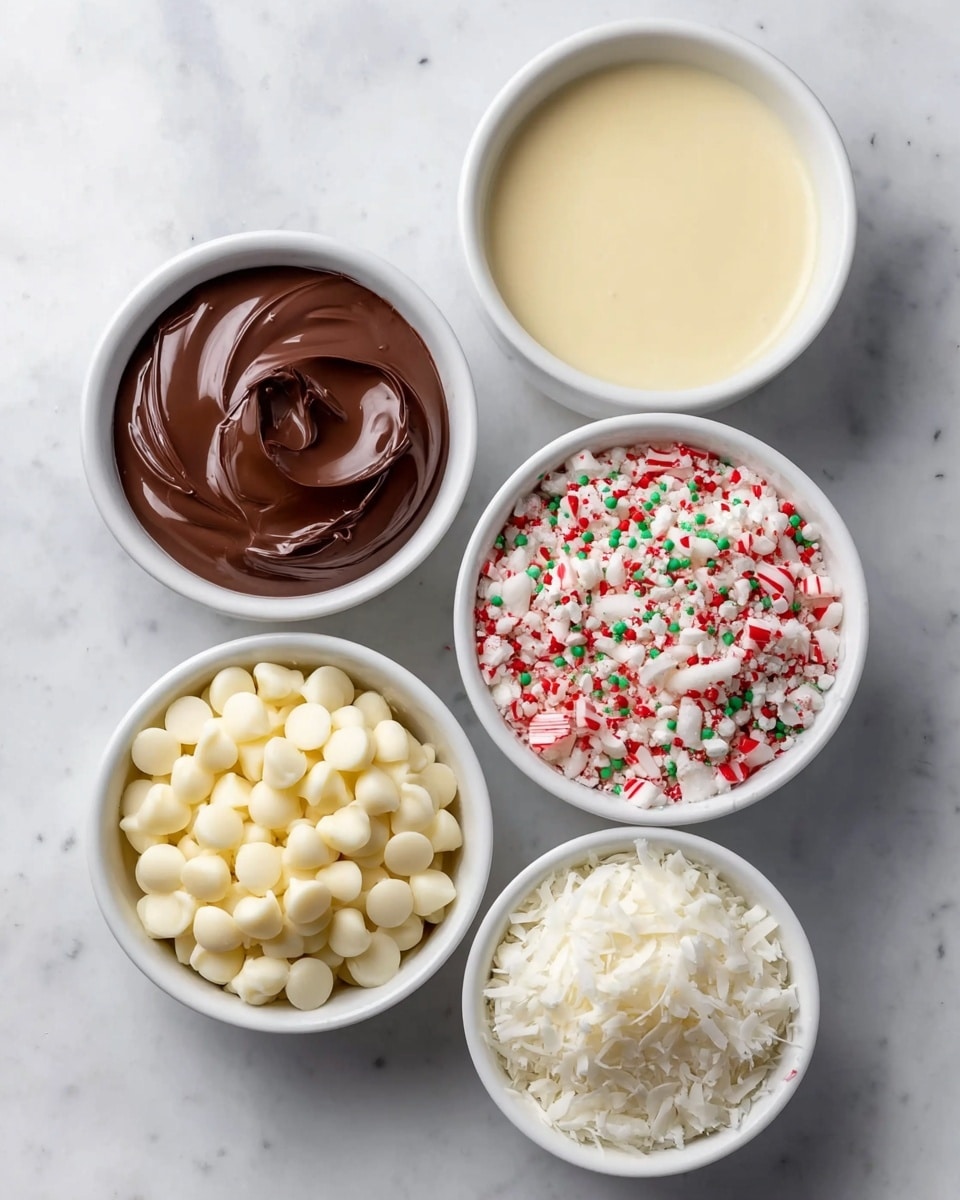
- Semi-sweet melting chocolates: Choose good-quality chips or wafers—they melt evenly and have that classic chocolate flavor everyone loves.
- White chocolate melting wafers: These give a creamy contrast and are easy to drizzle or coat candy with without seizing up.
- White non-pareil sprinkles: Adds a delicate crunch and a snowy look that’s perfect for Christmas vibes.
- Red, green, and white non-pareil sprinkles: These bring in the festive colors that make your candy stand out and feel extra special.
- Crushed candy canes: Don’t skip these—they add just the right peppermint zing and a satisfying crunch that screams holiday.
Variations
I love how versatile this recipe is. Depending on your mood or what you’ve got in the pantry, you can easily tweak it to suit your taste—making it either more decadent or a bit healthier. Don’t hesitate to play around with different toppings or chocolate blends!
- Dark Chocolate Swap: I sometimes swap the semi-sweet with 70% dark chocolate for a richer, more intense flavor which pairs beautifully with the peppermint.
- Nutty Touch: Adding chopped toasted almonds or pecans gives a lovely texture contrast and nutty flavor—great if you want something a little heartier.
- Vegan Version: I’ve used dairy-free melting chocolate to make a vegan-friendly batch, and it worked perfectly without losing that creamy mouthfeel.
- Spiced Candy Canes: Using cinnamon or ginger-flavored crushed candy canes adds a warm spice twist that enhances the festive feel.
How to Make Festive Chocolate Christmas Candy Recipe
Step 1: Melt Your Chocolates Gently
Start by melting the semi-sweet and white chocolate wafers separately because they have different melting points. I like to do this in a microwave-safe bowl, heating in 30-second intervals and stirring in between to avoid overheating. Alternatively, a double boiler works beautifully if you want to stay extra cautious. You want the chocolate silky and smooth, not grainy or burnt—that’s the secret to a great final texture.
Step 2: Pour and Spread the Base Chocolate Layer
Once melted, pour the semi-sweet chocolate onto a parchment-lined baking sheet or silicone mat, spreading it evenly into about 1/4-inch thick layer. Don’t worry about getting it perfectly smooth—the irregular edges are part of the charm and will break apart easily once set. This base will be the main canvas for your festive decorations!
Step 3: Drizzle White Chocolate and Add Decorations
Using a spoon or a piping bag, drizzle the melted white chocolate over the dark chocolate base in any pattern you like—zigzags, swirls, or even little dots. While the chocolate is still warm, sprinkle your white and colorful non-pareil sprinkles generously, then add the crushed candy canes on top. This step is where the Festive Chocolate Christmas Candy Recipe really shines, because you get to be creative and make it look extra merry.
Step 4: Let It Set Completely
Pop the tray into the refrigerator for at least 30 minutes to firm up. It’s tempting to dig in early, but this patience pays off when you break the candy into perfect pieces that hold their shape without melting all over your fingers.
How to Serve Festive Chocolate Christmas Candy Recipe
Garnishes
I often add an extra sprinkle of crushed candy canes or a few whole mini candy canes alongside the candy pieces for an added festive touch. Sometimes, a gentle dusting of powdered sugar feels like tucking it into a fresh snow blanket—such a simple way to make your presentation pop.
Side Dishes
These chocolate candies pair wonderfully with a warm cup of mulled wine or spiced hot chocolate, making your holiday dessert table both cozy and indulgent. I also like to serve them with a cheese platter—something about salty cheese and sweet chocolate is irresistible!
Creative Ways to Present
For gifting, I like to arrange the decorated chocolate pieces in a festive tin or clear cellophane bags tied with ribbons. They make perfect stocking stuffers or party favors. If serving at a party, arrange the candy shards on a decorative wooden board with sprigs of fresh rosemary or pine branches for that extra Christmas charm.
Make Ahead and Storage
Storing Leftovers
I usually keep any leftover candy in an airtight container at room temperature if my house isn’t too warm—chocolate loves a cool, dry spot. If it’s humid or warm, the fridge is better to prevent melting. Just bring them to room temperature before enjoying again to avoid that waxy feel.
Freezing
I’ve frozen this candy a few times with great success. Just layer the pieces between parchment paper in a freezer-safe container and thaw in the fridge overnight before serving. The texture stays surprisingly fresh, and it’s a great way to prep far ahead of the holiday rush.
Reheating
You typically don’t need to reheat this candy, but if the chocolate gets too firm, just leave it at room temperature for a bit. Avoid microwaving since it can cause the chocolate to bloom or turn grainy. Patience here is key to enjoying the candy just right.
FAQs
-
Can I use regular chocolate chips instead of melting wafers for the Festive Chocolate Christmas Candy Recipe?
You can, but melting wafers are designed to melt smoothly without seizing, making them ideal for candy-making. Regular chocolate chips might not melt as evenly due to stabilizers and could result in grainy or clumpy chocolate. If you only have chips, melt them slowly over low heat and stir constantly to reduce the risk.
-
How do I prevent the white chocolate from seizing when melting?
White chocolate is sensitive to heat and moisture. The best way to prevent seizing is to melt it in short bursts in the microwave, stirring frequently. Avoid any water contact in your bowls or utensils. Using melting wafers specifically formulated for candy-making also helps as they melt more reliably than regular white chocolate bars.
-
Can I make the Festive Chocolate Christmas Candy Recipe ahead of time?
Absolutely! This candy stores well in an airtight container for up to two weeks at room temperature or longer in the fridge or freezer. Making it ahead saves you stress during the busy holidays and allows the flavors to meld even better.
-
What’s the best way to crush candy canes for this recipe?
I usually put the candy canes into a sealed plastic bag and gently smash with a rolling pin or heavy pan. Breaking them into small, uneven pieces adds great texture and visual appeal. Just be cautious to avoid fine powder, which can get messy and overpower the chocolate.
-
Can I add other toppings besides sprinkles and candy canes?
Definitely! You can try crushed nuts, dried cranberries, mini marshmallows, or even edible glitter for extra sparkle. The Festive Chocolate Christmas Candy Recipe is very flexible, so feel free to get creative and make it your own.
Final Thoughts
This Festive Chocolate Christmas Candy Recipe has become a cherished tradition for me, and I love sharing it with friends every holiday season. It’s one of those recipes that feels fancy but is truly simple—and that’s why I keep coming back. I hope you enjoy making and gifting this sweet treat as much as I do. So grab your chocolates, get creative with those sprinkles, and make your holidays a little sweeter!
PrintFestive Chocolate Christmas Candy Recipe

This festive Chocolate Christmas Candy recipe features two luscious chocolate bases—semi-sweet and white chocolate melting wafers—perfect for holiday celebrations. Topped with vibrant red, green, and white non-pareil sprinkles and crushed candy canes, these homemade treats deliver a delightful crunch and sweet peppermint flavor that embodies the Christmas spirit.
- Prep Time: 10 minutes
- Cook Time: 5 minutes
- Total Time: 1 hour 15 minutes
- Yield: Approximately 30–40 pieces depending on size 1x
- Category: Dessert
- Method: No-Cook
- Cuisine: American
- Diet: Vegetarian
Ingredients
Chocolate Bases
- 2 cups semi-sweet melting chocolates
- 2 cups white chocolate melting wafers
Decorations
- ½ cup white non-pareil sprinkles
- ½ cup red, green, and white non-pareil sprinkles
- ½ cup crushed candy canes
Instructions
- Prepare the Melting Chocolate: In two separate microwave-safe bowls, place 2 cups of semi-sweet melting chocolates in one and 2 cups of white chocolate melting wafers in the other. Microwave each bowl separately on medium power in 30-second increments, stirring well between each, until fully melted and smooth.
- Spread the Chocolate Bases: Line a baking sheet with parchment paper or a silicone mat. Pour and spread the melted semi-sweet chocolate evenly into one section of the prepared sheet to a thickness of about ¼ inch. Repeat with the melted white chocolate in another section, maintaining the same thickness.
- Add Decorations: Immediately sprinkle the white non-pareil sprinkles over the semi-sweet chocolate while it is still wet. For the white chocolate, generously sprinkle the red, green, and white non-pareil sprinkles as well as the crushed candy canes to create the festive look and add flavor.
- Set the Chocolate: Allow the spread, decorated chocolates to rest at room temperature until completely hardened, approximately 1 to 2 hours. For faster setting, place the baking sheet in the refrigerator for about 30 minutes.
- Break Into Pieces: Once fully set, gently break or cut the chocolates into bite-sized pieces or desired shapes. Store the chocolate candies in an airtight container in a cool place until ready to serve.
Notes
- Use high-quality melting chocolates for the best texture and flavor.
- Ensure the chocolate is not overheated during melting, as it can seize and become grainy.
- Working quickly when adding sprinkles helps them stick well before the chocolate hardens.
- Store the finished candy in a cool, dry place to prevent melting or blooming.
- Customize decorations according to your holiday theme or preferences.
Keywords: Christmas candy, chocolate candy recipe, holiday treats, festive chocolate, peppermint candy, semi-sweet chocolate, white chocolate, holiday sweets