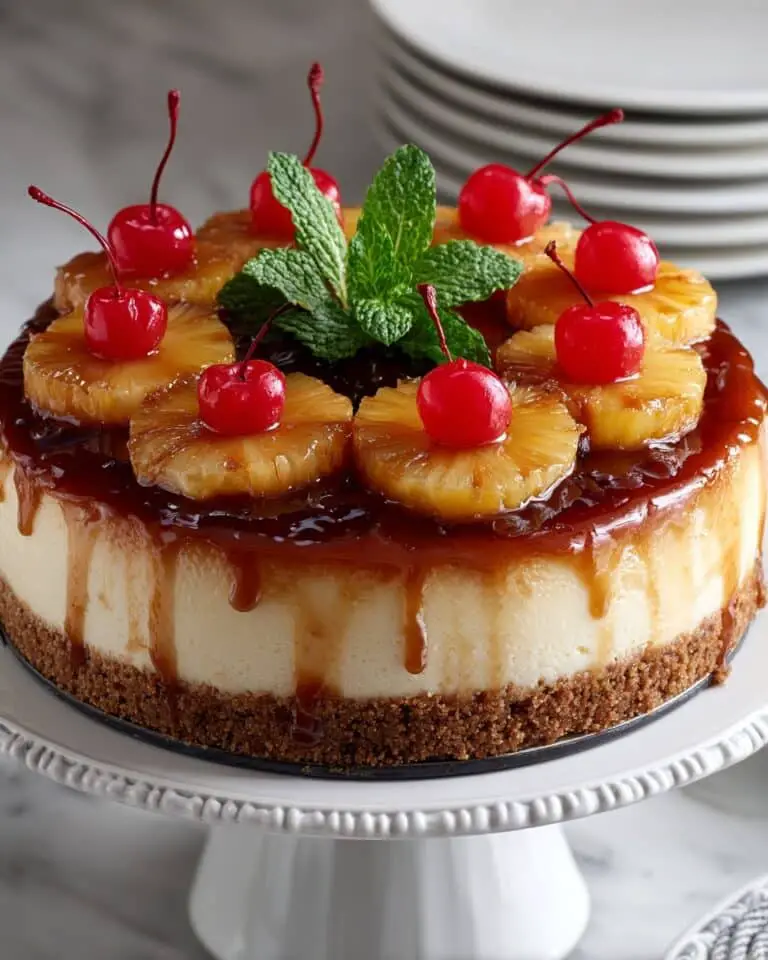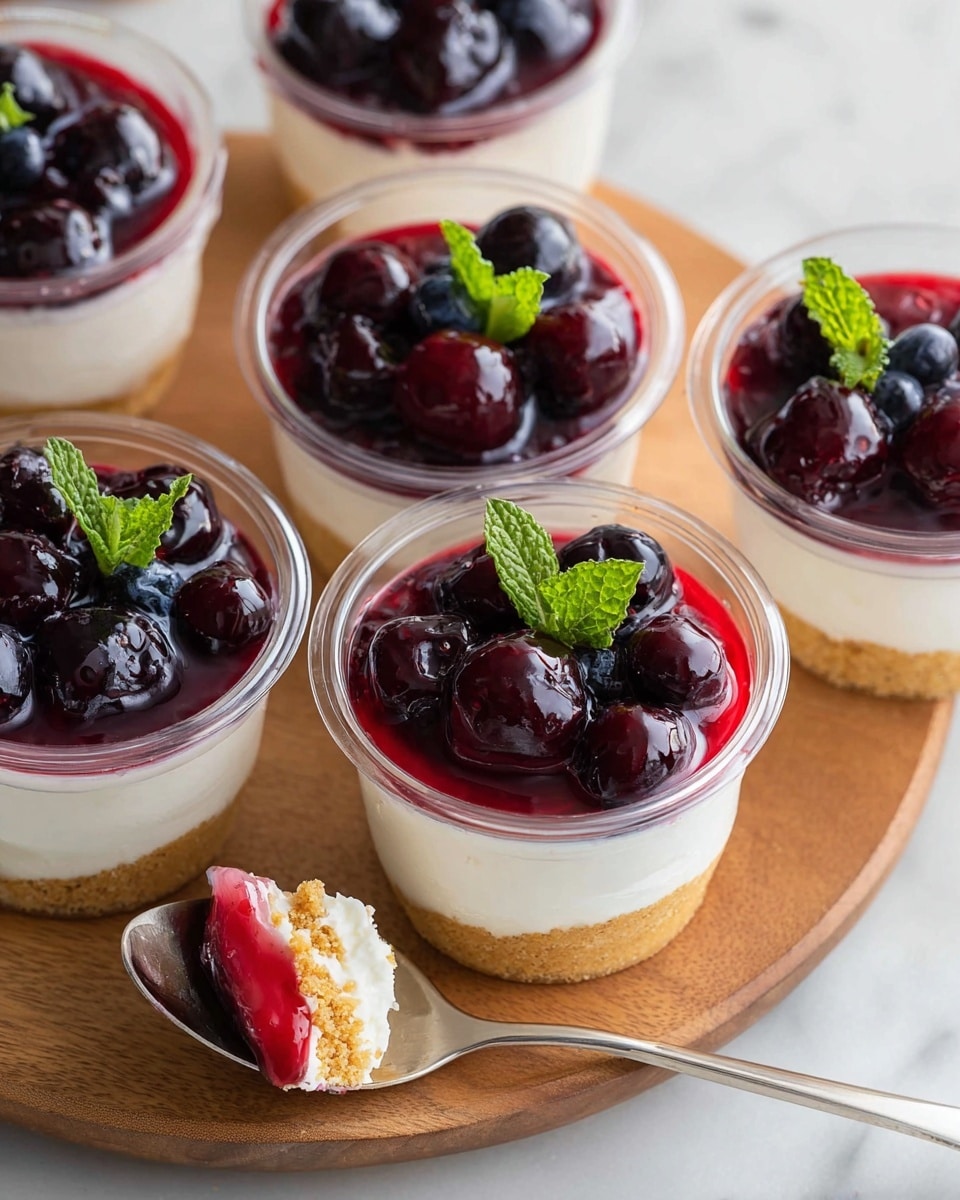
Easy Cheesecake Cups Recipe
If you’re craving a dessert that feels fancy but comes together in a snap, this Easy Cheesecake Cups Recipe is going to be your new go-to. I love it because it’s the perfect balance of creamy cheesecake goodness layered over a simple graham cracker crust, all served up in adorable little cups—no slicing, no mess. Whether you’re whipping these up for a casual weeknight treat or a last-minute gathering, they always impress without making you feel like you spent hours in the kitchen.
What makes this Easy Cheesecake Cups Recipe truly special is how effortlessly it blends smooth cream cheese with fluffy whipped cream, giving you that rich cheesecake flavor without baking. Plus, you get to customize toppings to match your mood (or whatever’s lurking in your fridge!). I promise, once you try these, you’ll find yourself keeping the ingredients on hand for whenever that sweet tooth strikes.
Ingredients You’ll Need
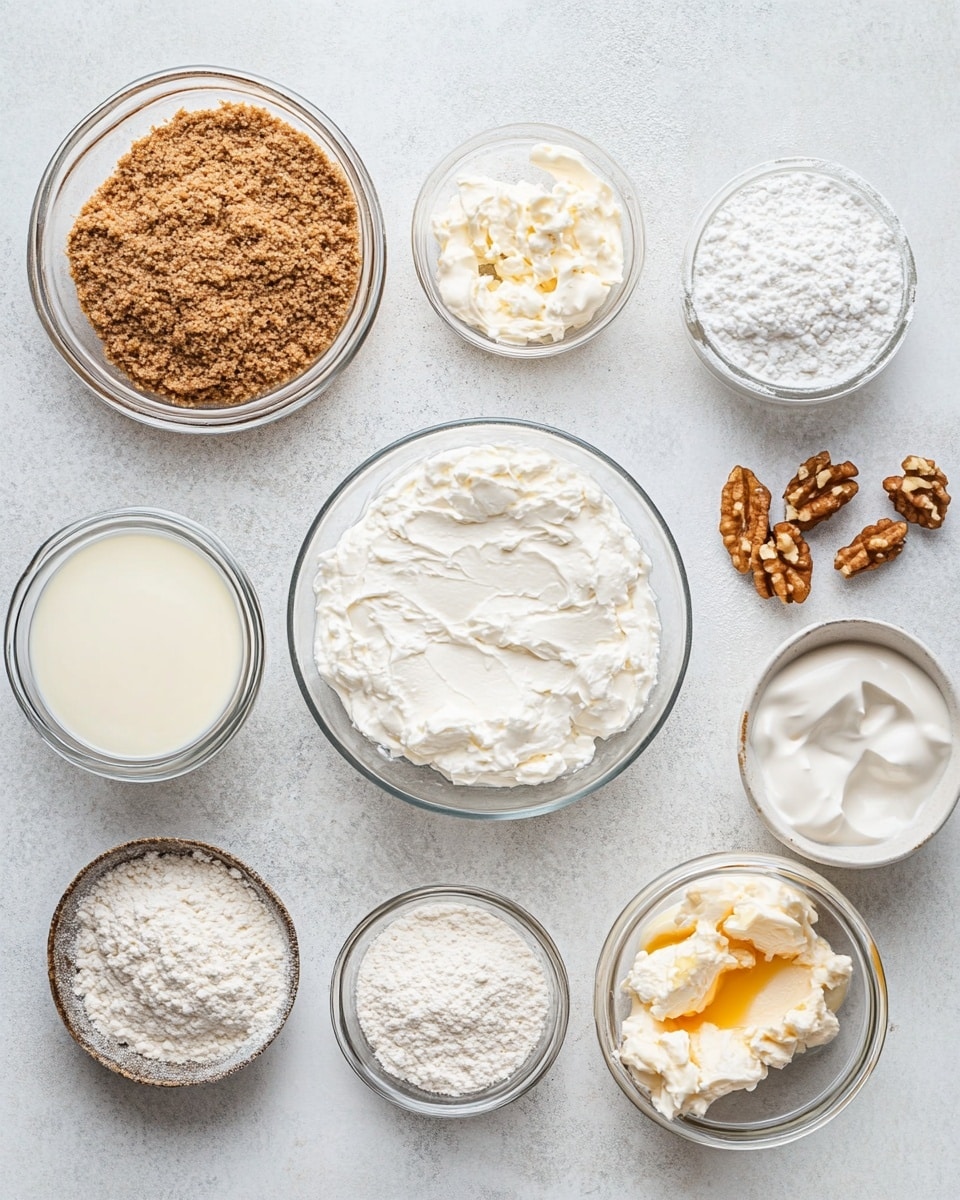
The magic of this recipe lies in its simplicity. Each ingredient plays a role in creating that velvety, lightly sweet cheesecake filling paired with a crunchy, buttery base. Here are the essentials you’ll want to gather before diving in:
- Graham cracker crumbs: These make for the classic, slightly sweet crust that contrasts perfectly with the creamy filling. If you want extra crunch, toast them lightly before using.
- Cream cheese: Full-fat is key here for that rich, smooth texture. Make sure it’s at room temperature for easy mixing and no lumps.
- Heavy whipping cream: This adds the fluffy, airy lightness to the cheesecake filling. Chilling your mixing bowl before whipping really helps get those perfect stiff peaks.
- Powdered sugar: I split it between the cream cheese and the whipped cream to ensure gentle sweetness that doesn’t overpower.
- Fresh lemon juice: Adds a subtle zing that brightens the flavors, balancing out the richness beautifully.
- Vanilla extract: A must for that warm, comforting background note that makes everything taste like dessert perfection.
Variations
I’m all for making recipes your own, and this Easy Cheesecake Cups Recipe is no exception. Over time, I’ve played around with flavors and crusts that suit my cravings and what I have on hand. Feel free to get creative and put your personal spin on these delightful cups!
- Crust swaps: Instead of graham crackers, I sometimes use crushed Oreos or gingersnaps for a richer, spicier twist. Whole cookies at the bottom work wonders too and cut down on prep time.
- Toppings: Fresh berries are my go-to for freshness but don’t underestimate a drizzle of chocolate ganache or a dollop of tangy lemon curd. If I’m feeling nostalgic, crushed candy bars add an irresistible crunch.
- Diet-friendly: For a lighter version, I’ve tried substituting part of the cream cheese with Greek yogurt, which worked surprisingly well and gave it a touch of tang.
How to Make Easy Cheesecake Cups Recipe
Step 1: Prep Your Cups with Crust
The amount of crust depends on your cup size, so take a moment to size up your containers. For large 9-ounce cups, I dollop about 2 tablespoons of graham cracker crumbs into each—perfect for that satisfying crunch at the bottom. Smaller cups get about a tablespoon each. Press them slightly to form a base but don’t compact too much; you want some texture still.
Step 2: Beat the Cream Cheese and Sugar
Using an electric mixer, whip your room-temp cream cheese with 1 cup of powdered sugar until it’s completely smooth and creamy. This usually takes about 1-2 minutes. No lumps here—if you get some stubborn bits, just scrape down the sides and keep mixing. Think of this as your cheesecake’s rich base.
Step 3: Whip the Cream to Stiff Peaks
This step is crucial for that airy texture. I always chill my mixing bowl and beaters in the freezer for 15 minutes beforehand—that little trick makes whip cream come together in record time. Once chilled, add the heavy whipping cream, remaining ½ cup powdered sugar, fresh lemon juice, and vanilla extract. Beat on medium-high until stiff peaks form, about 4-5 minutes. You’ll know it’s ready when the cream stands tall and holds its shape.
Step 4: Gently Fold and Combine
Now for the fun part—folding the cream cheese mixture into the whipped cream. Combine them on a low mixer speed or gently fold by hand if you want to keep it extra fluffy. This should only take a minute or two until there’s no visible separation between the two. Be careful not to overmix—you want to keep as much airiness as possible.
Step 5: Pipe the Filling into Cups
Transfer your creamy filling into a piping bag or a ziplock bag with a corner snipped off—it makes filling the cups so much neater and faster. Fill each cup about ¾ of the way to leave room for toppings. At this point, it’s already tempting enough to dig into, but resist!
Step 6: Chill and Set
Pop your cheesecake cups in the fridge for at least 1 to 2 hours so they can firm up slightly and the flavors can meld. If you’re prepping in advance, covering the cups with plastic wrap keeps them fresh overnight. I’ve made these the day before parties, which really streamlines the dessert game.
Step 7: Add Toppings and Enjoy!
Once chilled, it’s time to get creative. Spoon on cherry pie filling, sprinkle crushed Oreos, add fresh berries, or drizzle chocolate ganache—whatever suits your fancy. Each topping brings a new layer of flavor, so don’t shy away from mixing it up!
How to Serve Easy Cheesecake Cups Recipe
Garnishes
I’m a huge fan of fresh fruit garnishes—raspberries and blueberries pop beautifully on these creamy cups. For a rich finish, a little chocolate shaving or a sprinkle of crushed candy bars really elevates the experience. Mint leaves add a fresh, unexpected touch that impresses guests every time.
Side Dishes
These cheesecake cups work wonderfully as a standalone dessert, but if I’m serving a meal, I like pairing them with light sides like lemon sorbet or a fresh fruit salad. It balances the richness and keeps the dessert feeling fresh and summery.
Creative Ways to Present
For special occasions, I’ve arranged these cups on tiered dessert stands for a charming presentation. Another fun trick is layering different pie fillings or fruit purees in the cups before piping the cheesecake filling for a colorful surprise. Mini edible flowers also make a stunning garnish if you really want to wow your guests.
Make Ahead and Storage
Storing Leftovers
I store leftover cheesecake cups in airtight containers in the fridge, which keeps them fresh for up to 3 days. I always cover them individually with plastic wrap to prevent drying out or absorbing fridge odors. They taste just as delicious the next day, which is perfect for satisfying late-night cravings.
Freezing
Freezing cheesecake cups is a bit tricky since the whipped cream can change texture, but I’ve had decent results freezing them without toppings. I recommend freezing before adding fruit or ganache, then thawing overnight in the fridge. When thawed, the texture is softer but still enjoyable—perfect if you want to prep way ahead.
Reheating
Because these are no-bake and served chilled, reheating isn’t necessary. Just pop them in the fridge to thaw or freshen up the toppings before serving. If you prefer a softer texture, let them sit out for 10-15 minutes at room temperature, but don’t let them get too warm or they’ll lose that lovely firmness.
FAQs
-
Can I use low-fat cream cheese in this Easy Cheesecake Cups Recipe?
You can, but keep in mind the texture and richness might be a bit different. Full-fat cream cheese helps achieve that creamy, luscious consistency that low-fat versions struggle to replicate. If using low-fat, you might notice a slightly less creamy filling.
-
Do I have to chill the mixing bowl to whip the cream?
While not mandatory, chilling the bowl and beaters really speeds up whipping and helps your cream reach perfect stiff peaks faster. It’s a simple trick I always use to get consistent fluffy results without the cream turning grainy.
-
How long can I keep these cheesecake cups in the refrigerator?
They store well covered in the fridge for up to 3 days. Beyond that, the crust can get soggy and the whipped cream texture may start to break down. For best taste and texture, enjoy within this window.
-
Can I make these cheesecake cups vegan or dairy-free?
This recipe relies heavily on dairy for creaminess, but you could experiment with vegan cream cheese alternatives and coconut whipping cream. I’d recommend testing small batches first, as texture might vary significantly.
-
What are some fun topping ideas for Easy Cheesecake Cups Recipe?
Endless options! Fresh fruit like strawberries or blueberries, pie fillings (cherry, blueberry), chocolate ganache, crushed cookies or candy bars, lemon curd, or even a sprinkle of toasted coconut all work beautifully. Choosing toppings based on the season can also keep the dessert feeling fresh and exciting.
Final Thoughts
Honestly, this Easy Cheesecake Cups Recipe holds a special place in my kitchen because it’s so reliably delicious and foolproof, perfect for both newbie bakers and seasoned pros in a hurry. I love how it feels indulgent but isn’t intimidating, and it always gets compliments no matter the occasion. Give it a try—you might just find yourself reaching for these tiny cups of joy whenever life calls for a sweet boost.
PrintEasy Cheesecake Cups Recipe

These Easy Cheese Cake Cups are a delightful no-bake dessert featuring a creamy, smooth cheesecake filling over a crunchy graham cracker crust, perfect for individual servings and quick preparation. With a light lemon and vanilla flavor, they are customizable with a variety of toppings.
- Prep Time: 15 minutes
- Cook Time: 0 minutes
- Total Time: 1 hour 15 minutes
- Yield: 8 servings 1x
- Category: Dessert
- Method: No-Cook
- Cuisine: American
Ingredients
Crust
- 2 tablespoons graham cracker crumbs per 9 oz cup (for 8 cups)
- Or 1 tablespoon graham cracker crumbs per 4-6 oz cup (for 12–16 cups)
Filling
- 16 oz full fat cream cheese (2 x 8 oz packages), room temperature
- 2 cups (473 ml) heavy whipping cream (1 pint)
- 1 ½ cups (169 g) powdered sugar, divided into 1 cup and ½ cup
- 1 tablespoon fresh lemon juice
- 2 teaspoons vanilla extract
Instructions
- Prepare Cups and Crust: Choose your cup size, either 9 oz or smaller 4-6 oz cups. Place 2 tablespoons graham cracker crumbs in the bottom of each 9 oz cup or 1 tablespoon in the smaller cups to form the crust.
- Chill Mixing Bowl: Put a metal or glass mixing bowl in the freezer for 15 minutes to ensure the whipping cream whips up nicely later.
- Beat Cream Cheese and Sugar: In a separate bowl, beat the room temperature cream cheese with 1 cup powdered sugar using an electric mixer for 1-2 minutes until smooth and creamy.
- Whip Cream Mixture: Remove the chilled mixing bowl from the freezer. Add heavy whipping cream, ½ cup powdered sugar, fresh lemon juice, and vanilla extract. Beat on high with an electric mixer until stiff peaks form, about 4-5 minutes.
- Combine Mixtures: Gently fold the cream cheese mixture into the whipped cream on low speed for 1-2 minutes, until fully incorporated and creamy.
- Fill the Cups: Transfer the cheesecake filling into a piping bag or ziplock bag with a corner cut off. Pipe the filling into each cup, filling about ¾ full.
- Refrigerate: Chill the cheesecake cups in the refrigerator for 1-2 hours. For extended storage, cover the cups with plastic wrap and refrigerate overnight if desired.
- Add Toppings: Before serving, top each cheesecake cup with your choice of toppings such as cherry pie filling, blueberry pie filling, homemade strawberry sauce, chocolate ganache, Oreo crumbs, or chopped candies.
Notes
- Crust variations: Substitute graham cracker crumbs with a whole Nilla wafer, whole Oreo, whole gingersnap cookie, or crushed versions of these cookies.
- Topping variations: Use fresh fruit, raspberry puree, pie filling, lemon curd, sautéed apples, chocolate shavings, crushed candy bars, or mint chips to enhance flavor and presentation.
Keywords: cheesecake cups, easy cheesecake, no bake cheesecake, individual desserts, graham cracker crust, creamy cheesecake filling, party desserts