Copycat Andes Mints Recipe
If you’ve ever found yourself daydreaming about those smooth, minty chocolates from Andes, then this Copycat Andes Mints Recipe is exactly what you need. I stumbled upon this recipe during a holiday baking marathon, and honestly, nothing beats having a batch of these goodies at home whenever a mint chocolate craving strikes. The perfect harmony of dark chocolate, cooling peppermint, and a hint of white chocolate makes each bite feel like a little celebration.
I especially love serving these around the holidays or as a simple homemade gift because they look so pretty and taste just like the originals—maybe even better! Plus, once you master this Copycat Andes Mints Recipe, you’ll feel a little like a chocolate alchemist, transforming basic ingredients into something special. Trust me, you’re going to enjoy the process as much as the results!
Ingredients You’ll Need
The beauty of this Copycat Andes Mints Recipe is in its simplicity. Each ingredient plays a critical role to get that classic mint-chocolate flavor and smooth texture, so be sure to pick good quality chocolate chips and pure peppermint extract for the best results.
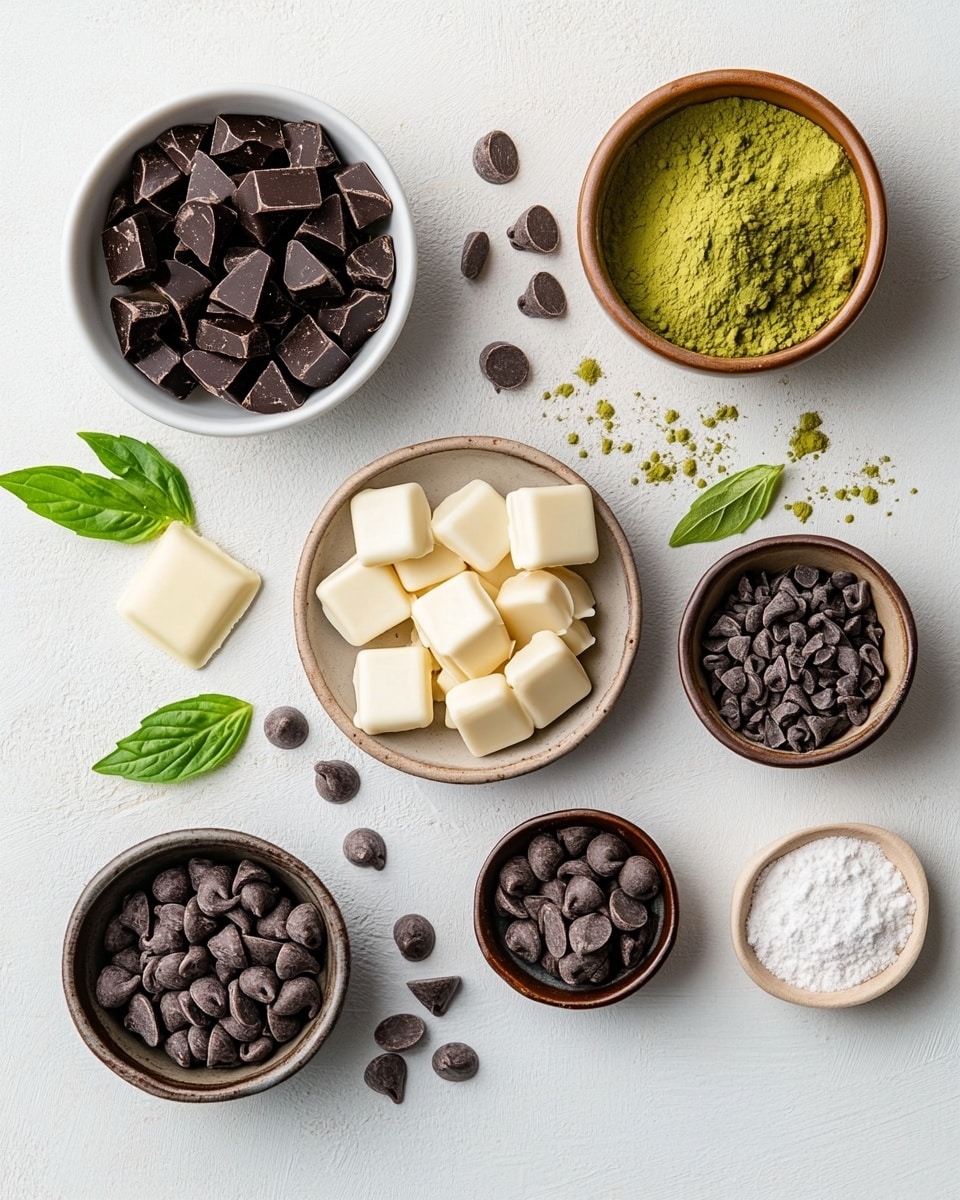
- Dark chocolate chips: Use a rich, smooth variety—about 11 ounces. I find that the darker, the better for that deep chocolate base.
- White chocolate chips: You’ll only need about half of an 11-ounce bag. The white chocolate adds that creamy, minty middle layer.
- Peppermint extract: Just a teaspoon packs a punch. Be careful with quantity here—too much can overpower the chocolate.
- Green gel food coloring: For that signature Andes mint color without altering the taste or texture. Gel color blends nicely without thinning the white chocolate.
Variations
I like to switch things up sometimes depending on mood or occasion. The great thing about this Copycat Andes Mints Recipe is how customizable it can be without losing that iconic flavor.
- Dairy-free Variation: I’ve tried using dairy-free chocolate chips and coconut-based white chocolate for friends with allergies—and it still turns out deliciously minty.
- Less Sweet Version: If you’re watching your sugar intake, try cutting back slightly on the white chocolate or use dark chocolate with a higher cocoa percentage.
- Mint Intensity: If you love a stronger mint flavor, add an extra ½ teaspoon of peppermint extract, but do this gradually so you don’t lose the balance.
- Holiday Twist: Swapping the green food coloring for red or even gold can align these treats to different celebrations while keeping their classic charm.
How to Make Copycat Andes Mints Recipe
Step 1: Melt the Dark Chocolate
Start by gently melting those dark chocolate chips. I prefer using a double boiler to avoid burning the chocolate, but a microwave on 20-second intervals with stirring between works fine too. Aim for a silky, smooth texture—this will be the base of your mints, so patience here pays off.
Step 2: Prepare the White Chocolate Mint Layer
While the dark chocolate cools slightly but is still pourable, melt half the white chocolate chips the same way. Once melted, stir in the peppermint extract and green gel food coloring a tiny bit at a time until you get that perfect minty shade. Taste a little to adjust the mint—remember, you want that gentle cooling sensation without it overwhelming the chocolate.
Step 3: Assemble the Layers
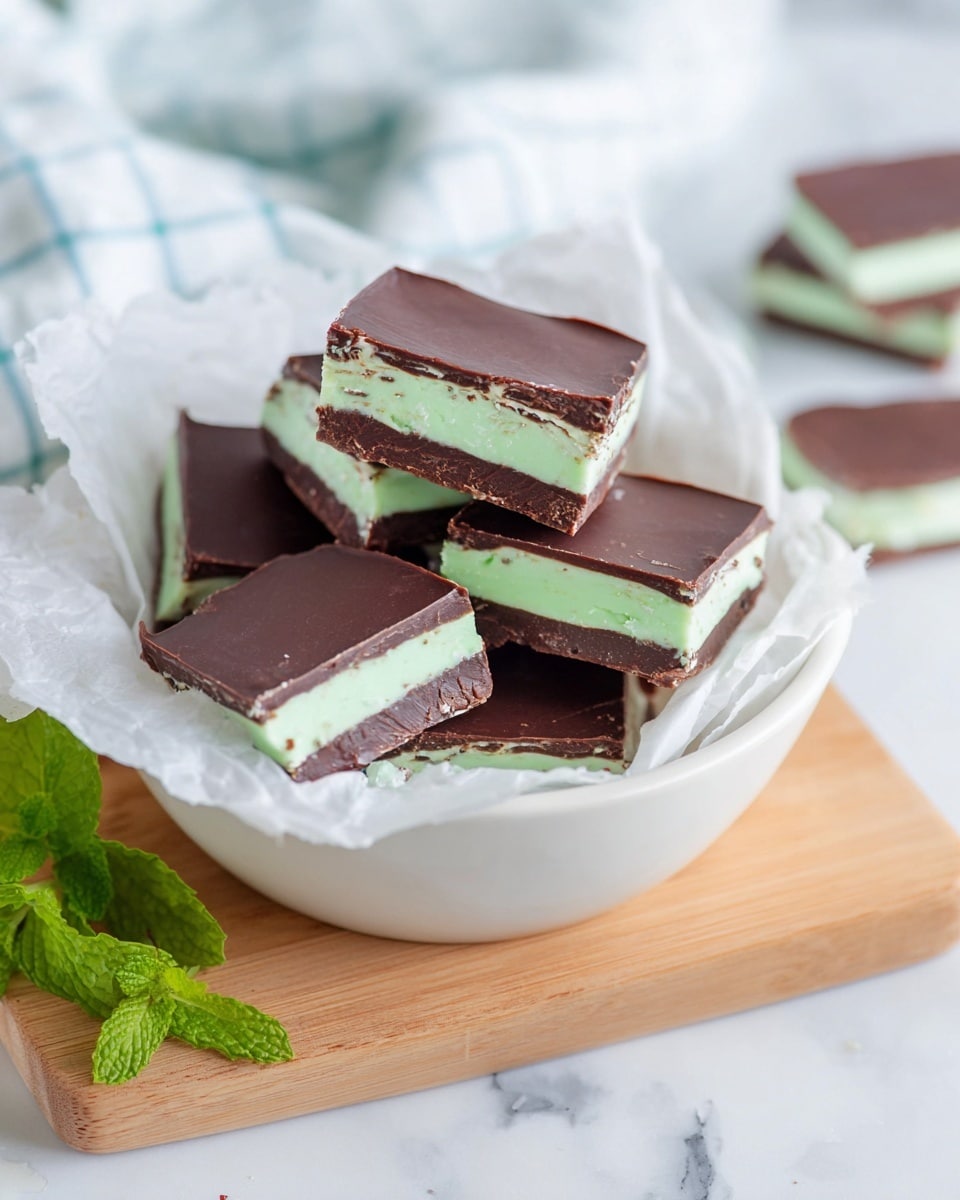
Line a baking pan or silicone mold with parchment paper. Pour in a layer of the dark chocolate and let it set just enough to be firm but still adhesive—this usually takes about 10 minutes in the fridge. Next, carefully spread the minty white chocolate layer over it. You want a neat layer but not too thin, about ¼ inch thick works well. Finish with another layer of dark chocolate on top. Chill everything for at least 1 hour to let it fully harden.
Step 4: Slice and Serve
Once firm, remove the block from the pan and use a sharp knife to cut into small rectangular pieces—just like the original Andes mints. I like to warm the knife slightly under hot water and wipe it dry between cuts to keep edges clean and smooth. Voilà! Your homemade mints are ready.
How to Serve Copycat Andes Mints Recipe
Garnishes
I typically serve these without extra garnishes because they’re so charming on their own. But sometimes, a tiny sprinkle of crushed candy canes on the white mint layer before the final chocolate layer sets adds a festive crunch and extra peppermint pop.
Side Dishes
Pair these mints alongside a hot cup of coffee or after-dinner tea. They’re a fantastic palate cleanser after rich meals, or even served alongside a slice of chocolate cake for an indulgent dessert plate.
Creative Ways to Present
For gift-giving or parties, I love bundling the mints in tiny clear bags tied with festive ribbons or arranging them neatly in a decorative tin. Another fun idea is placing them in mini cupcake liners for an elegant candy display at showers or holiday buffets.
Make Ahead and Storage
Storing Leftovers
Once you’ve made your batch, store leftovers in an airtight container at room temperature if it’s cool or in the fridge if your kitchen tends to be warm. They keep their perfect chewy texture for up to two weeks. I’ve also found placing parchment paper between layers in the container helps prevent sticking.
Freezing
If you want to stock up, these Copycat Andes Mints freeze beautifully. Wrap them tightly in plastic wrap and then a freezer bag. When I thaw them in the fridge overnight, they maintain their chewy texture and fresh taste without condensation issues.
Reheating
Since these are meant to be enjoyed chilled or at room temp, reheating isn’t typically necessary. But if you prefer slightly softer mints, leaving them out at room temperature for 10-15 minutes works perfectly. Just avoid direct heat because it can melt the layers unevenly.
FAQs
-
Can I substitute the peppermint extract with fresh mint?
Fresh mint leaves won’t provide the concentrated flavor peppermint extract brings. If you want a natural twist, you can steep fresh mint in melted white chocolate and strain before using, but expect a milder mint taste compared to extract.
-
Why does my white chocolate sometimes seize when melting?
White chocolate is sensitive to temperature and moisture. Melt it slowly over low heat or in short microwave bursts, stirring frequently. Avoid water contact, as even a drop can cause it to seize and become grainy.
-
Can I make these mints vegan?
Yes! Use vegan dark and white chocolate alternatives made from plant-based ingredients. Make sure the peppermint extract is vegan-friendly. The texture might be a bit different, but the flavor is still fantastic.
-
How do I get those perfectly smooth layers like store-bought Andes mints?
Patience and gentle spreading are key. Pour and chill each layer slightly before adding the next to prevent mixing. Using a silicone mold also helps create neat edges and uniform thickness.
-
Is green gel food coloring safe to use in white chocolate?
Absolutely! Gel food coloring is concentrated and won’t thin your white chocolate like liquid dyes might, preserving the texture and ensuring vibrant color without affecting taste.
Final Thoughts
This Copycat Andes Mints Recipe has become one of my go-to sweet treats whenever I want that classic combination of chocolate and peppermint without leaving the house. It’s surprisingly simple but feels so indulgent—and that little burst of green is just the cherry on top. I promise once you try these, you’ll find yourself making them again and again. Give it a go, and I’d love to hear how your version turns out. Happy mint making!
PrintCopycat Andes Mints Recipe

This Copycat Andes Mints recipe recreates the iconic layered chocolate mint candy at home. Featuring a rich, smooth dark chocolate base, a refreshing peppermint-flavored green mint layer, and a delicate white chocolate top, this treat is perfect for satisfying your mint-chocolate cravings. Easy to make with just a few ingredients, these homemade Andes Mints provide a luxurious, melt-in-your-mouth experience.
- Prep Time: 15 minutes
- Cook Time: 10 minutes
- Total Time: 1 hour 15 minutes
- Yield: About 30 pieces 1x
- Category: Candy
- Method: No-Cook
- Cuisine: American
- Diet: Vegetarian
Ingredients
Chocolate Layers
- 11 ounces dark chocolate chips
- 5.5 ounces white chocolate chips (half a 11-ounce bag)
Mint Layer
- 1 teaspoon peppermint extract
- Green gel food coloring (a few drops to desired color)
Instructions
- Prepare dark chocolate layer: Melt the 11 ounces of dark chocolate chips gently over a double boiler or in short bursts in the microwave, stirring frequently until smooth. Pour and spread evenly into a parchment-lined baking dish to create the bottom layer. Place in the refrigerator until set, about 15-20 minutes.
- Prepare mint filling: In a mixing bowl, melt half the white chocolate chips (about 5.5 ounces) gently over a double boiler or microwave. Once melted, add 1 teaspoon peppermint extract and several drops of green gel food coloring. Stir well to combine and achieve a smooth, even green mint layer.
- Add mint layer to chocolate base: Pour the green mint mixture evenly over the chilled dark chocolate layer. Return to the refrigerator to set completely, about 20-30 minutes.
- Top with white chocolate layer: Melt the remaining white chocolate chips until smooth. Pour over the set mint layer, spreading evenly. Chill until completely firm, approximately 30 minutes to 1 hour.
- Slice and serve: Once fully set, carefully lift out the layered chocolate from the baking dish using the parchment paper. Using a sharp knife, cut into small rectangles resembling classic Andes mints. Store in an airtight container in the refrigerator.
Notes
- Use high-quality chocolate for best flavor and texture.
- Gel food coloring is preferred for vibrant green color without diluting the mixture.
- Ensure each layer is fully set before adding the next to maintain clean, distinct layers.
- Store Andes Mints chilled to keep their shape and texture.
- You can adjust peppermint extract to taste, but avoid adding too much to prevent bitterness.
Keywords: copycat Andes mints, homemade Andes mints, chocolate mint candy, layered chocolate mint recipe