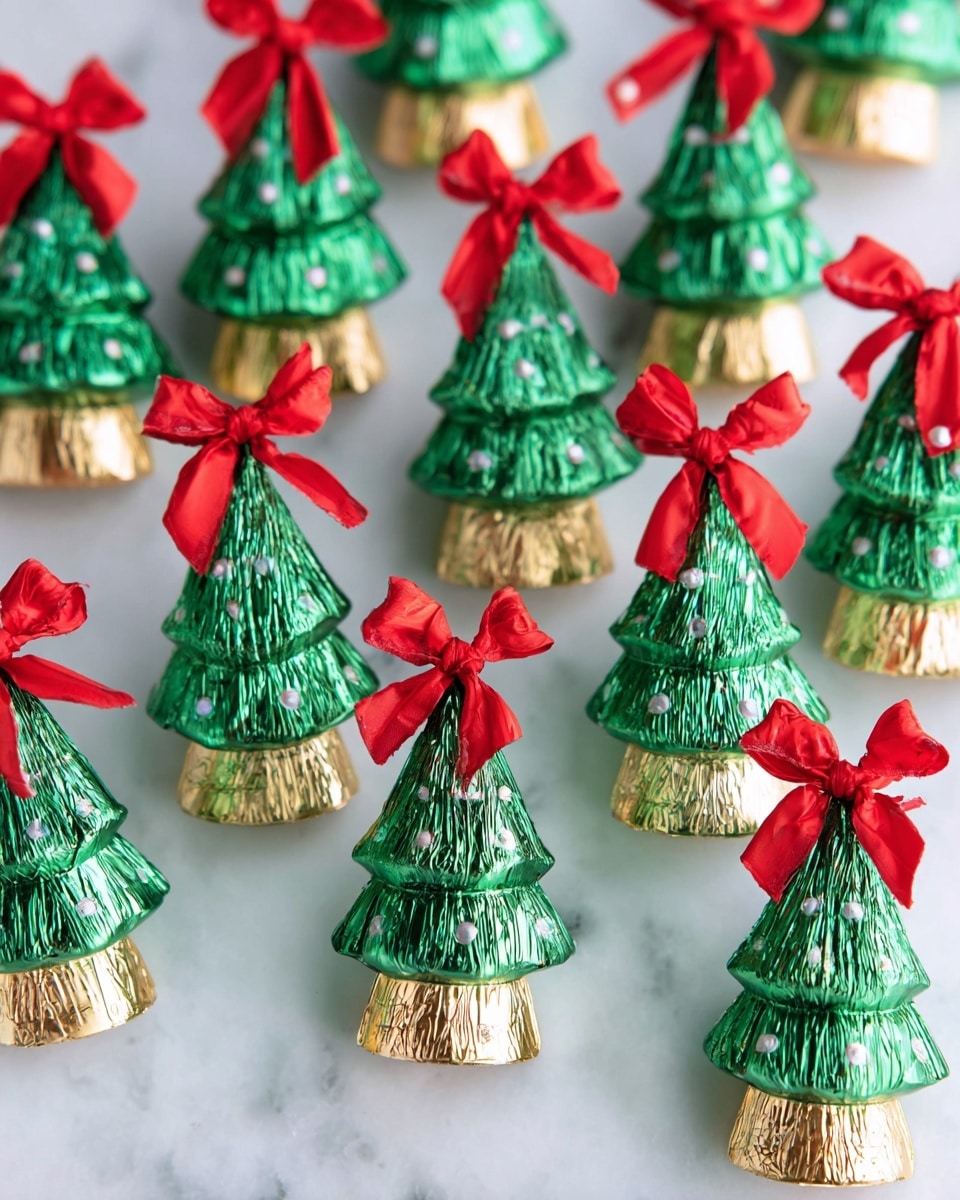
Candy Christmas Trees Recipe
There’s something truly magical about creating edible decorations that double as festive treats, and this Candy Christmas Trees Recipe is just that! Every year, I love making these little green candy trees as an easy and adorable addition to my holiday dessert table—plus, they’re a hit with kids and adults alike. What makes this recipe so special is its simplicity paired with a delightful mix of chocolate and caramel flavors encapsulated in perfectly stacked green candies.
If you’re wondering when to whip these up, I’d say anytime from early December through the holiday parties is perfect. They’re quick to assemble, need no baking, and add that wow factor with minimal effort. Trust me, once you make this Candy Christmas Trees Recipe, you’ll find yourself reaching for those mini Reese’s Cups and Rolos whenever Christmas rolls around!
Ingredients You’ll Need
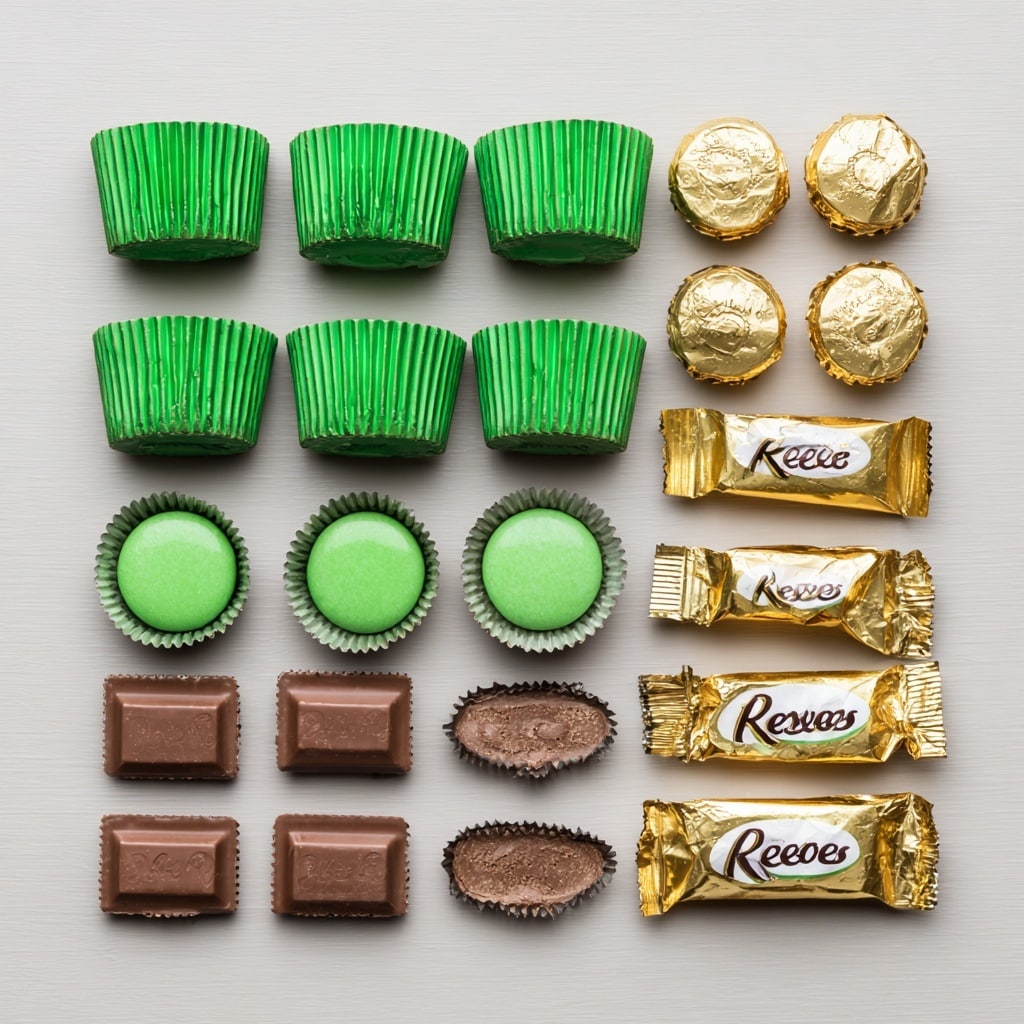
The beauty of this Candy Christmas Trees Recipe lies in its simple ingredients, which blend super well to create a festive look and a wonderful taste combo. Heads-up: snagging these candies in their individually wrapped form really helps keep the assembly neat and the colors festive!
- Green Individually Wrapped Mini Reese’s Cups: These form the base and body of your trees, adding that classic peanut butter-chocolate flavor with a vibrant green wrapper for the holiday vibe.
- Individually Wrapped Rolos in Gold Foil: Rolos bring that smooth caramel and chocolate combo; the gold foil adds a touch of elegance and mimics ornaments or gifts on the tree.
- Green Kisses: I love using these as the tree toppers—they’re perfect for mimicking the star on a Christmas tree and add a creamy touch to the overall flavor.
Variations
One of the best things about this Candy Christmas Trees Recipe is how easy it is to personalize it according to your tastes or dietary needs. I often tweak the candy choices or colors to match different themes or to accommodate friends who prefer something nut-free or vegan.
- Nut-Free Variation: Swap out the Reese’s Cups for green-wrapped Hershey’s Kisses or other nut-free chocolates; I did this once when I had guests with allergies, and no one missed the peanut butter.
- Red and Green Theme: Instead of all green, mix in some red Kisses or mini Santas for a more colorful tree effect—this always makes my holiday parties feel extra joyful.
- Mini Marshmallow “Snow” Tips: Sprinkle tiny marshmallows or edible glitter around the base of your trees for a snowy look; I love this for holiday school events.
How to Make Candy Christmas Trees Recipe
Step 1: Gather and Prepare Your Candies
Start by collecting all your candies on a clean surface. I like to unwrap the green Reese’s Cups and Rolos carefully without denting them because their wrappers add to the visual appeal. Make sure your green Kisses are ready to go as tree toppers. Keep some wax paper handy to assemble the candies without sticking them to your counter.
Step 2: Build the Base Layer with Mini Reese’s Cups
Take about five to six green mini Reese’s Cups and line them up in a triangular shape. This forms your tree base, so spacing matters here—it needs to be stable but close enough for good “tree” coverage. If your candies slide around, a dab of melted chocolate or frosting underneath them can act as glue.
Step 3: Add Rolos to Form the Middle Layers
Stack gold foil Rolos on top of the green Reese’s layer, shaping them so they mimic the tapering of a Christmas tree. I usually use four Rolos for this layer, balancing carefully so the structure stays steady. If you find the stack wobbly, securing each candy with a little bit of softened caramel or chocolate helps tremendously.
Step 4: Top It Off with a Green Kiss
The final step is the crowning moment—place a single green Kiss candy on the top point of the tree. This adds that finishing “star” effect, and honestly, it’s my favorite part because it just screams festive cheer. If your Kiss won’t stand upright easily, slightly warming the base helps it stick better.
How to Serve Candy Christmas Trees Recipe
Garnishes
I love sprinkling edible gold glitter or tiny silver sugar pearls around the candy trees to mimic ornaments and twinkling lights. You can also place crushed peppermint bits nearby for an extra pop of color and refreshing aroma. These small additions make your Candy Christmas Trees Recipe stand out as both treats and décor.
Side Dishes
These candy trees pair delightfully with simple holiday snacks like spiced nuts, mini gingerbread cookies, or even a creamy eggnog dip. I’ve found that having a variety of textures—from crunchy to creamy—keeps guests coming back for more. Plus, it rounds out your festive snack table nicely.
Creative Ways to Present
For holiday parties, I love arranging several Candy Christmas Trees upright on a decorated platter lined with faux snow or shredded coconut to imitate a snowy forest floor. Another fun idea is to place each tree in a mini cupcake liner for easy individual handling—this is a huge hit with kids! You can even tie a small ribbon around the base for gifting.
Make Ahead and Storage
Storing Leftovers
If you end up with any leftover Candy Christmas Trees (and sometimes I do because they’re too tempting to eat all at once), store them in an airtight container at room temperature. Keeping them out of direct sunlight helps preserve their color and prevents the chocolate from melting or blooming. I usually keep mine fresh for up to a week this way.
Freezing
Freezing works, but it’s a little tricky with wrapped candies. I’ve wrapped my trees tightly in plastic wrap and popped them in the freezer when I needed to prepare way ahead of time. When thawed gently, they hold shape, though the wrappers sometimes get a bit dull. It’s a decent option if you want to make them weeks in advance.
Reheating
Since this Candy Christmas Trees Recipe involves no baking, reheating isn’t much of a thing here. But if you want the chocolates a little melty for a different serving style, popping them in a warm oven (around 100°F) for a minute or two works—just keep a close eye to avoid melting. I usually enjoy them as-is for the perfect bite of crispness and chocolate.
FAQs
-
Can I use other candy types instead of Reese’s and Rolos in the Candy Christmas Trees Recipe?
Absolutely! The beauty of this recipe is how customizable it is. You can substitute Reese’s with any green-wrapped chocolates like Hershey’s Kisses or even green gummy candies for a twist. Rolos can be replaced with other caramel-filled or plain chocolates; just pick something similar in size to keep your tree stable.
-
How do I keep the candy trees from toppling?
Stability is key! To keep everything standing upright, try using a bit of melted chocolate or frosting between layers to “glue” the candies together. Also, assembling on a non-slip surface like wax paper helps, and make sure the candies are positioned close together without big gaps. Sometimes a toothpick inserted through the layers from bottom to top can provide extra support, but be sure to remove before eating.
-
Can I prepare these candy trees in advance?
Yes! You can make your Candy Christmas Trees Recipe a day or two ahead and store them in an airtight container at room temperature. Just avoid humid areas to prevent wrappers from peeling or chocolates melting. For longer storage, freezing is an option but consider the possible dulling of candy wrappers.
-
Are there options for making these trees nut-free?
Definitely. Swap the Reese’s Cups for nut-free alternatives such as green Hershey’s Kisses or nut-free chocolates. Always check the labels to ensure candies fit your dietary needs. The rest of the assembly remains the same, so you don’t lose out on that festive charm or ease of making these.
Final Thoughts
This Candy Christmas Trees Recipe has become one of my go-to festive treats because it’s just so simple yet so charming. Whether you’re hosting a holiday party, gifting a sweet token to friends, or just want a quick festive project with the kids, these little candy trees don’t disappoint. Give it a try—I promise, you’ll enjoy every step from stacking to snacking!
PrintCandy Christmas Trees Recipe

Create a festive and delightful Candy Christmas Tree display using a simple stacking method with green mini Reese’s Cups, Rolos wrapped in gold foil, and green Hershey’s Kisses. This no-cook, quick assembling treat is perfect for holiday parties, gifting, or festive decorations that are both visually appealing and delicious.
- Prep Time: 10 minutes
- Cook Time: 0 minutes
- Total Time: 10 minutes
- Yield: Makes 2 candy Christmas trees 1x
- Category: Dessert
- Method: No-Cook
- Cuisine: American
Ingredients
Christmas Tree Candy
- 20 green individually wrapped mini Reese’s Cups
- 10 individually wrapped Rolos with gold foil
- 10 green Hershey’s Kisses
Instructions
- Base Layer Assembly: Begin by laying out the 20 green mini Reese’s Cups in a circular pattern to form the base of the Christmas trees. These candies will serve as the tree’s foliage and foundation.
- Second Layer Placement: Carefully place 10 gold foil wrapped Rolos on top of the base layer of Reese’s Cups, arranging them strategically to add height and contrast, simulating ornaments or garland on the tree.
- Tree Topper: Finish each tree by adding a green Hershey’s Kiss at the tip, representing the star or tree topper, for a perfect festive look.
- Secure the Tree: Optionally, you can use a small amount of edible glue, frosting, or melted chocolate to stick the candies together and ensure they don’t fall apart when moving or displaying the trees.
- Display and Serve: Place your Candy Christmas Trees on a decorative plate or stand and serve immediately or keep in a cool, dry place until ready to enjoy.
Notes
- Use clear edible adhesive or melted white chocolate to stabilize the structure if required.
- These candy trees are best consumed within a few days to maintain freshness and visual appeal.
- Customize your trees with other wrapped candies or small edible decorations for variety.
- Ideal for quick holiday party snacks or as charming edible gifts.
Keywords: Candy Christmas Trees, Holiday Candy Crafts, No Bake Candy Treats, Festive Edible Decorations, Reese’s Christmas Treats