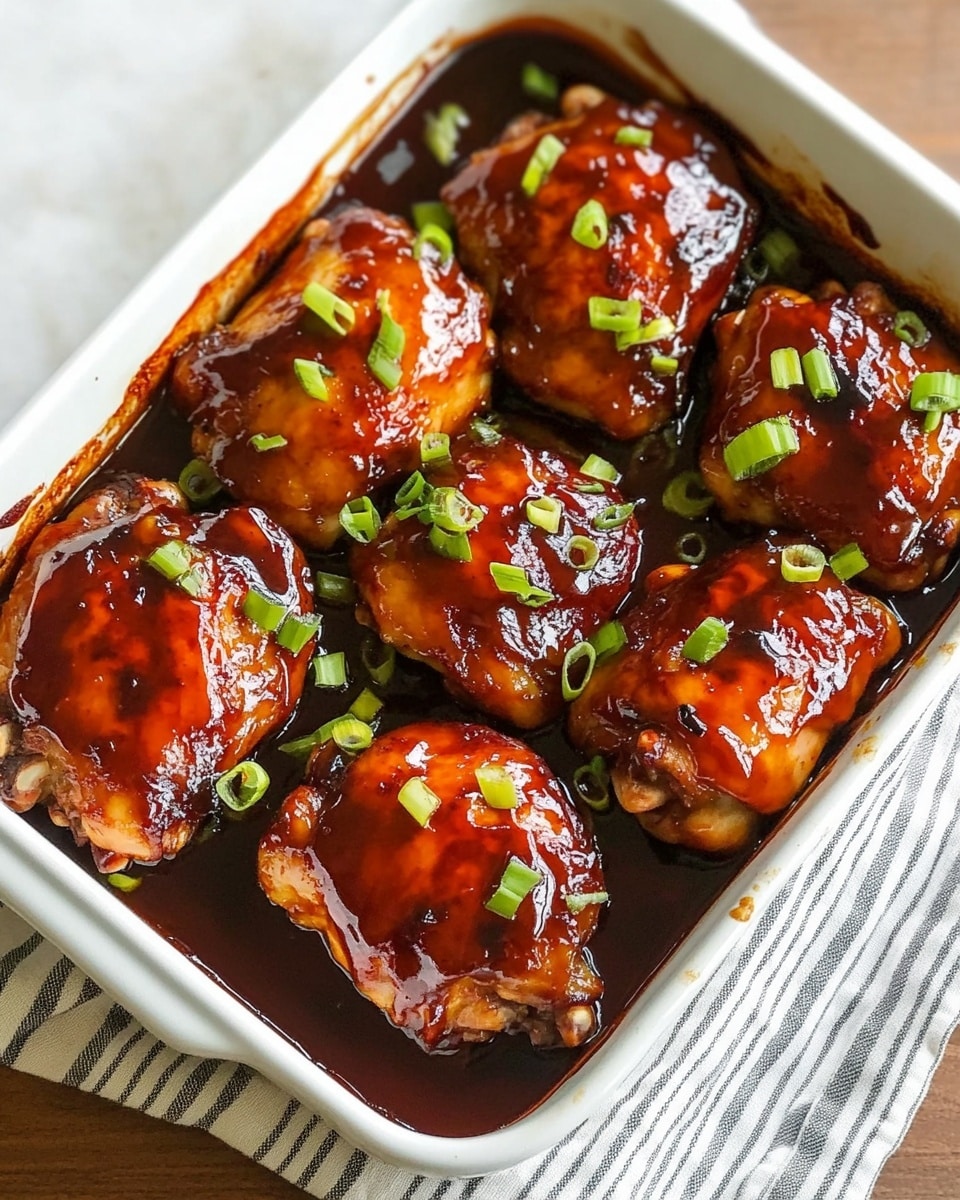
Baked Teriyaki Chicken Recipe
There’s something so comforting about a warm bowl of Italian Wedding Soup, isn’t there? It’s like a hug in food form, packed with tender meatballs, fresh greens, and tender orzo that all come together in a flavorful broth. This baked teriyaki chicken recipe you’re looking at today has a similar cozy vibe, but with an Asian twist that brings a wonderful sweet and savory flavor to your weeknight dinners.
What makes this baked teriyaki chicken recipe stand out for me is how easy it is to pull together without sacrificing any flavor. Whether you’re cooking for yourself or a hungry family, it’s a fantastic go-to meal that’s both satisfying and healthy. I’ve found it’s perfect for those busy nights when you want something impressive but can’t spend hours in the kitchen.
Ingredients You’ll Need
The magic of this baked teriyaki chicken recipe lies in its simple, fresh ingredients that balance each other perfectly. Shopping for these is straightforward, and many of the items you might already have in your pantry or fridge.
- Chicken thighs or breasts: I usually go for thighs because they’re more forgiving in the oven and stay juicy, but breasts work well, too.
- Soy sauce: The salty backbone of the teriyaki flavor – use low sodium if you want to keep it lighter.
- Brown sugar or honey: Adds that essential sweet note that balances the soy sauce beautifully.
- Garlic: Freshly minced gives the best punch, but garlic powder works in a pinch.
- Ginger: Fresh is ideal for a bright zing, but ground ginger can be a backup.
- Rice vinegar: Adds a tangy depth that wakes up the sauce.
- Sesame oil: Just a little bit goes a long way in giving the dish that authentic flavor.
- Cornstarch: This helps thicken the sauce to a glossy, perfect consistency.
Variations
I love making this baked teriyaki chicken recipe my own by mixing things up depending on what’s in season, or what everyone’s craving. You should definitely feel free to tailor it to your taste buds.
- Swap chicken for tofu: For a vegetarian version, I’ve used firm tofu cubes marinated in the same sauce – they soak up all that delicious flavor.
- Add vegetables: Toss in broccoli florets, snap peas, or bell peppers before baking for extra nutrients and color.
- Spicy twist: I sometimes stir in a dash of chili flakes or sriracha for a kick that wakes up the palate.
- Gluten-free option: Use tamari instead of soy sauce and cornstarch to keep it friendly for gluten sensitivity.
How to Make Baked Teriyaki Chicken Recipe
Step 1: Prepare the Teriyaki Sauce
Start by whisking together soy sauce, brown sugar or honey, minced garlic, fresh grated ginger, rice vinegar, and sesame oil in a bowl. I like to taste the sauce here — it should be a lovely balance of sweet and salty with a little zing from the ginger. If you want it thicker, dissolve the cornstarch in a tablespoon of water and stir that in.
Step 2: Marinate the Chicken
Place your chicken in a baking dish and pour half of the teriyaki sauce over it, turning pieces to coat well. Let it marinate for at least 30 minutes if you have time — this really helps the flavors penetrate and keeps the chicken juicy.
Step 3: Bake Until Perfect
Preheat your oven to 400°F (200°C). Pour the remaining sauce over the chicken before sliding it in. Bake uncovered for about 25-30 minutes, or until the chicken reaches an internal temperature of 165°F (74°C). Keep an eye on the marinade to make sure it doesn’t burn; if it looks like it’s getting too dark, cover loosely with foil.
Step 4: Glaze and Broil (Optional)
For that sticky, beautiful glaze, switch your oven to broil for the last 2-3 minutes. Watch closely so it doesn’t scorch. This step really brings that signature glossy finish you want in a baked teriyaki chicken recipe.
How to Serve Baked Teriyaki Chicken Recipe
Garnishes
I keep it classic with a sprinkle of toasted sesame seeds and sliced green onions. They add a nice crunch and pop of color that makes this dish feel fresh. Sometimes I’ll toss in a handful of chopped fresh cilantro for a herbaceous twist.
Side Dishes
My go-to sides are steamed jasmine rice or fluffy brown rice – they soak up all the delicious sauce. I also love pairing this baked teriyaki chicken recipe with a simple stir-fried vegetable medley or a crisp cucumber salad to balance the rich flavors.
Creative Ways to Present
For special occasions, I sometimes plate the chicken over a bed of shredded lettuce and garnish with thinly sliced radishes and toasted seaweed flakes. It adds a beautiful texture and makes the dish feel extra special without much effort.
Make Ahead and Storage
Storing Leftovers
I store any leftover baked teriyaki chicken in an airtight container in the fridge, and it typically keeps well for up to 3 days. Make sure to pour any extra sauce over the chicken before storing so it doesn’t dry out.
Freezing
If you want to freeze leftovers, I recommend freezing the chicken separately from any rice or sides. Wrap it tightly in foil or plastic wrap, then place in a freezer bag. It freezes really well and is perfect for a quick meal when you’re short on time.
Reheating
For best results, reheat baked teriyaki chicken in the oven at 350°F (175°C) until warmed through, about 10-15 minutes. This keeps the skin or sauce from getting soggy, unlike microwaving which can make the texture less appealing.
FAQs
-
Can I use chicken breasts instead of thighs in this baked teriyaki chicken recipe?
Absolutely! Chicken breasts will work fine; just be careful not to overcook them as they tend to dry out faster than thighs. Marinating before baking helps keep them juicy.
-
How can I make the sauce thicker?
Mixing a small amount of cornstarch with water and adding it to the sauce before baking helps achieve a glossy, thicker texture. Just make sure to stir it well so there are no lumps.
-
Is it necessary to marinate the chicken?
While you can bake the chicken immediately with the sauce, marinating for at least 30 minutes enhances flavor and tenderness, making the final result even tastier.
-
Can I make this recipe gluten-free?
Yes! Simply substitute soy sauce with tamari and ensure your cornstarch is gluten-free. This keeps the flavors close to the original while making it safe for gluten sensitivities.
-
How do I prevent the sauce from burning in the oven?
Keep an eye on the chicken as it bakes, and if the sauce starts to caramelize too quickly or darken, loosely cover the dish with foil to protect it while still cooking through.
Final Thoughts
This baked teriyaki chicken recipe is one of those dishes that quickly became a favorite in my household. It’s straightforward, packed with flavor, and consistently juicy, which really makes it shine compared to other baked chicken dishes I’ve tried. I hope you’ll give it a go and make it your own — it’s a recipe you can come back to again and again, whether for busy weeknights or when you want to impress guests with minimal effort.
PrintBaked Teriyaki Chicken Recipe

Italian Wedding Soup is a comforting and hearty soup featuring tender meatballs made from lean ground beef, combined with fresh vegetables and orzo pasta in a flavorful chicken broth. This classic Italian-American soup is perfect for a cozy meal and balances protein, greens, and carbs in one bowl.
- Prep Time: 15 minutes
- Cook Time: 20 minutes
- Total Time: 35 minutes
- Yield: 4 servings 1x
- Category: Soup
- Method: Stovetop
- Cuisine: Italian-American
Ingredients
Meatballs
- ½ pound extra-lean ground beef
- 1 large egg, lightly beaten
- 2 tablespoons dry bread crumbs
- 1 tablespoon grated Parmesan cheese
- ½ teaspoon dried basil
- ½ teaspoon onion powder
Soup
- 5 ¾ cups chicken broth
- 2 cups thinly sliced escarole
- 1 cup uncooked orzo pasta
- ⅓ cup finely chopped carrot
Instructions
- Prepare the meatball mixture: In a mixing bowl, combine the extra-lean ground beef, lightly beaten egg, dry bread crumbs, grated Parmesan cheese, dried basil, and onion powder. Mix gently until all ingredients are well incorporated, being careful not to overwork the meat to keep the meatballs tender.
- Shape the meatballs: Using your hands or a small spoon, form the mixture into small, bite-sized meatballs, about ¾ inch in diameter. Set them aside on a plate while you prepare the soup base.
- Bring the broth to a simmer: In a large pot, bring the chicken broth to a gentle simmer over medium heat.
- Cook the meatballs in broth: Carefully add the meatballs to the simmering broth. Cook for about 8-10 minutes, or until the meatballs are cooked through and tender, skimming off any foam or impurities from the surface.
- Add vegetables and pasta: Stir in the finely chopped carrot, sliced escarole, and uncooked orzo pasta into the broth with the meatballs. Continue simmering for an additional 8-10 minutes, or until the vegetables are tender and the orzo is cooked al dente.
- Adjust seasoning and serve: Taste the soup and adjust salt or pepper as needed. Serve hot, optionally garnished with extra grated Parmesan cheese and freshly ground black pepper for added flavor.
Notes
- Use extra-lean ground beef to keep the soup light and reduce fat content.
- Escarole can be substituted with spinach, kale, or escarole for similar texture and flavor.
- For a gluten-free version, substitute the breadcrumbs and orzo with gluten-free alternatives such as gluten-free bread crumbs and rice or gluten-free pasta.
- Do not overcook the orzo; it should be tender but slightly firm to avoid mushiness.
- The soup can be stored in the refrigerator for up to 3 days and reheated gently on the stovetop.
Keywords: Italian wedding soup, meatball soup, escarole soup, orzo soup, comforting soup