Cream Cheese Mints Recipe
If you’ve ever been on the hunt for that perfect, melt-in-your-mouth candy to wow your guests or simply satisfy a sweet craving, this Cream Cheese Mints Recipe is a game-changer. These little delights are not only vibrant and fun to make, but they pack a refreshing peppermint punch balanced with smooth cream cheese richness. Whether you’re looking for a homemade treat for the holidays, party favors, or something charming to tuck into a gift box, you’ll find these mints are surprisingly simple to whip up.
One thing I love about this Cream Cheese Mints Recipe is how versatile it is. You can color them, shape them, and even adjust the peppermint level to your liking. Plus, they require no baking, which makes them an indulgent yet easy recipe to tackle last minute. Once you get the hang of the dough’s perfect consistency, you’ll find yourself making these little mints again and again.
Ingredients You’ll Need
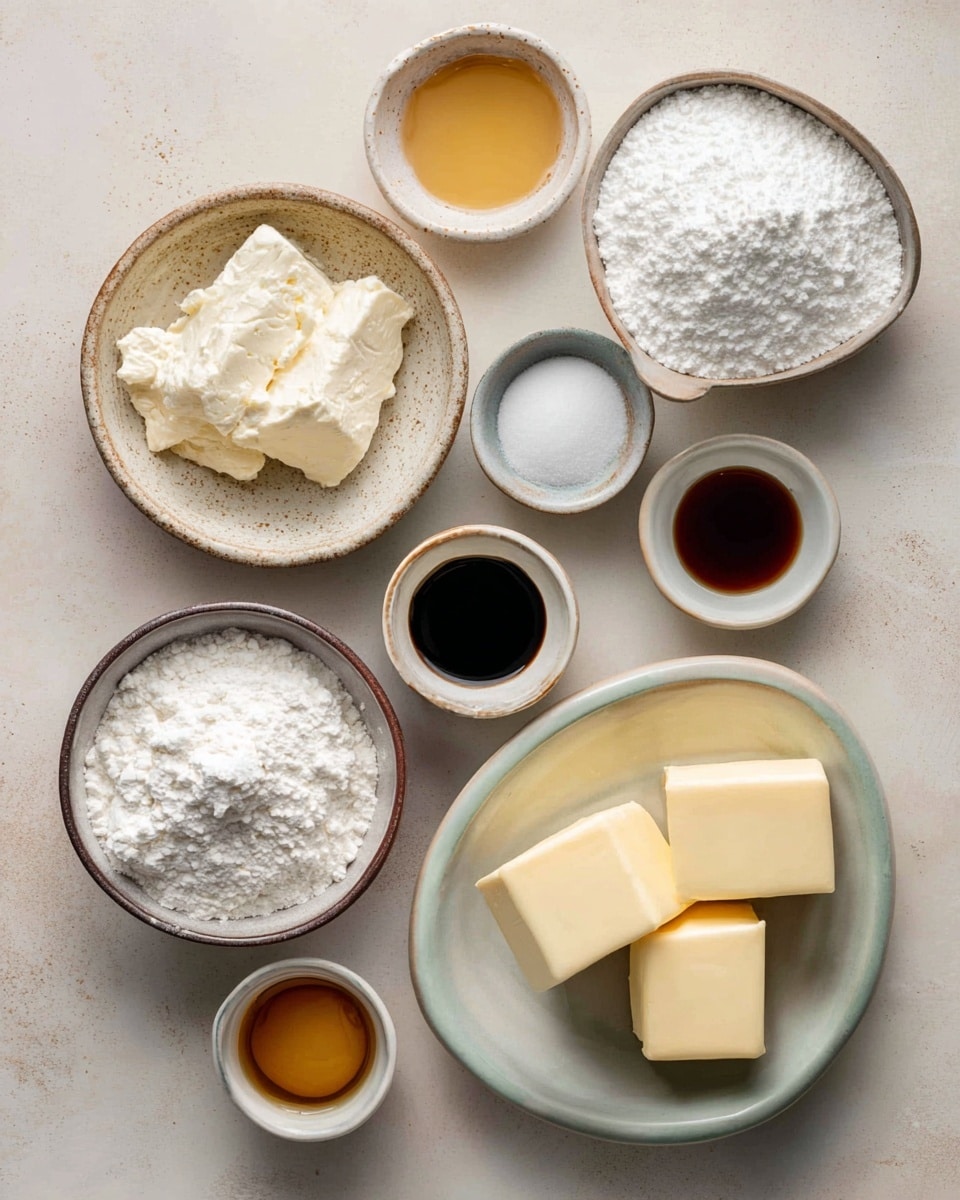
The magic behind these cream cheese mints lies in simple, classic ingredients working harmoniously to produce that signature firm yet creamy texture and bright flavor. Make sure to grab brick-style cream cheese for the right consistency—it makes all the difference.
- Cream cheese: Use brick-style (not spreadable tub kind) and let it soften to room temperature for easy mixing.
- Salted butter: Softened butter adds a subtle richness and helps bind the mixture smoothly.
- Powdered sugar: This provides the sweetness and stiff texture you want—be ready to add a bit more if the dough is too sticky.
- Peppermint extract: The star of the show! Adds that fresh, minty zing; adjust to your taste buds.
- Vanilla extract: Just a dash to round out the flavor and add warmth.
- Food coloring (optional): Add fun pops of color if you want to jazz them up or match a theme.
Variations
I like to play around a bit with the flavor and look of the mints, especially around holidays. You really can make the Cream Cheese Mints Recipe your own by mixing in different extracts or dividing the dough to create colorful batches.
- Chocolate Peppermint: Add a tablespoon or two of cocoa powder for a rich chocolate twist. I tried this last Christmas and ended up with a new family favorite.
- Almond extract: Swap or mix peppermint with almond extract for a different flavor profile; it’s surprisingly lovely.
- Fruit-flavored mints: Use extracts like lemon or raspberry for a fresh change, and pair with matching colors for an eye-catching effect.
- Molds instead of rolling: For special occasions, press the dough into candy molds dusted with granulated sugar to get perfect shapes—great for gifts!
How to Make Cream Cheese Mints Recipe
Step 1: Cream Together the Base
Start by beating the softened cream cheese and butter until they’re creamy and completely combined. I usually use my stand mixer for this to get a smooth base without lumps, but a hand mixer works just fine too. This step is key because you want a silky texture before adding sugar; rushed mixing here can leave little pockets that ruin the final mint texture.
Step 2: Add Sugar Gradually
With your mixer on low, slowly add half the powdered sugar, mixing in completely before moving on. This keeps the sugar from clouding the air or flying everywhere while also helping the dough start to bind. Then add the peppermint and vanilla extracts and stir them in well for an even flavor throughout.
Step 3: Finish the Dough
Add the remaining powdered sugar gradually, mixing and scraping the bowl often. Your goal is a stiff, non-sticky dough that feels like play-dough in your hands. Don’t rush this part; if it’s still sticky after all sugar is in, sprinkle in a bit more powdered sugar until you reach that perfect texture. This made all the difference when I first tried the recipe—patience here pays off.
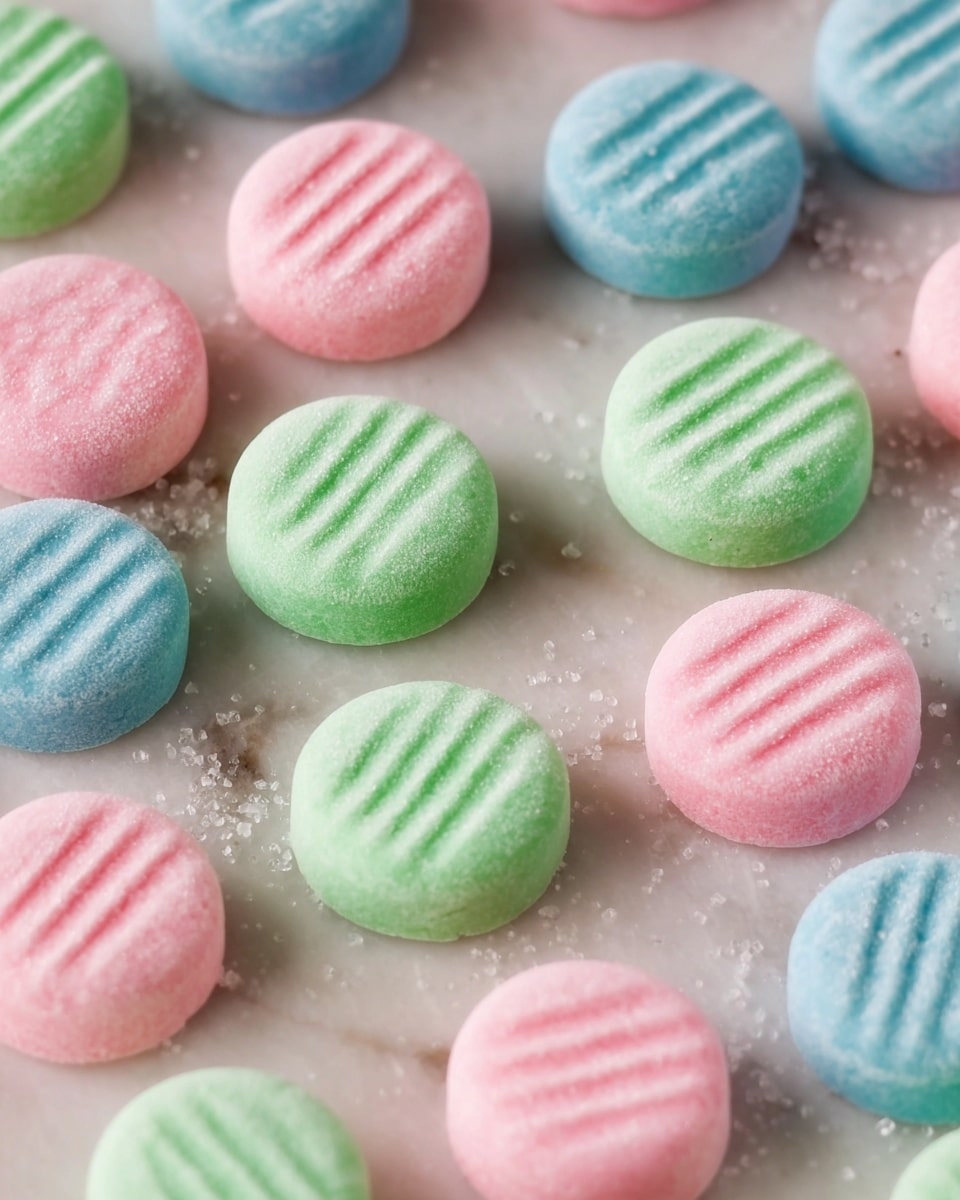
Step 4: Color and Shape
If you want to add color, now’s the time. You can mix food coloring directly into the whole batch or divide the dough into smaller portions for multi-colored mints. Once colored, roll teaspoon-sized portions into smooth balls, then place them on a wax paper-lined sheet. I like dusting a fork in powdered sugar and gently pressing down to imprint a cute pattern—adds a fun, homemade touch.
Step 5: Dry and Store
Let the mints dry at room temperature for several hours until they’re firm to the touch—if they squish when you press, they need more drying time. Once set, store them in an airtight container in the refrigerator, layered with wax paper to keep them from sticking. Trust me, this drying stage is what gives them that classic firm yet creamy bite.
How to Serve Cream Cheese Mints Recipe
Garnishes
I usually keep garnishes simple—powdered sugar dusting or tiny candy pearls work beautifully and add a pretty, festive touch without overpowering the mint flavor. Sometimes I’ll even drizzle a bit of melted dark chocolate on top for a bit of elegance.
Side Dishes
These mints pair wonderfully with a hot cup of tea or coffee as a refreshing finish. At parties, I like serving them alongside a cheese board or after a rich dessert to cleanse the palate.
Creative Ways to Present
For special occasions, I’ve molded these mints into holiday shapes like stars and trees using silicone molds—rolling in granulated sugar first helps them pop right out. Another fun idea is stacking them in clear jars layered with colorful ribbon for homemade gifting that looks as good as it tastes.
Make Ahead and Storage
Storing Leftovers
I find storing leftover cream cheese mints in the fridge is best to maintain their texture and flavor. Using airtight containers and wax paper between layers prevents sticking and keeps those pretty imprints intact. They’ll stay fresh for about 1-2 weeks.
Freezing
Believe it or not, freezing cream cheese mints works great if you want to prep way ahead. I wrap them tightly in parchment and place in a freezer-safe container. When you’re ready, just thaw them in the fridge overnight—they retain their texture surprisingly well.
Reheating
While these don’t require reheating, if you prefer a softer mint, you can let them sit at room temperature for about 20 minutes before serving. Avoid microwaving, as that can make the sugar melt unevenly and ruin the texture.
FAQs
-
Can I use the spreadable cream cheese for this recipe?
It’s best to use brick-style cream cheese because the spreadable kind is usually softer and contains more moisture, which can make the dough too sticky. The brick-style gives the dough the right firmness for rolling and drying.
-
How long do the cream cheese mints need to dry?
Drying time can vary depending on humidity, but usually 4-6 hours at room temperature is sufficient. They should feel firm and not squishy when pressed, which means they’re ready to store or serve.
-
Can I make these mints without food coloring?
Absolutely! The mints will still taste amazing and have a lovely creamy white look, perfect for a classic presentation. Food coloring just adds a fun visual twist, especially for parties or holidays.
-
What if my dough is too sticky?
Simply add more powdered sugar a tablespoon at a time until the dough feels like play-dough and no longer sticks to your fingers. Don’t rush this step, as the right consistency makes shaping and drying easier.
-
How can I shape the mints other than rolling balls?
You can use candy molds by rolling dough balls coated in granulated sugar and pressing them into silicone molds. This not only creates fun shapes but also impresses guests with professional-looking mints.
Final Thoughts
Making this Cream Cheese Mints Recipe feels a bit like coming home—it’s comfort food with a touch of fun and elegance all rolled into one. I love how simple ingredients and no-bake methods can produce something that looks so polished and tastes so fresh. Give this recipe a try, especially when you want to impress without the stress, and I’m sure you’ll find yourself coming back to it again and again—just like I do!
PrintCream Cheese Mints Recipe

Delicious and refreshing Cream Cheese Mints made with simple ingredients like cream cheese, butter, powdered sugar, and peppermint extract. These no-bake bite-sized mints are easy to prepare, customizable with food coloring, and perfect for gifting or serving at parties.
- Prep Time: 15 minutes
- Cook Time: 0 minutes
- Total Time: 3 hours 15 minutes
- Yield: Approximately 50 mints 1x
- Category: Candy
- Method: No-Cook
- Cuisine: American
Ingredients
Main Ingredients
- 4 oz (113 g) cream cheese, softened
- 1 Tablespoon salted butter, softened
- 4 cups (500 g) powdered sugar, plus additional as needed and for imprinting mints
- 1/2 teaspoon peppermint extract
- 1/8 teaspoon vanilla extract
- Food coloring (optional)
Instructions
- Combine Cream Cheese and Butter: Place the softened cream cheese and salted butter in the bowl of a stand mixer or a large mixing bowl. Beat them together until the mixture is creamy and well-combined, forming a smooth base for the mints.
- Add Powdered Sugar Gradually: With the mixer on low speed, gradually add 2 cups (250 g) of powdered sugar, stirring continuously until fully incorporated into the creamy mixture.
- Incorporate Extracts: Add the peppermint extract and vanilla extract to the mixture and stir well to evenly distribute the flavors throughout the dough.
- Add Remaining Powdered Sugar: Continue mixing on low speed as you gradually add the remaining 2 cups (250 g) of powdered sugar. Pause occasionally to scrape down the sides and bottom of the bowl. Continue until the dough becomes very stiff and no longer sticky, resembling play-dough in consistency. If still sticky, add more powdered sugar as needed.
- Add Food Coloring (Optional): If desired, divide the dough into separate bowls for different colors. Use your mixer or stir by hand to blend food coloring into each portion until the color is evenly incorporated.
- Shape the Mints: Roll the dough into teaspoon-sized portions between your palms until smooth. Place each shaped mint on a wax paper-lined baking sheet. Dip the tines of a fork into powdered sugar and press gently but firmly on each mint to create an imprint.
- Dry and Store: Allow the mints to dry at room temperature for several hours, until fully firm and no longer squishy when pressed. Once dried, transfer them to an airtight container and store in the refrigerator. To prevent sticking, layer the mints with sheets of wax paper between them.
Notes
- Use brick-style cream cheese (the kind in a block) rather than spreadable cream cheese from a tub for the best texture.
- To make molded mints, roll dough balls in granulated sugar and firmly press into silicone or other molds. Invert and pop out shaped mints for a fun presentation.
Keywords: cream cheese mints, peppermint mints, no-bake candy, holiday mints, homemade mints