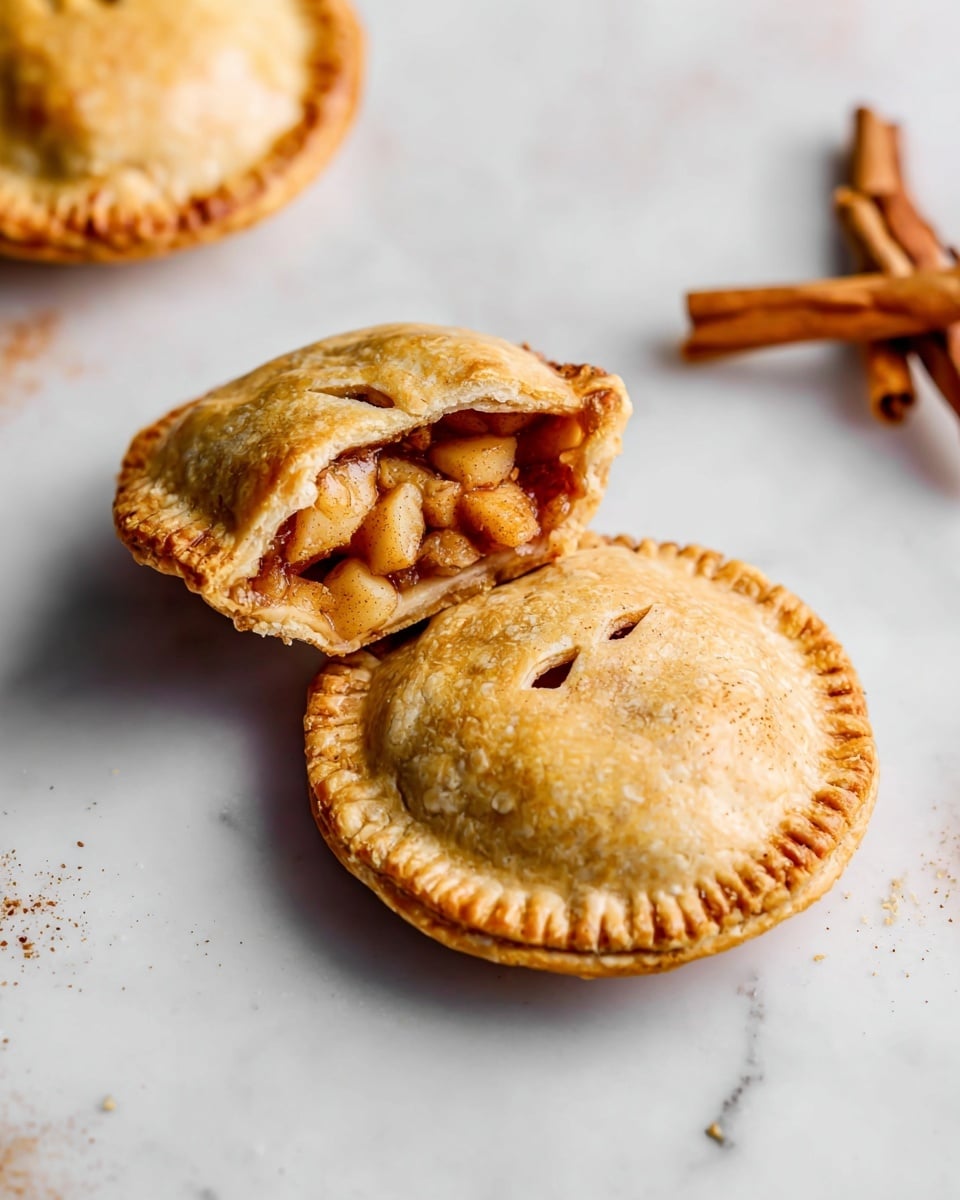
Mini Apple Pies (Apple Hand Pies) Recipe
There’s something irresistibly charming about these Mini Apple Pies (Apple Hand Pies) Recipe that makes them perfect for any occasion. Whether you’re craving a cozy fall treat or need a portable dessert for a picnic, these little pies bring together that perfect combo of flaky crust and sweet, cinnamon-kissed apple filling. I love how easy they are to hold, making them kid-friendly and ideal for sharing around the table—or on the go!
What really makes this Mini Apple Pies (Apple Hand Pies) Recipe stand out is the balance of textures. The buttery dough stays tender and flaky without being overly complicated to make, and the filling thickens just right so it doesn’t spill everywhere when you take a bite. I’ve made these countless times, and every batch comes out golden, with just the right amount of sweetness and warming spices. You’re definitely going to want these in your baking rotation!
Ingredients You’ll Need
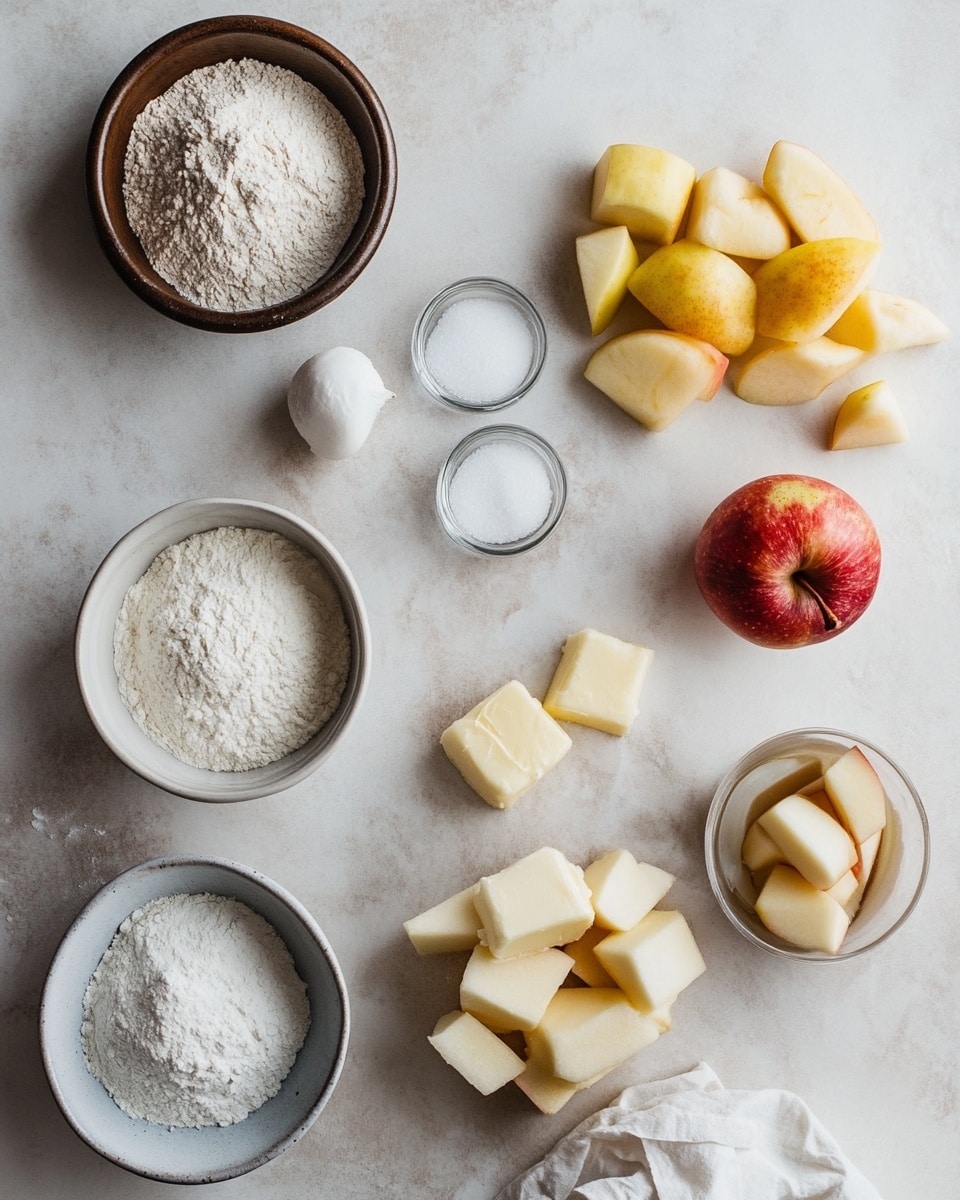
The ingredients for this Mini Apple Pies (Apple Hand Pies) Recipe are simple but thoughtfully paired to create that classic apple pie flavor in a mini, portable package. You don’t need anything fancy—just good butter, fresh apples, and a touch of cinnamon—and I recommend picking apples that hold their shape well for the best filling texture.
- All-purpose flour: The base of your flaky dough—go for good-quality flour for the best texture.
- Granulated sugar: Adds just a hint of sweetness to the dough without overpowering.
- Salt: Enhances all the flavors and balances the sweetness.
- Unsalted butter (cold and cubed): Keeping it cold helps create those layered, flaky bits in the crust.
- Water: Just enough to bring your dough together without making it sticky.
- Apples: I prefer Pink Lady, Fuji, or Royal Gala for their balance of sweetness and firmness.
- Unsalted butter (for filling): Adds richness and helps the filling set once chilled.
- Brown sugar: Gives the filling that warm, caramelized note that pairs beautifully with cinnamon.
- Ground cinnamon: Absolutely essential for that familiar apple pie flavor.
- Cornstarch: Thickens the apple filling to keep it from being runny in your pies.
- Water (for filling): Just a dash to help the ingredients meld as they cook.
- Egg: For brushing on the pies to get that gorgeous golden finish.
- Brown sugar (for sprinkling): Adds a little crunch and makes the crust sparkle after baking.
Variations
One of my favorite things about this Mini Apple Pies (Apple Hand Pies) Recipe is how easy it is to tailor it to your taste or dietary needs. Feel free to experiment with different apple varieties or add your own twist to the filling, and I encourage you to make it your own—it’s one of the joys of baking!
- Spiced Up: I sometimes add a pinch of nutmeg or ground cloves to the cinnamon for extra warmth—perfect for holiday vibes!
- Gluten-Free: Swap the all-purpose flour for a gluten-free blend; just be sure it has xanthan gum to keep the dough together.
- Vegan Version: Use coconut oil or vegan butter instead of regular butter, and replace the egg wash with a mix of plant-based milk and maple syrup for that beautiful shine.
- Pear and Apple Combo: For a seasonal twist, I mix in some finely diced pears with the apples—it adds a subtle sweetness and interesting texture.
- Caramel Drizzle: Once baked, drizzle some homemade caramel sauce over the pies for a decadent finish.
How to Make Mini Apple Pies (Apple Hand Pies) Recipe
Step 1: Prepare the Dough – The Flaky Foundation
Start by combining the flour, sugar, and salt in a large bowl. I find it easier to mix these dry ingredients with a whisk to evenly distribute everything. Next, add the cold cubed butter. Use your fingers to pinch and press the butter into the flour, but don’t overwork it—those small butter lumps are what make the dough flaky, so you want to keep some intact. Once you have pea-sized pieces, slowly add the cold water a little at a time and gently knead until the dough just comes together. It might feel a bit shaggy—that’s okay! Wrap it in cling film and refrigerate for at least 30 minutes. If you’re prepping ahead, this dough freezes beautifully for up to two months.
Step 2: Cook the Apple Filling – Turning Apples into Pure Comfort
While the dough chills, peel and dice your apples into small 4-5 mm cubes—this size helps them cook evenly and soften just right. Toss them into a pot along with the butter, brown sugar, cinnamon, cornstarch, salt, and water. Cook over medium heat, stirring occasionally. At first, you’ll see lots of juice, but keep going! The apples will soften and the mixture will thicken into a luscious, slightly jammy filling. Once it looks like a thin jam, take it off the heat and let it chill in the fridge until it’s completely cold. Cooling the filling helps it set up thanks to the butter, which makes filling your pies much less messy.
Step 3: Assemble Your Mini Apple Pies – The Fun Part
On a lightly floured surface, roll out your chilled dough to about 2mm thick. Using a 9-10 cm (3.5-4 inch) cookie cutter, cut out even circles. Place a heaping 2 tablespoons of your apple filling in the center of each circle. If your dough edges feel dry from flour, brush a little water around the edges to help seal. Then, gently stretch a second dough circle slightly with your fingers—it helps with sealing and creates that perfect hand pie shape. Place it over the filling and press the edges together firmly using the tines of a fork. For an even edge, press again lightly with your cookie cutter. Don’t forget to cut three small slits on top with a paring knife so all that steam can escape during baking.
Step 4: Paint and Bake – The Golden Finish
Beat together the egg and water and use a pastry brush to gently paint the tops of your pies. Sprinkle with brown sugar for that extra sweet crunch and sparkle. Bake in a preheated oven at 180℃ (350℉) for about 20-30 minutes, until golden brown. Keep an eye on them—you’ll know they’re done when the crust is beautifully golden and you can smell that warm apple aroma filling your kitchen. Let them cool briefly before enjoying the magic of these mini delights!
How to Serve Mini Apple Pies (Apple Hand Pies) Recipe
Garnishes
I love to keep it simple with a light dusting of powdered sugar on warm pies—it adds a pretty, delicate touch. Sometimes, I’ll add a dollop of whipped cream or a scoop of vanilla ice cream on the side for that classic combo. If you’re serving them for a brunch or afternoon tea, a sprinkle of chopped toasted pecans on top after baking brings in a nice crunch and nutty flavor.
Side Dishes
These mini pies pair wonderfully with hot beverages like spiced chai, strong coffee, or even a lightly brewed apple cider. For a festive spread, I usually set out slices of sharp cheddar cheese alongside—the savory contrast is surprisingly delightful. If you want a lighter side, a crisp green salad with a tangy vinaigrette works beautifully as a counterbalance.
Creative Ways to Present
When I bring these mini pies to gatherings, I sometimes arrange them in little paper cupcake liners for an elevated look and easy serving. Stacking them on a tiered dessert tray gives a festive vibe, perfect for holiday parties. If you’re gifting them, wrapping a few in parchment paper tied with twine always gets compliments and adds that homemade charm.
Make Ahead and Storage
Storing Leftovers
After they cool completely, I keep leftover pies in an airtight container at room temperature for up to two days. If you want them to last longer, storing them in the fridge is an option, but the crust might lose a bit of its crispness. To avoid soggy bottoms, placing a sheet of parchment paper between pies helps moisture from building up.
Freezing
If you want to prep ahead, these pies freeze wonderfully. I usually bake them fully, cool them, then flash freeze on a baking sheet before transferring to a freezer bag. This way, they don’t stick together, and I can grab just one whenever the craving hits. You can also freeze them assembled and unbaked—just remember to add a few extra minutes to the baking time when reheating.
Reheating
To bring back that fresh-baked charm, I reheat the pies in a 350℉ oven for 10-15 minutes. This keeps the crust crisp and reheats the filling evenly. Avoid microwaving if you can, as it tends to make the crust soggy. For a quick option, a toaster oven does the trick nicely!
FAQs
-
Can I use store-bought pie crust instead of making the dough?
Absolutely! Store-bought pie crust can save you a lot of time and still yield delicious Mini Apple Pies (Apple Hand Pies). Just be sure to thaw it properly and roll it out a little thinner if it’s thick, so your hand pies don’t end up too bulky.
-
What type of apples work best for these mini pies?
Apples that hold their shape and have a balanced sweetness, like Pink Lady, Fuji, and Royal Gala, are ideal. They soften nicely without turning into mush, which keeps each bite pleasantly textured.
- How can I prevent the mini pies from leaking filling during baking?
Make sure not to overfill each pie—two tablespoons per pie is perfect. Also, sealing the edges well with water and a fork helps. The slits on top allow steam to escape, preventing breakage. Lastly, chilling the filling before assembling reduces juice leakage.
- Can I make these pies ahead of time for a party?
Yes! You can assemble the pies, freeze them unbaked overnight, and bake fresh on the day of your party. Or bake them ahead, store in an airtight container, and reheat before serving. Both ways work great and save you stress on the big day.
- What’s the best way to store leftover pies?
Store cooled pies in an airtight container at room temperature for up to two days. For longer storage, refrigerate them, but reheat in the oven to restore crispiness before eating.
Final Thoughts
This Mini Apple Pies (Apple Hand Pies) Recipe is one I keep coming back to—not just because they’re delicious, but because they bring that warm feeling of homemade comfort with less fuss than a traditional pie. Sharing these with friends and family, especially in cooler months, always feels like a little celebration of simple joys. So grab some apples, dust off your rolling pin, and dive into these charming hand pies. I promise you’ll be hooked just like I am!
PrintMini Apple Pies (Apple Hand Pies) Recipe

These Mini Apple Pies, also known as Apple Hand Pies, are delightful little pastries filled with a sweet and spiced apple filling. Made with a flaky homemade dough and a cinnamon-scented apple mixture, they are perfect for a cozy dessert or a sweet snack. Crisply baked to golden perfection, these hand pies deliver all the comforting flavors of classic apple pie in a convenient, handheld form.
- Prep Time: 20 minutes
- Cook Time: 30 minutes
- Total Time: 50 minutes
- Yield: 15 mini apple pies 1x
- Category: Dessert
- Method: Baking
- Cuisine: American
Ingredients
For the dough:
- 300 g all-purpose flour
- 60 g granulated sugar
- 1 tsp salt
- 220 g unsalted butter, cold and cut into cubes
- 110 ml water
For the filling:
- 800 g apples (about 4 large apples, Pink Lady, Fuji, or Royal Gala preferred)
- 60 g unsalted butter
- 150 g brown sugar
- 1 tsp ground cinnamon
- 1 tbsp cornstarch
- ¼ tsp salt
- 2 tbsp water
For painting:
- 1 egg
- 1 tbsp water
- 4 tbsp brown sugar
Instructions
- Make the dough: In a mixing bowl, combine the flour, granulated sugar, and salt. Add the cold butter cubes and pinch them into the dry ingredients until some small butter lumps remain for flakiness. Add water and gently knead until the dough just comes together. Wrap in cling film and refrigerate for at least 30 minutes or up to 2 days.
- Prepare the filling: Peel and finely dice the apples into 4-5mm cubes. Put them in a pot with butter, brown sugar, cinnamon, cornstarch, salt, and water. Cook over medium heat until the mixture boils and thickens to a jam-like consistency. Cool completely in the refrigerator to solidify the filling.
- Roll out the dough: On a lightly floured surface, roll the chilled dough to about 2mm thickness. Use a 9-10cm round cookie cutter to cut circles from the dough.
- Assemble the pies: Place about 2 tablespoons of the cold apple filling in the center of each dough circle. Lightly dampen the edges with water if needed. Stretch a second dough circle slightly and cover the filling. Seal the edges tightly by pressing with a fork. Trim the edges with the same cookie cutter for neatness and cut 3 slits on top to vent steam.
- Paint and bake: Beat the egg with water and brush over the pies. Sprinkle the tops with brown sugar. Bake in a preheated oven at 180°C (350°F) for 20-30 minutes, or until golden brown and crisp.
Notes
- Butter should be cold to ensure a flaky dough texture.
- Use firm, sweet apples like Pink Lady, Fuji, or Royal Gala for best flavor and texture.
- Chilling the apple filling helps it firm up, making it easier to fill the pies without spilling.
- Do not over-knead the dough to keep it tender and flaky.
- The slits on top of the pies allow steam to escape, preventing sogginess.
- You can freeze the unbaked pies for up to 1 month and bake from frozen, adding a few extra minutes to baking time.
Keywords: Mini apple pies, apple hand pies, homemade apple dessert, flaky pastry, baked hand pies, cinnamon apple filling, fall dessert