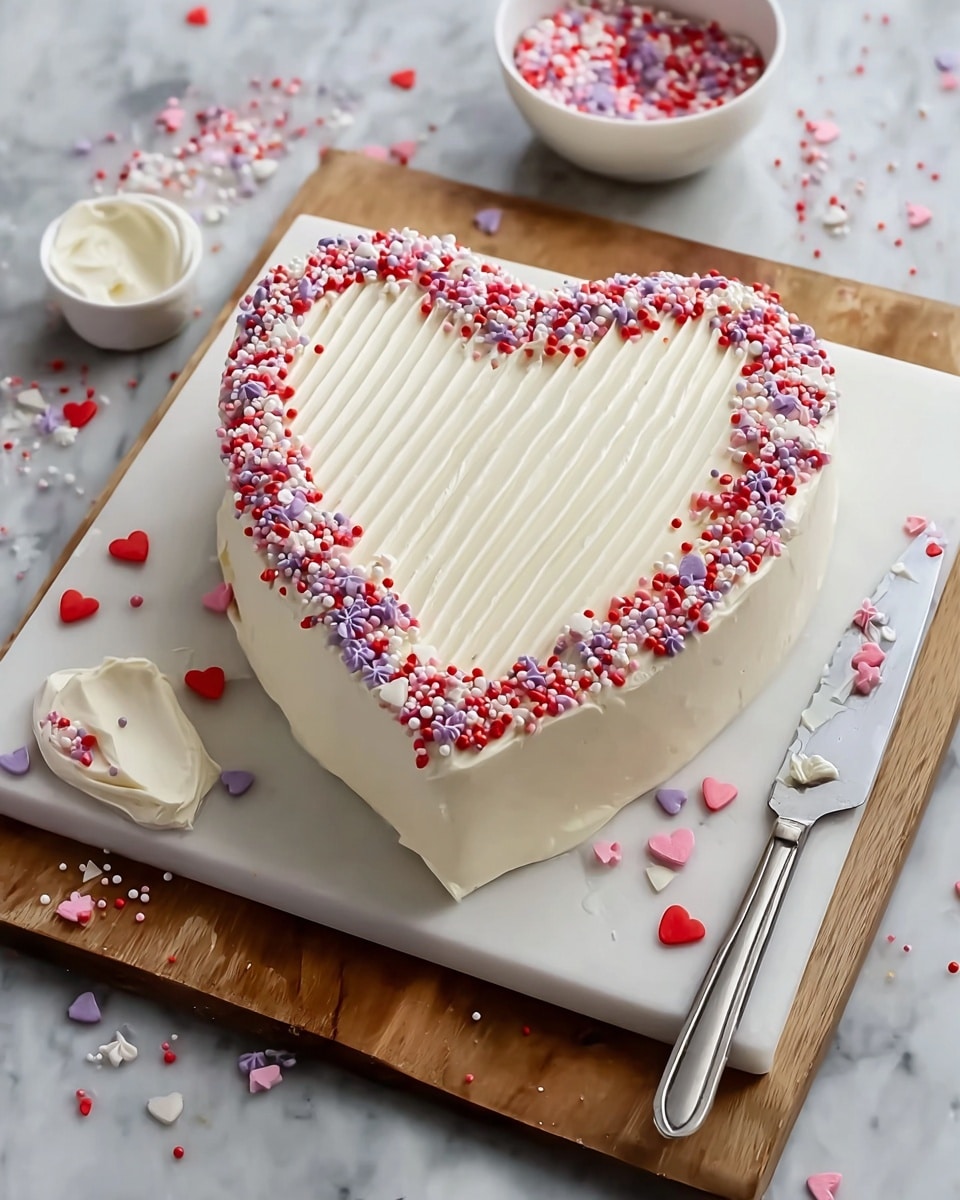
Heart Shaped Cocoa Cake with Cream Cheese Frosting Recipe
Let me tell you, the Heart Shaped Cocoa Cake with Cream Cheese Frosting Recipe is one of those desserts that just brings a smile to your face the moment you see it. It’s not just the cute heart shape that steals the show, but the rich, moist cocoa cake paired with that tangy, creamy frosting that makes it unforgettable. Whenever I want to serve something special for a birthday or an intimate gathering, this recipe instantly pops into my mind—it feels both festive and deeply comforting.
What I love most about this Heart Shaped Cocoa Cake with Cream Cheese Frosting Recipe is how approachable it is, despite looking like a showstopper. You don’t need any fancy equipment or bizarre ingredients, just simple pantry staples brought to life with a little love and patience. Plus, when you’re slicing into that moist, tender cake adorned with luscious cream cheese frosting, all the effort feels like a joyful celebration you get to share with everyone at the table.
Ingredients You’ll Need
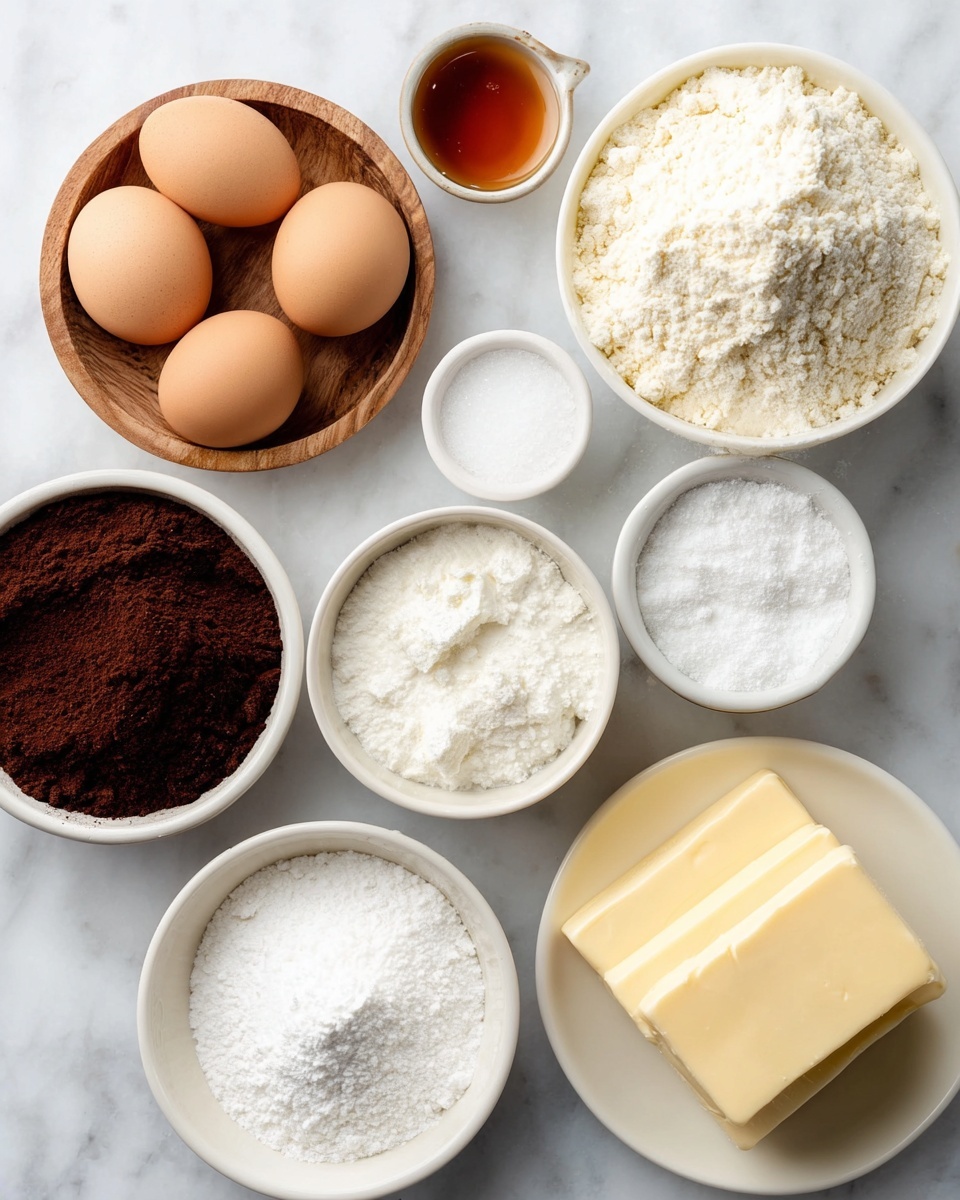
The ingredients for this cake work together like a dream to create a balance of fudgy cocoa flavor and creamy sweet frosting. Buying fresh, room-temperature ingredients can make a world of difference here, especially for the cream cheese and eggs to whip up that frosting smoothly without lumps.
- All-purpose flour: The base for your cake, gives it structure and tenderness when combined with the cocoa.
- Cocoa powder: Use good quality unsweetened cocoa for that rich, deep chocolate flavor.
- Baking soda & baking powder: These leavening agents help the cake rise nicely without getting heavy.
- Granulated sugar: Sweetens and contributes to the moist crumb.
- Salt: Just a pinch enhances all the other flavors.
- Buttermilk: Adds moisture and tenderness, plus a slight tang that balances the sweetness.
- Vegetable oil: Keeps the cake moist and soft—don’t swap it with butter here, or the texture changes.
- Eggs: Bind everything together and provide richness.
- White vinegar: Reacts with baking soda to make the cake extra fluffy.
- Vanilla extract: Adds warmth and depth to both the cake and frosting.
- Liquid red food coloring: This gives the cocoa cake that beautiful, vibrant heart-red hue.
- Cream cheese: The star of the frosting, making it tangy and smooth.
- Unsalted butter: Combined with cream cheese for a luscious, creamy frosting.
- Powdered sugar: Sweetens and thickens the frosting for perfect spreading consistency.
Variations
I’m a big fan of adding personal twists to this Heart Shaped Cocoa Cake with Cream Cheese Frosting Recipe to make it my own or suit the occasion. Don’t be shy—experimenting can lead to some delicious discoveries!
- Adding espresso powder: A teaspoon in the batter amplifies the cocoa flavor beautifully without making it taste like coffee—I’ve tried this and it’s a game-changer!
- Using vegan substitutes: Replacing eggs with flax eggs and using nondairy milk with lemon for acidity works well for a dairy-free version of this cake.
- Swap out the food coloring: If you want to go for a pastel pink rather than a bright red, just reduce the red food coloring—great for spring celebrations.
- Flavoring the frosting: You can mix in some orange zest or a splash of liqueur into the cream cheese frosting for a grown-up twist.
How to Make Heart Shaped Cocoa Cake with Cream Cheese Frosting Recipe
Step 1: Get your pans ready and preheat your oven
Start by preheating your oven to 350°F. I spray one 8-inch round pan and one 8-inch square pan with non-stick spray, then line them with parchment paper. Don’t forget to spray the parchment itself—that little extra step helps the cake slide out perfectly without any sticking. Trust me, it makes cleanup easier and keeps your cake smooth.
Step 2: Whisk dry ingredients together
In a medium bowl, sift together the flour, cocoa powder, baking soda, and baking powder. Then add the sugar and salt and whisk everything until combined. Sifting is key here—it helps avoid lumps and makes the cocoa blend evenly throughout your batter.
Step 3: Mix wet ingredients until smooth
In a large mixing bowl, whisk together buttermilk, vegetable oil, eggs, white vinegar, vanilla extract, and liquid red food coloring. Make sure your eggs are at room temperature for the smoothest blend and vibrant color. The red food coloring is what gives this cocoa cake its signature heart-red tone, so don’t skip it.
Step 4: Combine dry and wet mixtures gently
Gently whisk the flour mixture into the wet ingredients, mixing just until no dry spots remain. Overmixing is the enemy here because it can make your cake dense and tough. Folding carefully ensures a tender crumb.
Step 5: Bake the cakes
Divide the batter evenly between your two pans and pop them in the oven. Bake for 30–35 minutes, or until a toothpick inserted in the center comes out clean and the cake springs back when gently pressed. Let the cakes cool in their pans for about 10–15 minutes before moving them to a wire rack. Patience here pays off—rushing the removal can cause the cake to crumble.
Step 6: Make the cream cheese frosting
While the cakes cool, beat the cream cheese and unsalted butter together until creamy and smooth. Use room-temperature ingredients—you want to avoid lumps at all costs. Add vanilla extract, then gradually mix in the powdered sugar, first on low speed then increase the speed for fluffy, spreadable frosting. Scrape down the bowl sides so everything folds together nicely.
Step 7: Assemble the heart shape and frost
Once fully cooled, slice the round cake in half to create two half circles. Place the square cake on your serving plate as the base, then arrange the two half circles on adjacent sides to form a perfect heart. Spread a thin crumb coat layer of frosting over the whole cake to trap crumbs, then pop it in the fridge for a bit if you want. After chilling, spread the remaining frosting evenly over the cake, smoothing it out beautifully. Add any decorations you like!
How to Serve Heart Shaped Cocoa Cake with Cream Cheese Frosting Recipe
Garnishes
I love topping this cake with fresh raspberries or sliced strawberries because their tartness cuts through the rich sweetness. Sometimes I sprinkle a little cocoa nibs or even edible gold dust when I want to fancy it up for a special occasion. It’s all about that burst of color and texture contrast.
Side Dishes
Pair this heart-shaped cake with a light, fresh fruit salad or a scoop of vanilla bean ice cream to balance the richness. If you’re having tea or coffee, a simple herbal tea or espresso really complements the cocoa notes beautifully.
Creative Ways to Present
One memorable time, I added tiny edible flowers around the edges and piped delicate rosettes of cream cheese frosting on top for a romantic celebration—it was a hit! You can also serve it on a rustic wooden board with matching red napkins for a cozy Valentine’s Day vibe. Getting a little creative with presentation makes this cake feel even more special.
Make Ahead and Storage
Storing Leftovers
I usually keep leftover Heart Shaped Cocoa Cake with Cream Cheese Frosting Recipe covered tightly in the fridge, either in a cake dome or wrapped with plastic wrap. It stays fresh and moist for about 3-4 days like this. The cream cheese frosting firms up nicely but still stays creamy.
Freezing
Freezing this cake is totally doable if you want to prep ahead. I recommend freezing it unfrosted in an airtight container or wrapped securely in plastic wrap and foil. When ready to serve, thaw overnight in the fridge and then frost fresh. This keeps that moist cocoa cake texture intact better than freezing after frosting.
Reheating
If you want to warm a slice slightly, I pop it in the microwave for just 10-15 seconds—enough to soften the cream cheese frosting without melting it. It revives the flavors without drying out the cake, perfect for day-old leftovers.
FAQs
-
Can I make the Heart Shaped Cocoa Cake without food coloring?
Yes, you can skip the red food coloring if you want a more traditional chocolate cake color. The cake will still taste delicious, but the vibrant heart shape effect won’t be as pronounced.
-
How do I prevent the cream cheese frosting from getting too runny?
Using room-temperature cream cheese and butter and beating them until smooth helps create a stable base. Also, add powdered sugar gradually to thicken the frosting and chill it briefly if it feels too soft before spreading.
- Can I bake the cake in different shaped pans?
Definitely! While the recipe calls for an 8-inch round and square pan to create the heart shape, you can use other sizes or shapes—but just keep an eye on baking time and adjust accordingly.
- Is it okay to use regular milk instead of buttermilk?
You can substitute buttermilk with regular milk mixed with a tablespoon of lemon juice or vinegar to mimic the acidity. This helps the cake’s texture and flavor develop properly.
- How do I assemble the heart shape so it looks neat?
Carefully slice the round cake in half horizontally and arrange the two halves beside the square cake on your serving plate. Using a crumb coat layer first helps bind pieces and smooth frosting application.
Final Thoughts
This Heart Shaped Cocoa Cake with Cream Cheese Frosting Recipe is truly a treasure in my baking repertoire. It’s that perfect balance of impressive looks and straightforward technique, so you get all the “wow” with none of the stress. Whether you’re celebrating a special moment or just want to share some love through food, this cake delivers joy in every bite. I hope you try this recipe soon and find as much delight in making and sharing it as I have—trust me, you’ll want to make it again and again!
PrintHeart Shaped Cocoa Cake with Cream Cheese Frosting Recipe

This Heart Shaped Cocoa Cake with Cream Cheese Frosting is a delightful dessert perfect for special occasions. Featuring a moist cocoa-flavored cake dyed with vibrant red food coloring and layered with a rich, creamy cream cheese frosting, it’s both visually stunning and delicious. The cake is baked in two pans, then cleverly assembled into a heart shape and decorated to impress your guests.
- Prep Time: 40 minutes
- Cook Time: 35 minutes
- Total Time: 1 hour 45 minutes
- Yield: 12 servings 1x
- Category: Dessert
- Method: Baking
- Cuisine: American
Ingredients
Cake Ingredients
- 2 ½ cups all-purpose flour
- ¼ cup cocoa powder
- 1 ½ teaspoons baking soda
- 1 teaspoon baking powder
- 1 ½ cups granulated sugar
- ½ teaspoon salt
- 1 ½ cups buttermilk, room temperature
- 1 cup vegetable oil
- 2 large eggs, room temperature
- 1 teaspoon white vinegar
- 2 teaspoons vanilla extract
- 2 tablespoons liquid red food coloring
Cream Cheese Frosting Ingredients
- 1 pound cream cheese, room temperature
- 8 ounces unsalted butter, room temperature
- 1 teaspoon vanilla extract
- 1 ½ cups powdered sugar
Instructions
- Preheat and Prepare Pans: Preheat your oven to 350°F (175°C). Spray one 8-inch round pan and one 8-inch square pan with non-stick pan spray, line each with parchment paper, and spray the parchment paper as well. Set pans aside for batter.
- Mix Dry Ingredients: In a medium bowl, sift together the all-purpose flour, cocoa powder, baking soda, and baking powder. Add granulated sugar and salt, then whisk everything together until combined. Set this dry mixture aside.
- Combine Wet Ingredients: In a large bowl, whisk together the buttermilk, vegetable oil, eggs, white vinegar, vanilla extract, and liquid red food coloring until the mixture is smooth and well blended.
- Incorporate Dry into Wet: Gradually add the dry ingredient mix into the wet ingredients, whisking carefully until the batter is smooth and fully combined. Take care not to overmix to ensure a tender crumb.
- Pour and Bake: Evenly divide the batter between the prepared round and square pans. Place both in the oven and bake for 30-35 minutes, or until a toothpick inserted into the center comes out clean and the cake springs back when lightly pressed.
- Cool the Cakes: Remove cakes from the oven and allow them to cool in their pans for 10 to 15 minutes. After that, carefully remove the cakes from the pans, peel off the parchment paper, and transfer to a cooling rack to cool completely.
- Prepare the Frosting: While the cakes cool, beat the cream cheese and unsalted butter together in a large mixing bowl or stand mixer until creamy and smooth.
- Add Flavoring: Mix in the vanilla extract, scraping down the sides of the bowl as needed for an even consistency.
- Incorporate Powdered Sugar: Gradually add the powdered sugar while mixing on low speed to avoid clouds of sugar; once incorporated, increase the mixer speed and beat the frosting until light and fluffy.
- Assemble the Heart Shape: Once cakes are completely cooled, cut the round cake horizontally in half to create two half circles. Place the square cake on your serving plate, then position the two half circles on adjacent sides of the square so the edges meet forming a heart shape.
- Crumb Coat the Cake: Spread a thin layer of cream cheese frosting evenly over the entire assembled cake to trap any loose crumbs. Smooth this layer out and refrigerate briefly if desired to set.
- Final Frosting Layer: Apply the remaining frosting evenly over the cake’s surface, smoothing it carefully to create a neat finish. Decorate with sprinkles or any other desired decorations.
- Chill Before Serving: Refrigerate the decorated cake for at least 30 minutes so the frosting can firm up, making slicing easier and the presentation clean.
Notes
- Ensure all ingredients like eggs and buttermilk are at room temperature for best mixing results and texture.
- If you don’t have liquid red food coloring, gel food coloring can be used as a substitute for vibrant color.
- Be careful not to overmix the batter to avoid a dense cake.
- The cream cheese and butter should be softened but not melted for smooth frosting.
- This cake is best served chilled but allow it to come to room temperature for about 15 minutes before eating for optimal flavor.
- You can store the cake in the refrigerator, covered, for up to 3 days.
Keywords: heart shaped cake, cocoa cake, cream cheese frosting, red velvet style cake, valentine dessert, chocolate cake