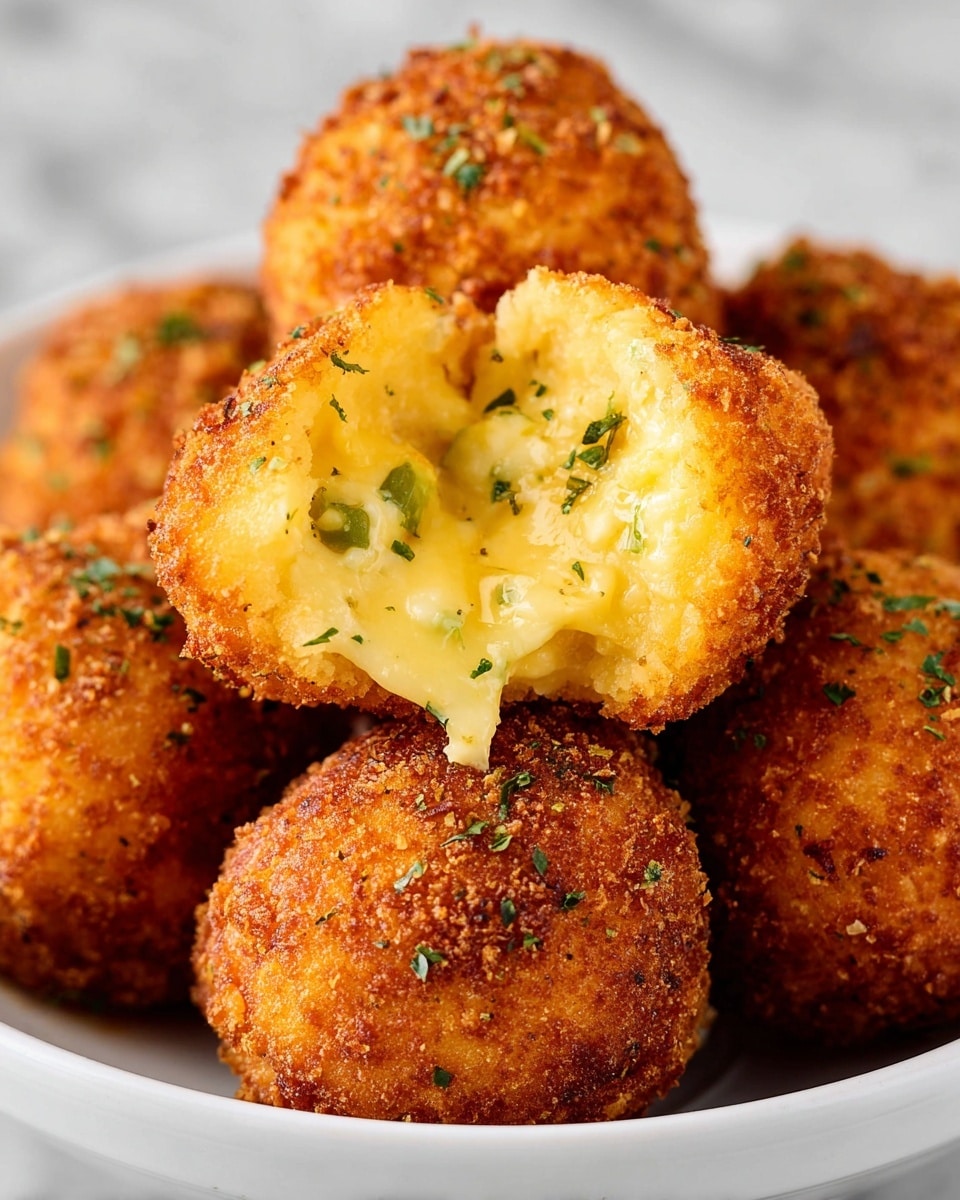
Spicy Bacon Jalapeño Popper Cheese Balls Recipe
Oh, you’re going to love this Spicy Bacon Jalapeño Popper Cheese Balls Recipe! It’s one of those irresistible appetizers that totally steals the show at parties or casual get-togethers. Imagine crispy, golden-fried bites bursting with creamy, cheesy, and just the right amount of spicy jalapeño kick — these cheese balls are just the kind of indulgence that’s perfect for sharing but good luck stopping at just one.
What makes this recipe so special is how it combines smoky bacon, sharp cheddar, and fresh jalapeños inside a crunchy, fried shell. I first made these on a whim for a game day snack, and they instantly became a favorite in my household. Plus, they’re surprisingly easy to make once you’ve got the steps down, so I know you’ll enjoy making — and eating — this Spicy Bacon Jalapeño Popper Cheese Balls Recipe just as much as I do.
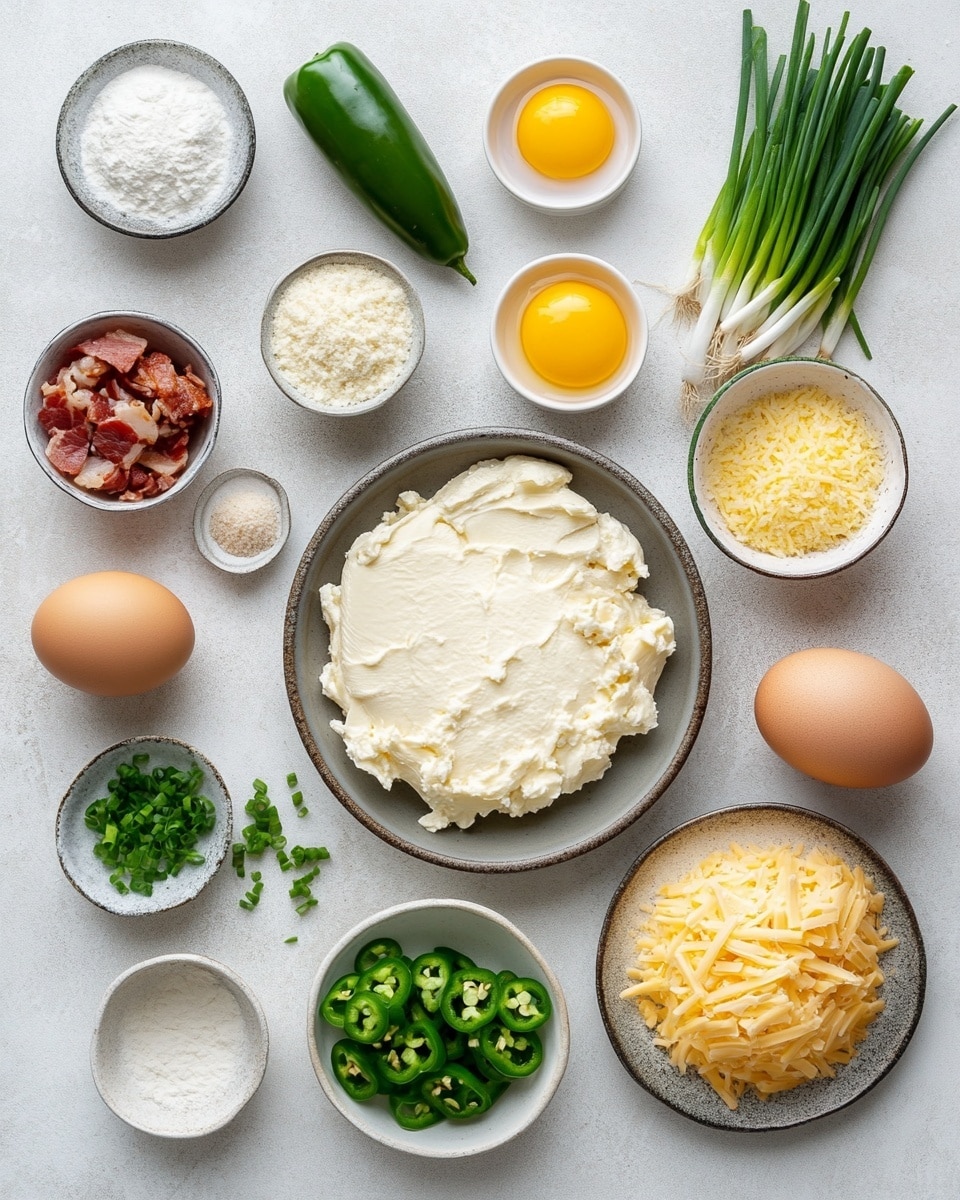
Ingredients You’ll Need
Each ingredient in this Spicy Bacon Jalapeño Popper Cheese Balls Recipe was chosen for its perfect flavor and texture balance. From creamy cheeses to crispy bacon and fiery jalapeños, these ingredients work beautifully together to create that classic popper taste with a fun twist.
- Cream cheese: Softened cream cheese is the perfect base for the filling—it gives that rich, creamy texture you want inside each cheese ball.
- Sharp cheddar cheese: Adds a nice tangy sharpness and helps the balls hold their cheesy flavor after frying.
- Jalapeños: Finely diced for a little spicy punch; fresh jalapeños bring true heat and a nice crunch if you leave some seeds in.
- Bacon: Cooked and crumbled for a smoky, savory contrast; I recommend thick-cut bacon for extra flavor.
- Green onions: Brings freshness and a light oniony tang that balances the richness.
- Garlic powder: Enhances depth of flavor without overpowering the other ingredients.
- Salt and black pepper: Basic seasoning to bring out all the layers of taste.
- All-purpose flour: Helps bind the mixture and is part of the breading process for frying.
- Eggs: Beaten eggs help the breadcrumbs stick to the cheese balls for that perfect crispy coating.
- Panko breadcrumbs: Panko gives an extra crunchy exterior compared to regular breadcrumbs—highly recommended!
- Vegetable oil: For frying until golden and crisp—choose an oil with a high smoke point.
Variations
I love putting my spin on this Spicy Bacon Jalapeño Popper Cheese Balls Recipe depending on the occasion or who I’m cooking for. Don’t be shy about tweaking the ingredients to suit your taste or dietary needs!
- Make it vegetarian: Simply leave out the bacon or substitute with smoked paprika or a plant-based bacon alternative. I’ve tried this and was surprised how flavorful it stayed with just the spices.
- Add creaminess with herbs: Mixing in some chopped fresh cilantro or chives adds a fresh punch that livens up each bite.
- Less heat option: Use mild or deseeded jalapeños to tame the spiciness without losing any of the signature popper taste.
- Cheese swaps: Swap shredded cheddar for pepper jack if you want an extra zesty kick or use a combo of cheeses for a richer flavor.
How to Make Spicy Bacon Jalapeño Popper Cheese Balls Recipe
Step 1: Prepare the flavorful filling
Start by softening your cream cheese to room temperature, so it’s easy to mix. Then, in a bowl, combine the cream cheese, shredded sharp cheddar, finely diced jalapeños, crumbled cooked bacon, chopped green onions, garlic powder, salt, and black pepper. Mix everything well until it’s an even, flavorful cheese mixture — I find a sturdy spoon or spatula works best here. This is your delicious base, so don’t rush and taste test if you want to tweak the heat or seasoning.
Step 2: Form and chill the cheese balls
Once the mixture is ready, take small handfuls and roll them into bite-sized balls. Don’t make them too big — about the size of a walnut works best. Place the balls on a parchment-lined tray and pop them in the fridge for at least 30 minutes. Chilling helps them firm up so they hold their shape better when you fry them.
Step 3: Set up the breading station
While the cheese balls chill, prepare your breading setup. Put the flour in one shallow bowl, the beaten eggs in another, and the panko breadcrumbs in a third. This simple three-step breading process creates that crispy outer crunch you’re after. Trust me, don’t skip any step — flour helps with sticking, egg secures the coating, and panko brings unbeatable texture.
Step 4: Bread the cheese balls carefully
Take the chilled cheese balls and first roll each one in the flour, making sure it’s coated evenly. Then dip it into the beaten eggs, and finally coat it generously with panko breadcrumbs. For best results, press the panko gently around the ball to adhere well. Place the breaded balls on a clean tray and refrigerate again for 15-20 minutes; this tightens the coating, reducing the risk of falling apart during frying.
Step 5: Fry to golden perfection
Heat about 2 cups of vegetable oil in a heavy-bottom pan or deep fryer to around 350°F (175°C). Carefully add a few cheese balls at a time — don’t overcrowd the pan, or the temperature will drop, making them greasy. Fry for 2-3 minutes or until they turn a beautiful golden brown. Use a slotted spoon to remove them and place on paper towels to drain excess oil. Pro tip: Keep them warm in a low oven if you need to fry in batches.
How to Serve Spicy Bacon Jalapeño Popper Cheese Balls Recipe
Garnishes
I often sprinkle chopped fresh parsley or extra green onions over the cheese balls for a burst of color and freshness. Sometimes, I drizzle a bit of creamy ranch or a spicy chipotle mayo on the side for dipping—that combo never fails to get compliments in my house.
Side Dishes
Pair these cheese balls with simple sides like crunchy celery sticks, sweet baby carrots, or a fresh garden salad to balance the richness. For a heartier setup, I love setting out a charcuterie board or serving with crispy sweet potato fries.
Creative Ways to Present
For a party, I like arranging the cheese balls on a colorful platter surrounded by little ramekins of dips like guacamole, salsa, or even blue cheese dressing. You can also serve each cheese ball on a small skewer with a jalapeño slice on top for a fun, bite-sized appetizer that’s easy for guests to grab.
Make Ahead and Storage
Storing Leftovers
I usually keep leftover cheese balls in an airtight container in the fridge for up to 3 days. Before reheating, let them come to room temperature to avoid overcooking the inside while warming the outside.
Freezing
Freezing works well if you prep and bread the cheese balls but don’t fry them yet. Place them on a parchment-lined tray to freeze individually first, then transfer to a freezer-safe bag. When ready to eat, just fry them straight from frozen — just add an extra minute or two to the cooking time.
Reheating
To keep them crispy, I reheat leftover cheese balls in a toaster oven or regular oven at 350°F for about 10 minutes. Avoid microwaving if you can, since it makes the crust soggy and takes away that crunch we’re after!
FAQs
-
Can I make Spicy Bacon Jalapeño Popper Cheese Balls Recipe ahead of time?
Absolutely! You can prepare and shape the cheese balls a day before, keep them covered in the fridge, then bread and fry them when you’re ready. Alternatively, you can bread them ahead and freeze for quick frying later.
-
What can I use instead of jalapeños if I want less heat?
Feel free to substitute with mild peppers like poblano or banana peppers, or remove the seeds from jalapeños to reduce the spice while keeping the flavor.
- Is frying the only way to cook these cheese balls?
While frying gives the classic crispy texture, you can try baking them at 400°F on a parchment-lined sheet for about 15-20 minutes. They won’t be quite as crunchy but still delicious!
- Can I make this recipe gluten-free?
Yes! Substitute the all-purpose flour and panko breadcrumbs with gluten-free flour and gluten-free breadcrumbs to make this recipe safe for gluten-sensitive eaters.
- How spicy will the Spicy Bacon Jalapeño Popper Cheese Balls be?
The heat depends on your jalapeños and how much you include. Dicing them finely distributes the spice, balancing it with creamy cheese and smoky bacon. If you’re sensitive to spice, try removing the seeds or using milder peppers.
Final Thoughts
These Spicy Bacon Jalapeño Popper Cheese Balls feel like a little celebration in every bite. I love how they’re crunchy, creamy, smoky, and spicy all at once — a real crowd-pleaser that’s surprisingly simple to make at home. If you enjoy bold flavors and crave a fantastic snack to impress your friends, I can’t recommend this recipe enough. Give it a try, and trust me, you’ll be reaching for seconds (and thirds!) in no time.
PrintSpicy Bacon Jalapeño Popper Cheese Balls Recipe

These Spicy Bacon Jalapeño Popper Cheese Balls are a delightful appetizer combining creamy sharp cheddar and cream cheese, spicy jalapeños, savory bacon, and crispy panko coating, perfect for parties or snacking.
- Prep Time: 20 minutes
- Cook Time: 10 minutes
- Total Time: 30 minutes
- Yield: 12 cheese balls 1x
- Category: Appetizer
- Method: Frying
- Cuisine: American
Ingredients
Cheese Mixture
- 113g cream cheese, softened
- 120g sharp cheddar cheese, shredded
Vegetables & Seasonings
- 2 jalapeños, finely diced
- 2 green onions, chopped
- 1/2 tsp garlic powder
- 1/4 tsp salt
- 1/4 tsp black pepper
Breading & Frying
- 1/2 cup all-purpose flour
- 2 eggs, beaten
- 1 cup panko breadcrumbs
- 4 slices bacon, cooked and crumbled
- 2 cups vegetable oil, for frying
Instructions
- Prepare Cheese Mixture: In a bowl, combine the softened cream cheese and shredded sharp cheddar cheese until smooth. Fold in the finely diced jalapeños, chopped green onions, crumbled bacon, garlic powder, salt, and black pepper until evenly mixed.
- Form Cheese Balls: Using your hands, shape the cheese mixture into small bite-sized balls, approximately 1 to 1.5 inches in diameter. Place them on a tray and chill in the refrigerator for about 30 minutes to firm up.
- Set Up Breading Stations: Prepare three shallow bowls: one with all-purpose flour, one with beaten eggs, and one with panko breadcrumbs.
- Coat Cheese Balls: Remove the chilled cheese balls from the refrigerator. Roll each ball first in the flour, shaking off any excess, then dip into the beaten eggs, and finally coat evenly with panko breadcrumbs. For extra crispness, you may repeat the egg and panko steps once more.
- Heat Oil for Frying: In a deep skillet or frying pan, heat the vegetable oil over medium-high heat until it reaches about 350°F (175°C). Use a thermometer if available to maintain proper frying temperature.
- Fry Cheese Balls: Carefully drop the coated cheese balls into the hot oil in batches to avoid overcrowding. Fry for 2-3 minutes or until golden brown and crispy on all sides. Use a slotted spoon to remove them and place them on a paper towel-lined plate to drain excess oil.
- Serve: Allow the popper cheese balls to cool for a minute and serve warm as an appetizer or snack with your favorite dipping sauces.
Notes
- Chilling the cheese balls before breading helps them hold their shape during frying.
- Adjust the amount of jalapeños based on your preferred spice level.
- To make the coating extra crispy, double dip in egg and breadcrumbs.
- Monitor oil temperature closely to avoid greasy cheese balls.
- These can be baked at 400°F (200°C) for 15-20 minutes as a healthier alternative.
Keywords: jalapeño popper, cheese balls, bacon appetizer, fried cheese balls, party snacks, spicy appetizers