
Oreo Cookie Christmas Ornaments Recipe
I’m so excited to share this Oreo Cookie Christmas Ornaments Recipe with you! It’s such a fun way to add some edible magic to your holiday decorating. I first made these ornaments a few years ago when I wanted to surprise my family with a festive treat that doubles as decoration – trust me, the kids loved hanging them on the tree and sneaking bites throughout the season.
What makes this recipe really special is how simple it is to pull off, even if you don’t normally consider yourself a baker or decorator. With just a handful of ingredients and a bit of creativity, you’ll whip up these charming Oreo ornaments that’ll be the talk of your holiday gatherings. Plus, they’re such a great activity to do with friends or family during a cozy winter afternoon!
Ingredients You’ll Need
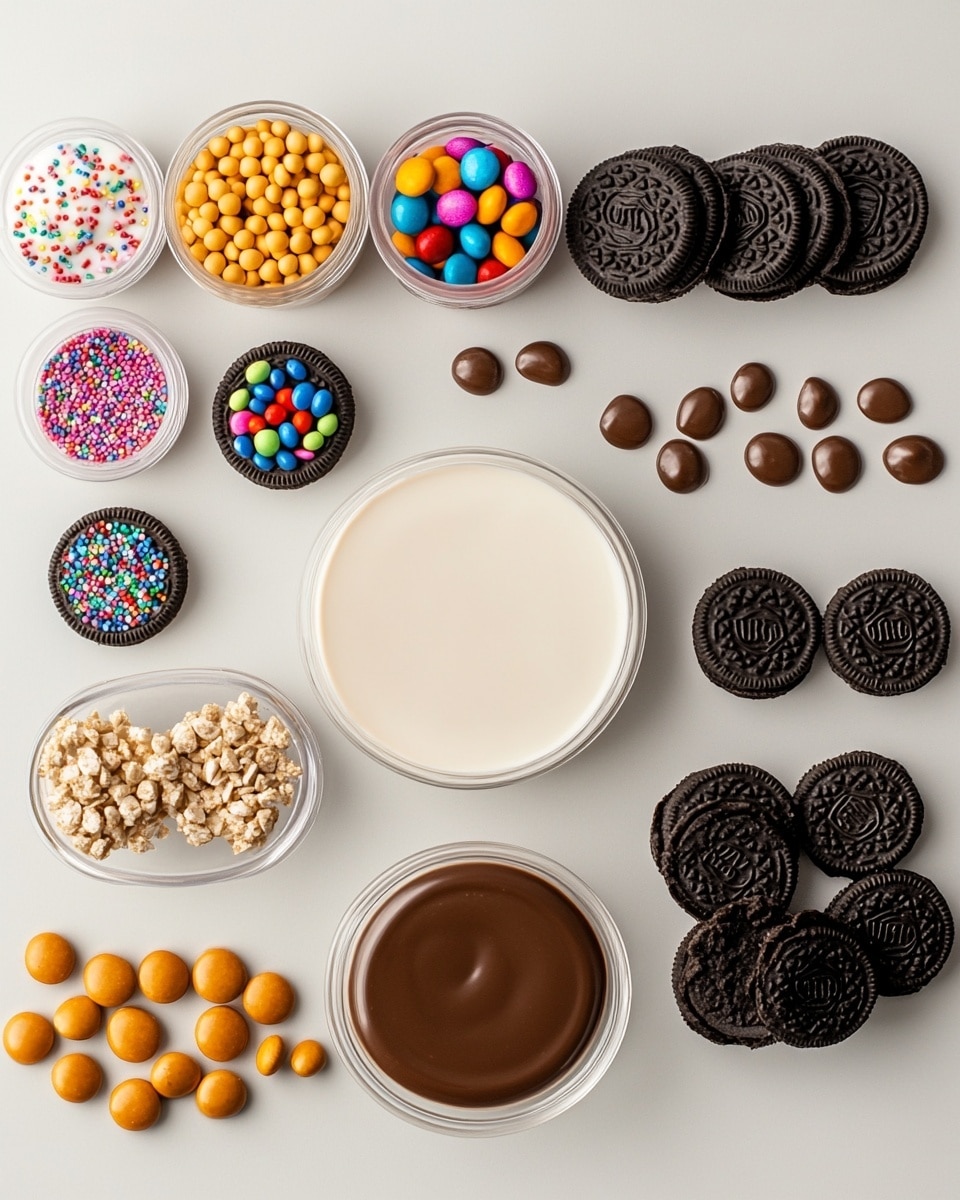
These ingredients come together perfectly to create Oreo Cookie Christmas Ornaments that are as delightful to look at as they are to eat. Choosing quality candy melts and fun sprinkles really ups the festive factor – and, of course, fresh Oreos make all the difference in texture and taste.
- Oreos: Classic Oreos work great here – their size is perfect for hanging on the tree and their texture holds up well when dipped.
- Mini peanut butter cups: These add a delicious center and a pop of color; plus, they adhere nicely to the Oreos with the melted candy.
- Candy melts: Choose a festive color like red or green, or go classic white to resemble snow. They melt smoothly and harden quickly, perfect for decorating.
- Sprinkles and candy decorations: Have fun with Christmas-themed sprinkles, edible glitter, or tiny candy stars to personalize your ornaments.
Variations
I love making this Oreo Cookie Christmas Ornaments Recipe my own by switching up the candy melts color or trying different sprinkle themes. You can really make it as simple or as elaborate as you like—go wild with edible glitter if you’re feeling fancy!
- Peanut-free option: I once made these with mini chocolate chips in place of the peanut butter cups for a nut-free crowd; they were just as tasty!
- Gluten-free Oreos: For friends with dietary restrictions, gluten-free Oreo varieties work perfectly to keep the fun going.
- Mint twist: Swap regular Oreos for mint-flavored ones and use green candy melts for a refreshing flavor that screams holiday spirit.
- Glitter surprise: Adding edible glitter to the melted candy before it sets gives an extra sparkle, which I find makes these ornaments extra magical.
How to Make Oreo Cookie Christmas Ornaments Recipe
Step 1: Melt the Candy Magic
Start by melting your candy melts according to the package instructions—usually in short bursts in the microwave or over a double boiler. I like to stir every 20 seconds to keep the melts smooth and prevent burning. The key here is patience; melting too fast risks clumps that won’t coat your Oreos evenly.
Step 2: Dip and Decorate Your Oreos
Once your candy melts are silky smooth, it’s time to dip each Oreo. You can dip the whole cookie or just the edges to create a fun snow-drift effect. Before the coating hardens, press a mini peanut butter cup gently onto the center as your ornament’s ‘hook’ and scatter your sprinkles on top. One tip: work quickly but carefully because the candy sets fast!
Step 3: Add a Hanging Ribbon
This is a festive trick I discovered after my first batch: use a little melted candy as glue to attach a looped ribbon or string to the mini peanut butter cup. Let it dry completely before trying to hang—it’ll hold firm and make your Oreo Cookie Christmas Ornaments ready to deck the halls!
Step 4: Let Them Set Completely
Place your finished oreo ornaments on wax paper or a silicone mat and let them set at room temperature for at least 30 minutes. If you’re in a hurry, popping them briefly in the fridge works too—but be gentle removing them so you don’t crack the candy coating.
How to Serve Oreo Cookie Christmas Ornaments Recipe
Garnishes
I like to keep garnishes simple—just a dusting of powdered sugar or some extra festive sprinkles here and there. It keeps the look clean but still brings that cheerful sparkle, especially if you’re gifting them.
Side Dishes
These ornaments are sweet and rich, so pairing them with something light like fresh fruit or a warm cup of cocoa really balances out the holiday treat vibe. They also make an adorable topping for ice cream or a dessert platter for any Christmas party.
Creative Ways to Present
One year, I arranged the Oreo Cookie Christmas Ornaments Recipe on a tiered serving tray wrapped with ribbons and pine sprigs—it doubled as a centerpiece and snack station for guests. Another fun idea is to package them in clear gift bags tied with red and green ribbon as edible favors for holiday visitors.
Make Ahead and Storage
Storing Leftovers
If you have leftovers (which is rare in my house!), store these ornaments in an airtight container at room temperature to keep the candy shell crisp and avoid moisture softening the Oreos. I’ve found they keep well for up to a week this way.
Freezing
While I don’t often freeze these, you can wrap each ornament individually and place them in a freezer-safe bag. When you thaw them, let them sit at room temperature to avoid condensation ruining the candy coating.
Reheating
These aren’t really meant to be reheated, but if your candy coating softens, a quick chill in the fridge helps it firm up again. Just make sure they’re completely dry before storing so they don’t stick together.
FAQs
-
Can I use regular chocolate instead of candy melts for the Oreo Cookie Christmas Ornaments Recipe?
You can substitute regular chocolate, but candy melts are designed to harden with a smooth finish and at room temperature, making them easier to work with for ornaments. Chocolate can be softer and may require refrigeration to set properly.
-
How do I make sure the mini peanut butter cups stick well to the Oreos?
Using the melted candy as glue is key! After dipping the Oreo, gently press the mini peanut butter cup into the wet coating and hold for a few seconds before placing it on the drying surface. This helps them bond as the candy sets.
-
Are these ornaments safe to hang on the tree around children and pets?
Because these are edible ornaments, I recommend hanging them on branches higher up and explaining to little ones that these are special treats, not toys. It’s always safer to keep edible decorations out of reach of pets to avoid any accidental eating.
-
Can I prep parts of the Oreo Cookie Christmas Ornaments Recipe ahead of time?
You can melt the candy melts ahead and store them warm in a sealed container for a short time, but it’s best to assemble the ornaments right before decorating to keep everything fresh and the coating smooth. You can also prep your sprinkles and candies in advance for smoother workflow.
Final Thoughts
This Oreo Cookie Christmas Ornaments Recipe is one of those little holiday projects that brings so much joy beyond just the taste. I love how it combines crafting with cooking—it’s truly a festive activity I look forward to every year. You’re going to enjoy making these as much as you’ll enjoy seeing them sparkle on your tree and sharing them with loved ones. Trust me, once you try this, it might just become your new holiday tradition!
PrintOreo Cookie Christmas Ornaments Recipe

Create festive Oreo Cookie Christmas Ornaments perfect for holiday treats or decorating your Christmas tree. These delightful snacks combine classic Oreos with melty candy coating, mini peanut butter cups, and festive sprinkles for a fun and delicious holiday dessert.
- Prep Time: 10 minutes
- Cook Time: 10 minutes
- Total Time: 20 minutes
- Yield: 12 ornaments 1x
- Category: Dessert
- Method: No-Cook
- Cuisine: American
Ingredients
Cookies
- 12 Oreo cookies
- 12 mini peanut butter cups
Candy Coating and Decorations
- 10 oz candy melts (any color, typically red or green for Christmas)
- Sprinkles and assorted candy for decorating
Instructions
- Melt Candy Coating: In a microwave-safe bowl, melt the 10 oz of candy melts in 30-second intervals, stirring well between each interval until smooth and creamy.
- Dip Oreos: Using a fork or dipping tool, dip each Oreo cookie into the melted candy until fully coated, allowing excess candy to drip off.
- Attach Peanut Butter Cups: Immediately press one mini peanut butter cup onto the center or top of each candy-coated Oreo before the coating sets.
- Decorate: Quickly sprinkle decorative sprinkles and assorted candies over the wet candy coating to create festive designs on each ornament.
- Set to Harden: Place the decorated Oreos on a parchment-lined tray and allow the candy melts to completely harden at room temperature, about 20-30 minutes.
- Add Ornament Hooks (optional): If desired, you can insert a small loop of ribbon or a candy cane hook into the candy coating before it hardens for hanging purposes.
Notes
- For a smoother coating, use candy melts specifically designed for dipping and ensure no water mixes with the melts.
- You can customize the colors and decorations to match your holiday theme.
- If you want to use these as ornaments, add ribbon before the coating hardens so it sticks firmly.
- Store in an airtight container at room temperature to keep cookies fresh.
- Handle decorated cookies gently as the candy coating can be fragile once hardened.
Keywords: Oreo cookies, Christmas ornaments, holiday treats, candy melts, peanut butter cups, festive desserts