Festive Christmas Marshmallow Pops Recipe
If you’re looking for a delightful holiday treat that’s as fun to make as it is to eat, you’re going to love this Festive Christmas Marshmallow Pops Recipe. These pops are the perfect combination of fluffy marshmallows, festive colors, and crunchy candy cane bits—making them a standout at any holiday party or family gathering. Plus, they’re so quick to whip up, you’ll have a batch ready before you know it.
What makes this recipe especially charming is how versatile it is. You can customize your pops with all sorts of colorful coatings and toppings, which turns the whole kitchen into a creative playground. I’ve made these with my nieces and nephews, and their eyes light up every time they get to decorate their own marshmallow pop. Trust me, this Festive Christmas Marshmallow Pops Recipe will put a smile on everyone’s face and add that extra sparkle to your holiday celebrations.
Ingredients You’ll Need
These ingredients come together perfectly to create marshmallow pops that are not only tasty but also visually stunning. The combination of different melting chocolates and candy cane bits brings both flavor and texture, while the sprinkles add that magical holiday touch.
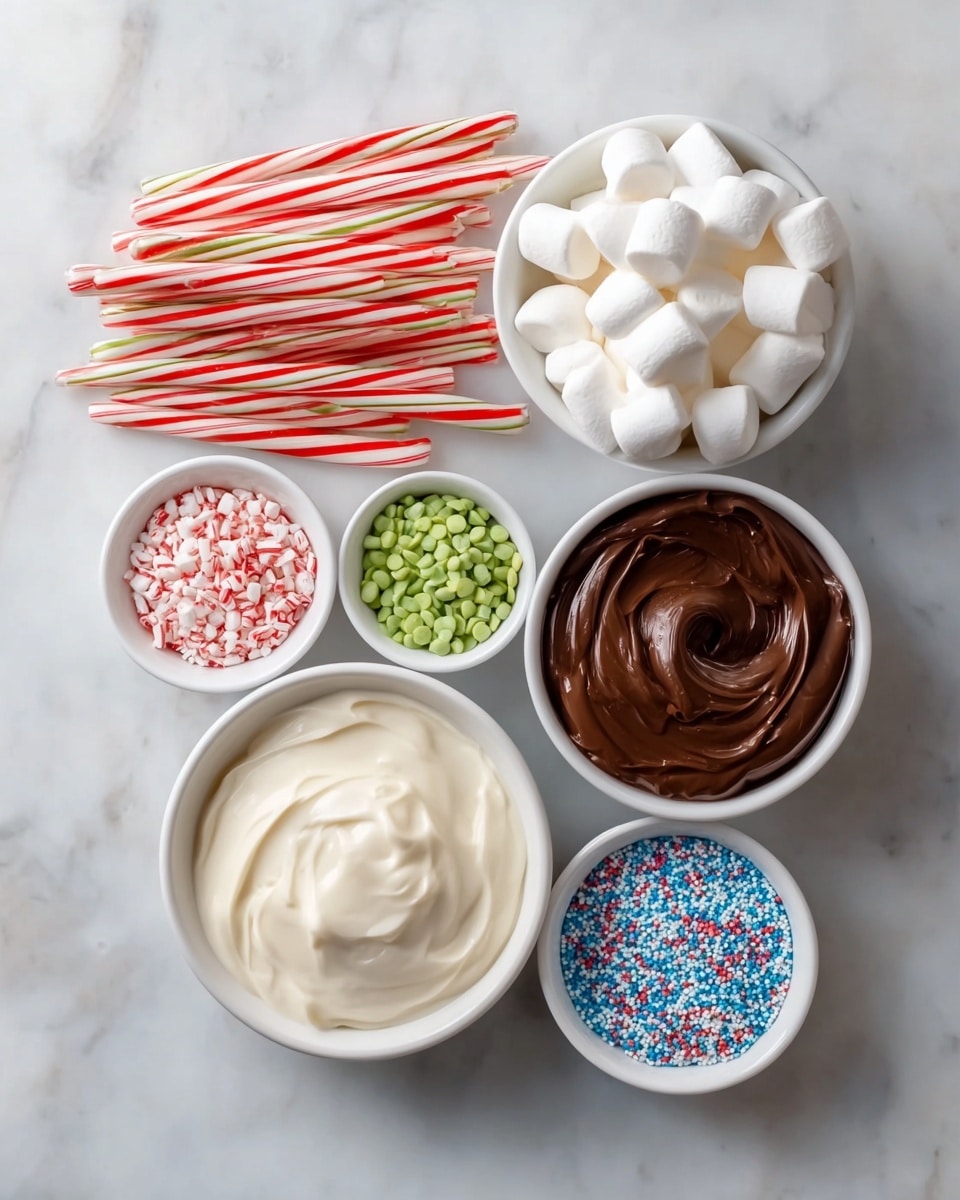
- Candy canes: Using plain, unwrapped candy canes means you get that classic peppermint crunch which pairs beautifully with the marshmallows.
- Large marshmallows: Pick fluffy, fresh marshmallows so your pops have that perfect soft bite.
- Melting chocolate: Choose good quality melting chocolate for a smooth, glossy coating. I find it melts evenly and sets with a nice shine.
- White melting chocolate: For contrast and added sweetness, white chocolate is a great choice.
- Green melts: These colored candy melts add festive flair without a lot of fuss.
- Red melts: Same as the green melts, red melts bring that holiday pop of color.
- Crushed candy canes: Don’t skip these—they add crunch and a peppermint kick that’s unmistakably Christmas.
- Holiday sprinkles: Use your favorite sprinkles to really personalize your marshmallow pops. I love a mix of red, green, and white for maximum festive effect.
Variations
I like to mix things up with this Festive Christmas Marshmallow Pops Recipe depending on the occasion or mood. Personalizing these treats is half the fun—you might discover your own signature version!
- Chocolate lovers’ twist: I once dipped some marshmallows in dark chocolate and sprinkled sea salt on top—it made for a surprisingly perfect sweet-salty combo.
- Nutty variation: Adding chopped nuts like pistachios or almonds can give a nice crunch and a bit of a twist for those who want to stray from traditional.
- Dairy-free option: Use dairy-free melting chocolate and skip the sprinkles that contain milk ingredients; I’ve tried vegan candy melts and my dairy-free friends were thrilled.
- Mini pops: Using mini marshmallows and smaller candy canes creates bite-sized pops, perfect for kids or as party favors.
How to Make Festive Christmas Marshmallow Pops Recipe
Step 1: Prepare Your Candy Cane Sticks and Marshmallows
Start by gently unwrapping each candy cane—these will be your sticks, giving the pops a sturdy peppermint handle. If a candy cane is too curved for your liking, you can carefully straighten it by warming it slightly in your hands (just be careful not to snap them). Then, firmly press each large marshmallow onto the end of a candy cane where it fits snugly. This helps prevent any wobbling when you dip the pops later on.
Step 2: Melt the Chocolates and Candy Melts
Melt your chocolates in separate microwave-safe bowls: the dark or milk melting chocolate in one, the white melting chocolate in another, and your green and red melts in their own containers. I recommend melting in short bursts of 20-30 seconds, stirring in between to avoid scorching. Smooth, glossy melted chocolate is the key to an even coating and beautiful pops.
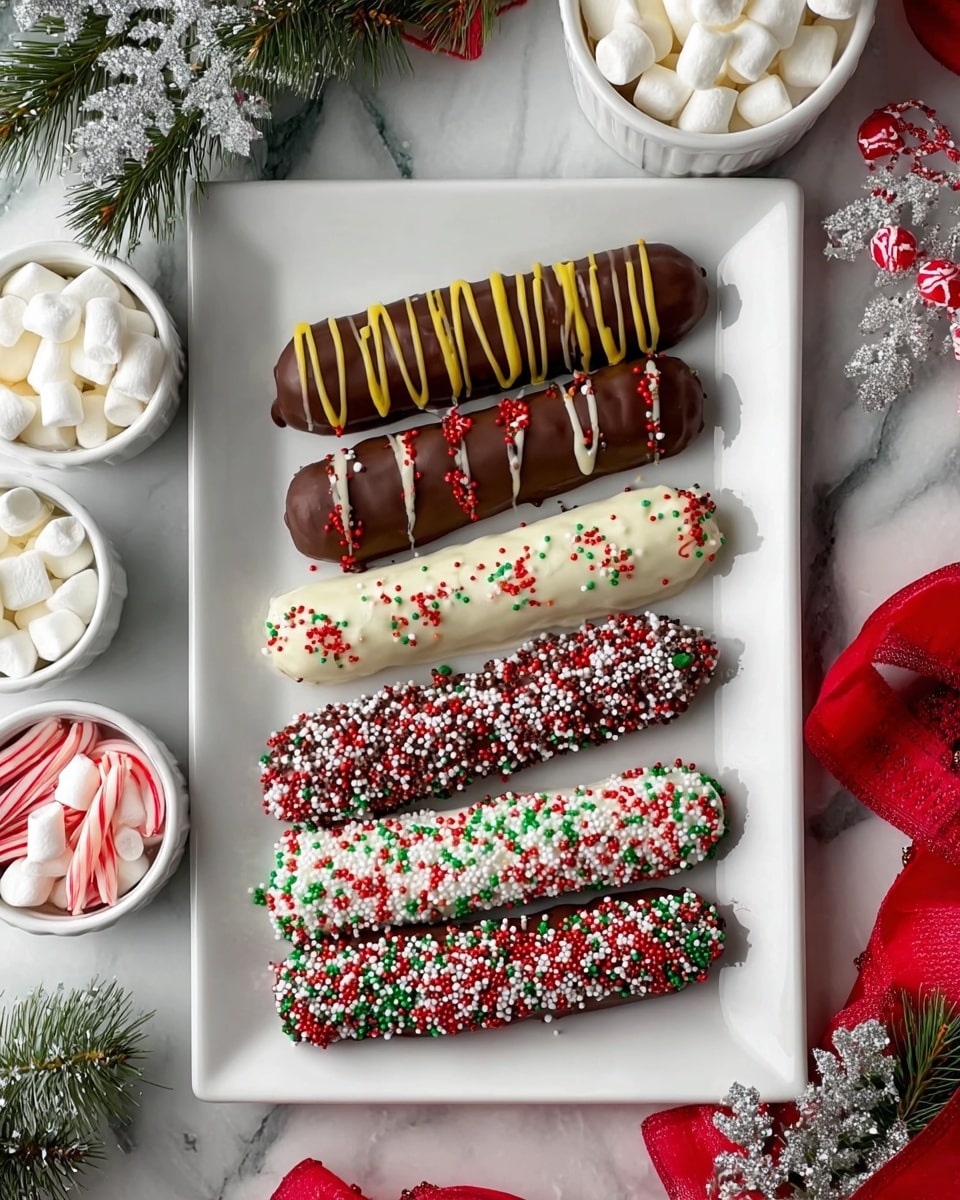
Step 3: Dip and Decorate Your Marshmallow Pops
Hold a marshmallow pop by the candy cane handle and dip it into whichever melted chocolate or candy melt you prefer. Let the excess drip off for a few seconds so your coating isn’t too thick. Next, quickly sprinkle your crushed candy canes or festive holiday sprinkles over the wet chocolate before it sets. You can even swirl different colors of melted chocolate for a marbled effect if you’re feeling creative—this is my personal favorite trick when making these pops with friends!
Step 4: Let Pops Set and Harden
Place your decorated pops on a parchment-lined tray or stand them upright in a foam block to let the coating harden completely. This usually takes about 20-30 minutes at room temperature, or you can speed it up by popping them in the fridge for 10-15 minutes. Just be gentle when handling—they can be delicate until fully set.
How to Serve Festive Christmas Marshmallow Pops Recipe
Garnishes
I love using crushed candy canes for their peppermint zing and crunchy texture, but holiday sprinkles really amp up the festive vibe. Sometimes I add edible glitter to make these marshmallow pops extra magical—kids and adults alike can’t resist the sparkle!
Side Dishes
These marshmallow pops pair perfectly with warm drinks—think hot cocoa or mulled cider. I’ve also enjoyed serving them alongside gingerbread cookies or a plate of assorted holiday chocolates. They’re a great sweet bite in between more substantial treats.
Creative Ways to Present
For parties, I like arranging the pops standing upright in mason jars filled with holiday-themed candy or colored sugar. Wrapping each pop in clear cellophane tied with a ribbon makes a lovely gift or take-home favor. Another idea is to create a marshmallow pop “bouquet” centerpiece—it always becomes a conversation starter!
Make Ahead and Storage
Storing Leftovers
I store leftover marshmallow pops in an airtight container at room temperature to keep the chocolate crisp and the marshmallow soft. They stay fresh for about 3-4 days this way, though they rarely last that long in my house! To avoid moisture making the chocolate coating sticky, place parchment paper between layers if stacking pops.
Freezing
If you want to make these ahead for a big party, they freeze quite well. I wrap each pop individually in plastic wrap and then seal them all in a freezer-safe bag. When I’ve thawed them at room temperature, the texture stays surprisingly good, though I recommend enjoying them within a month for best flavor and appearance.
Reheating
There’s no reheating needed for these marshmallow pops, but if you find the chocolate has dulled or softened after storage, just let them come to room temperature before serving. Avoid heating them as it can cause the marshmallows to melt or become sticky.
FAQs
-
Can I use wooden sticks instead of candy canes for marshmallow pops?
Absolutely! Wooden sticks or lollipop sticks work just as well and might even be easier to handle if you prefer. Candy canes add that peppermint flavor and holiday charm, but wooden sticks let you dip larger batches and customize in different ways.
-
What if I don’t have candy melts for dipping?
You can use regular white chocolate or colored white chocolate bark as substitutes. Just make sure to melt them gently over a double boiler or in short microwave bursts so they don’t seize. Food coloring or edible markers can help you add color and designs afterward.
-
How do I prevent marshmallows from sliding off the candy canes?
Press the marshmallow firmly onto the curved end of the candy cane so it fits snugly. Sometimes lightly warming the candy cane can help it soften just enough to secure the marshmallow without breaking. Another tip: dip the tip of the candy cane in chocolate before adding the marshmallow to act like edible glue.
-
How long do Festive Christmas Marshmallow Pops stay fresh?
Stored in an airtight container at room temperature, these pops stay fresh and tasty for about 3-4 days. They’re best enjoyed soon after making because the marshmallows can dry out or the chocolate can lose its snap over time.
-
Can kids help make this recipe?
Absolutely! This is a kid-friendly recipe that’s perfect for little hands. Just supervise the melting chocolate step. Kids love decorating their own pops with sprinkles and candy bits — it’s a wonderful way to get them involved in holiday cooking.
Final Thoughts
This Festive Christmas Marshmallow Pops Recipe always reminds me of cozy afternoons in the kitchen with friends and family, laughing and creating holiday memories one sweet pop at a time. I hope you’ll give it a try because it’s such an easy, joyful way to bring a sprinkle of magic to your holiday celebrations. Whether you’re making these to share or to gift, the smiles they inspire are truly the best part of the recipe. Happy festive popping!
PrintFestive Christmas Marshmallow Pops Recipe

Celebrate the festive season with these delightful Christmas Marshmallow Pops! Soft marshmallows coated in rich chocolate and decorated with colorful holiday sprinkles and crushed candy canes make for a fun and easy treat perfect for parties or gifting.
- Prep Time: 15 minutes
- Cook Time: 10 minutes
- Total Time: 25 minutes
- Yield: 18 marshmallow pops 1x
- Category: Dessert
- Method: No-Cook
- Cuisine: American
- Diet: Vegetarian
Ingredients
Marshmallow Pops
- 6 candy canes, unwrapped
- 18 large marshmallows
Chocolate Coating
- 1 cup melting chocolate
- 1 cup white melting chocolate
- ¼ cup green melts
- ¼ cup red melts
Decorations
- 2 tablespoons crushed candy canes
- 2 tablespoons holiday sprinkles
Instructions
- Prepare Candy Cane Sticks: Unwrap the candy canes and use them as sticks for your marshmallow pops by gently straightening and placing them on a clean surface.
- Insert Marshmallows: Skewer three large marshmallows onto each candy cane, spacing them evenly to create a pop shape.
- Melt Chocolate Coatings: In separate microwave-safe bowls, melt the melting chocolate and white melting chocolate according to package instructions. Also melt the green and red melts individually for decorating.
- Coat Marshmallows: Dip each marshmallow pop into the melted chocolate or white chocolate coatings until fully covered. Tap off excess chocolate gently.
- Decorate Pops: While the chocolate is still wet, sprinkle crushed candy canes and holiday sprinkles onto the coated marshmallows. Use the melted green and red melts to add decorative details by drizzling or spot application.
- Set Pops: Place the finished marshmallow pops on parchment paper and allow the chocolate to harden at room temperature or in the refrigerator for about 15-20 minutes.
- Serve and Enjoy: Once set, your festive Christmas Marshmallow Pops are ready to be served or packaged as gifting treats.
Notes
- You can substitute candy canes with sturdy lollipop sticks if preferred.
- Ensure marshmallows are fresh for the best texture and taste.
- Use high-quality melting chocolates for a smooth coating.
- Store the marshmallow pops in an airtight container to keep them fresh.
- Feel free to get creative with decorations using colored sugar, edible glitter, or other festive toppings.
Keywords: Christmas marshmallow pops, holiday treats, festive desserts, chocolate coated marshmallows, Christmas candy