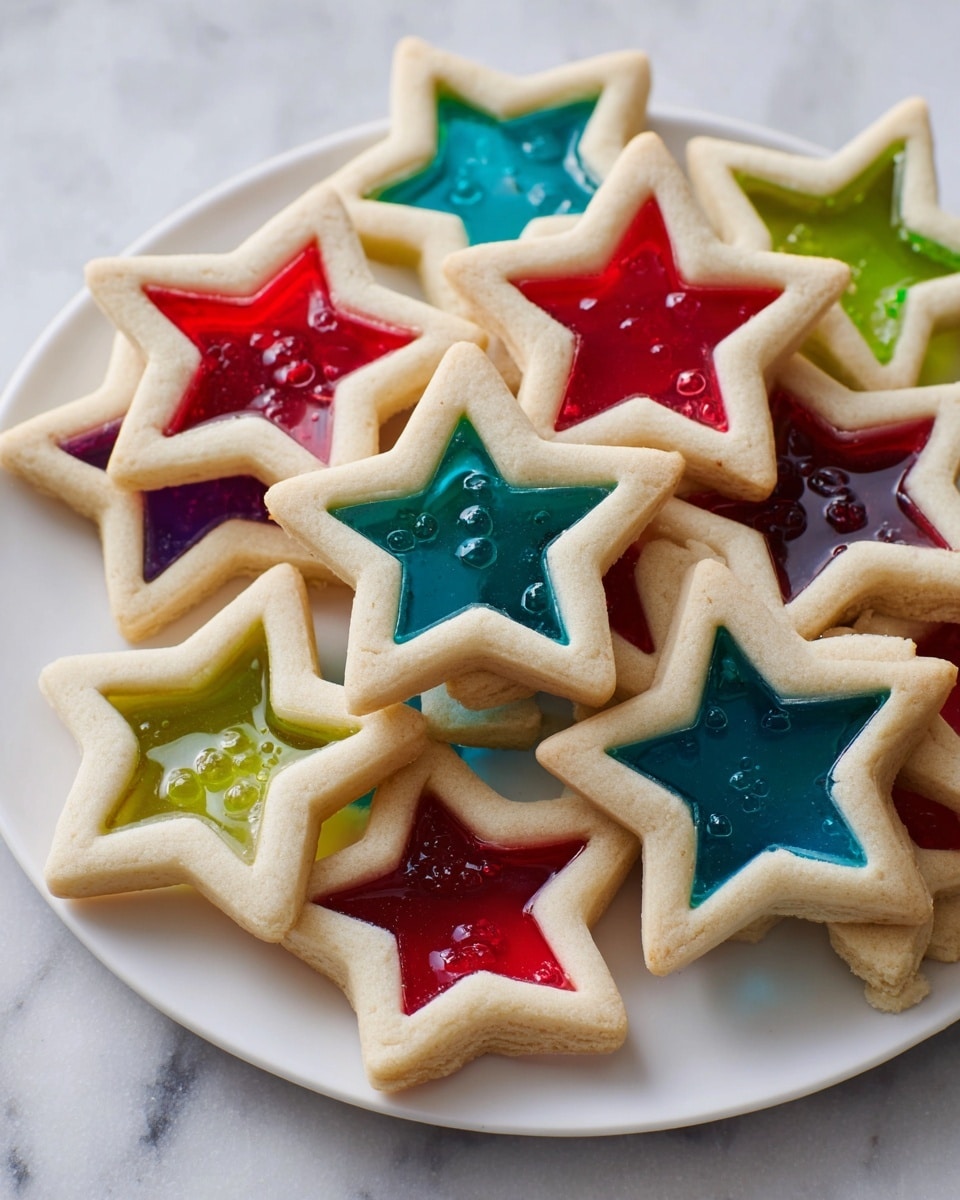
Stained Glass Cookies Recipe
There’s something truly magical about making stained glass cookies. When the sunlight hits those colorful candy centers, they practically glow—creating the most charming, almost edible works of art. If you’re looking for a fun project that’s part baking, part crafting, this Stained Glass Cookies Recipe is the perfect treat to try, especially around holidays or for a whimsical party dessert.
I remember the first time I made these cookies with my niece; we spent hours cutting shapes, choosing Jolly Rancher colors, and watching the candy melt into these beautiful “glass” centers. Not only are they impressive to look at, but they also have that classic buttery sugar cookie flavor everyone loves, with a delightful chewy center. You’ll enjoy how simple the ingredients are and how joyful the baking process feels.
Ingredients You’ll Need
These ingredients come together to create the perfect texture and flavor for your stained glass cookies. Using simple pantry staples and colorful hard candies makes this recipe accessible and super fun to customize.
- Jolly Ranchers hard candies: These provide the vibrant “glass” effect inside your cookies. Choose different colors to make your cookies pop. You’ll want to unwrap them and crush them up finely to get that pretty melted center.
- Unsalted butter: Softened butter creates that tender, buttery cookie base. I always recommend unsalted so you can control the saltiness better.
- Granulated sugar: Gives sweetness and helps with the classic crisp-edge sugar cookie texture.
- Salt: Just a pinch enhances all the flavors without being noticeable.
- Eggs: The eggs bind everything together and add richness to the dough.
- Vanilla extract: Vanilla brings warmth and depth, making the cookie taste homemade and comforting.
- All-purpose flour: This is the base of your dough, giving structure without making the cookies too dense. Remember to spoon and level it for accurate measurement!
Variations
I love tweaking this Stained Glass Cookies Recipe depending on the season or the mood. Once you get the hang of it, don’t hesitate to add your own spin! Baking should feel joyful and expressive, after all.
- Gluten-Free Version: I’ve swapped out all-purpose flour for a gluten-free blend with success — just be mindful it might change the dough’s firmness slightly.
- Different Candies: Instead of Jolly Ranchers, using Lifesavers or another hard candy can give you new flavor combos and colors.
- Flavored Extracts: Experiment with almond or peppermint extract if you want to add a glimpse of holiday spirit or a nutty note.
- Spiced Dough: Adding a pinch of cinnamon or nutmeg to the dough makes the cookies feel even cozier, especially for winter baking.
How to Make Stained Glass Cookies Recipe
Step 1: Prepare Your Dough Like a Pro
Start by creaming the softened butter and sugar until the mixture turns light and fluffy — usually about 3-4 minutes with a hand or stand mixer. This step is crucial because it adds air to the dough, making your cookies tender rather than dense. Beat in the eggs one at a time, followed by the vanilla extract, mixing until everything’s well incorporated. Then, gradually add the flour and salt, mixing on low speed just until combined. Overmixing here is a common mistake that can lead to tough cookies, so be gentle.
Step 2: Chill and Roll Out Your Dough
Wrap the dough in plastic wrap and refrigerate for at least an hour. This step makes rolling much easier and helps the cookies keep their shape during baking. Once chilled, lightly flour your surface and roll the dough out to about 1/4 inch thickness — a perfect thickness that balances baking through and holding the candy centers. I use a ruler to check and keep it consistent.
Step 3: Cut Shapes and Create Windows
Use your favorite cookie cutters to cut out shapes, then use smaller cutters (or a carefully used knife) to cut out the centers that will hold your “stained glass.” Don’t discard the centers; you can save the dough scraps to reroll once you’re done.
Step 4: Crush Candies and Fill the Windows
Unwrap your Jolly Ranchers and crush them into small, even pieces — I find a rolling pin inside a sealed zip-top bag works best, but be gentle to avoid too many powdery bits. Sprinkle the crushed candies evenly into the center cut-outs on each cookie. This will melt while baking to create your beautiful stained glass effect.
Step 5: Bake and Cool to Perfection
Bake the cookies in a preheated oven at 350°F (177°C) for 8-10 minutes, or until the cookie edges just start to turn golden and the candy centers have melted completely. Keep a close eye—any longer and the candy might start to bubble too much or burn. Let the cookies cool on the baking sheet for about 10 minutes before transferring them to a wire rack. The candy will harden as it cools, so patience here really pays off!
How to Serve Stained Glass Cookies Recipe

Garnishes
I like to keep it simple and let these cookies shine on their own, but a dusting of powdered sugar adds a whimsical “frosted” touch without overpowering the stained glass centers. For festive occasions, you can sprinkle edible glitter or add a tiny piped border of royal icing for an elegant finish.
Side Dishes
These cookies are lovely alongside a hot cup of tea or a frothy latte — perfect for cozy afternoon snacks. If you’re serving a batch at a party, I like pairing them with fresh fruit platters or light cheeses for a surprisingly delightful flavor balance.
Creative Ways to Present
Arrange your stained glass cookies on a clear glass platter near a sunny window or candlelight to make those colors glow. For holiday gifting, package them in cellophane bags tied with ribbon or stack them in a box layered with parchment paper. It’s a guaranteed showstopper!
Make Ahead and Storage
Storing Leftovers
I store leftover stained glass cookies in an airtight container at room temperature for up to 5 days. Layer them between sheets of parchment paper to prevent sticking or cracking. They tend to stay fresh and keep their shiny centers beautifully if you handle them gently.
Freezing
Freezing baked stained glass cookies isn’t ideal because the candy centers can lose their translucence and become cloudy. However, you can freeze the dough portion before baking. Just roll it into a disk, wrap tightly, and freeze for up to 3 months. When you’re ready, thaw in the fridge and proceed with cutting and baking.
Reheating
I usually don’t reheat these cookies because they’re best enjoyed at room temperature, which preserves the candy’s glassy effect. If you want warm cookies, a few seconds in the microwave can soften the butter slightly but be careful not to melt the candy again.
FAQs
-
Can I use other hard candies for the stained glass part?
Absolutely! While Jolly Ranchers are popular because of their vibrant colors and flavors, you can use Lifesavers, Werther’s Originals, or other clear hard candies. Just ensure they melt down smoothly and check their flavors to complement the cookie dough.
-
Why do my candy centers crack after baking?
Cracking usually happens if the candy cools too quickly or if the candy pieces are too thick. To avoid this, crush the candy into small, even pieces and allow the cookies to cool fully on the baking sheet before moving them. Also, try not to open the oven door during baking to keep temperature steady.
-
Can I make the cookie dough ahead of time?
Yes! Preparing and chilling the dough a day in advance actually improves the flavor and makes rolling out easier. Just cover it tightly in plastic wrap and refrigerate. Take it out about 15-20 minutes before rolling to soften slightly.
-
How thick should I roll the dough for stained glass cookies?
Roll your dough to about 1/4 inch thick. This thickness ensures the cookie bakes evenly and supports the melted candy without collapsing or burning too quickly.
-
Are stained glass cookies suitable for kids to make?
Definitely! Kids especially love picking the candy colors and cutting shapes. Just supervise during baking because melted candy is hot. It’s a fun, hands-on project that’s perfect for family baking days.
Final Thoughts
This Stained Glass Cookies Recipe always brings a smile whenever I bake it. The combination of buttery sugar cookie dough and those shimmering candy “windows” turns every batch into a little celebration. Plus, it’s such a creative way to involve friends or family in baking. If you’re looking for a recipe that’s as fun to make as it is to eat, trust me—you’ll love making these cookies as much as I do. Grab your cookie cutters and candy, and get ready to make some magic in your kitchen!
PrintStained Glass Cookies Recipe

Stained Glass Cookies are delightful sugar cookies with a colorful twist, featuring a window of melted Jolly Rancher candies in the center. These festive treats are perfect for holidays and special occasions, combining a buttery, tender cookie exterior with a vibrant, translucent candy glaze that shines like stained glass.
- Prep Time: 20 minutes
- Cook Time: 10-12 minutes
- Total Time: 1 hour 32 minutes
- Yield: 24 cookies 1x
- Category: Dessert
- Method: Baking
- Cuisine: American
Ingredients
Cookies
- 1 cup (226g) unsalted butter, softened
- 1 cup (200g) granulated sugar
- 1/4 tsp salt
- 2 large eggs
- 1 tsp vanilla extract
- 3 cups (382g) all-purpose flour (spooned and leveled), plus more for dusting
Stained Glass Centers
- Jolly Ranchers hard candies (approx. 20), assorted colors, unwrapped and crushed or whole depending on cookie cutter size
Instructions
- Prepare the Cookie Dough: In a large mixing bowl, cream together the softened unsalted butter and granulated sugar until light and fluffy. Add the eggs one at a time, beating well after each addition, then mix in the vanilla extract and salt. Gradually incorporate the all-purpose flour, mixing until a smooth dough forms. Avoid overmixing to keep cookies tender.
- Chill the Dough: Divide the dough into two portions, wrap each in plastic wrap, and refrigerate for at least one hour to firm up. This helps the dough hold its shape when rolling and cutting.
- Preheat the Oven and Prepare Baking Sheets: Preheat your oven to 350°F (175°C). Line baking sheets with parchment paper or silicone baking mats to prevent sticking.
- Roll Out and Cut Cookies: Lightly dust your work surface and rolling pin with flour. Roll out one portion of dough to approximately 1/4 inch thickness. Using a large cookie cutter, cut out shapes from the dough. Then, with a smaller cookie cutter, cut out the center of each shape to create a window for the candy.
- Add the Candy Centers: Place the cut-out cookies on prepared baking sheets. Fill the centers with crushed or whole Jolly Ranchers candies, ensuring the candy fills the holes but stays within the cookie edges. If using crushed candy, sprinkle enough to cover the center hole evenly.
- Bake the Cookies: Bake in the preheated oven for 10 to 12 minutes, or until the cookies are lightly golden around the edges and the candy centers have melted and are bubbly. Keep an eye on the candy to avoid burning.
- Cool Completely: Remove cookies from oven and let them cool on the baking sheets for 10-15 minutes before transferring them to wire racks. Allow the candy centers to harden fully before handling or serving to prevent cracking.
Notes
- Use different colors of Jolly Ranchers to create a vibrant stained glass effect.
- If you prefer, you can crush the candies finely for a smoother candy window or use whole pieces for a more mosaic look.
- Ensure the dough is chilled well to make rolling and cutting easier.
- Store cookies in an airtight container at room temperature; they stay fresh for up to a week.
- Be careful when handling and eating as the candy centers can be very hard.
Keywords: Stained Glass Cookies, Sugar Cookies, Holiday Cookies, Jolly Rancher Cookies, Candy Window Cookies