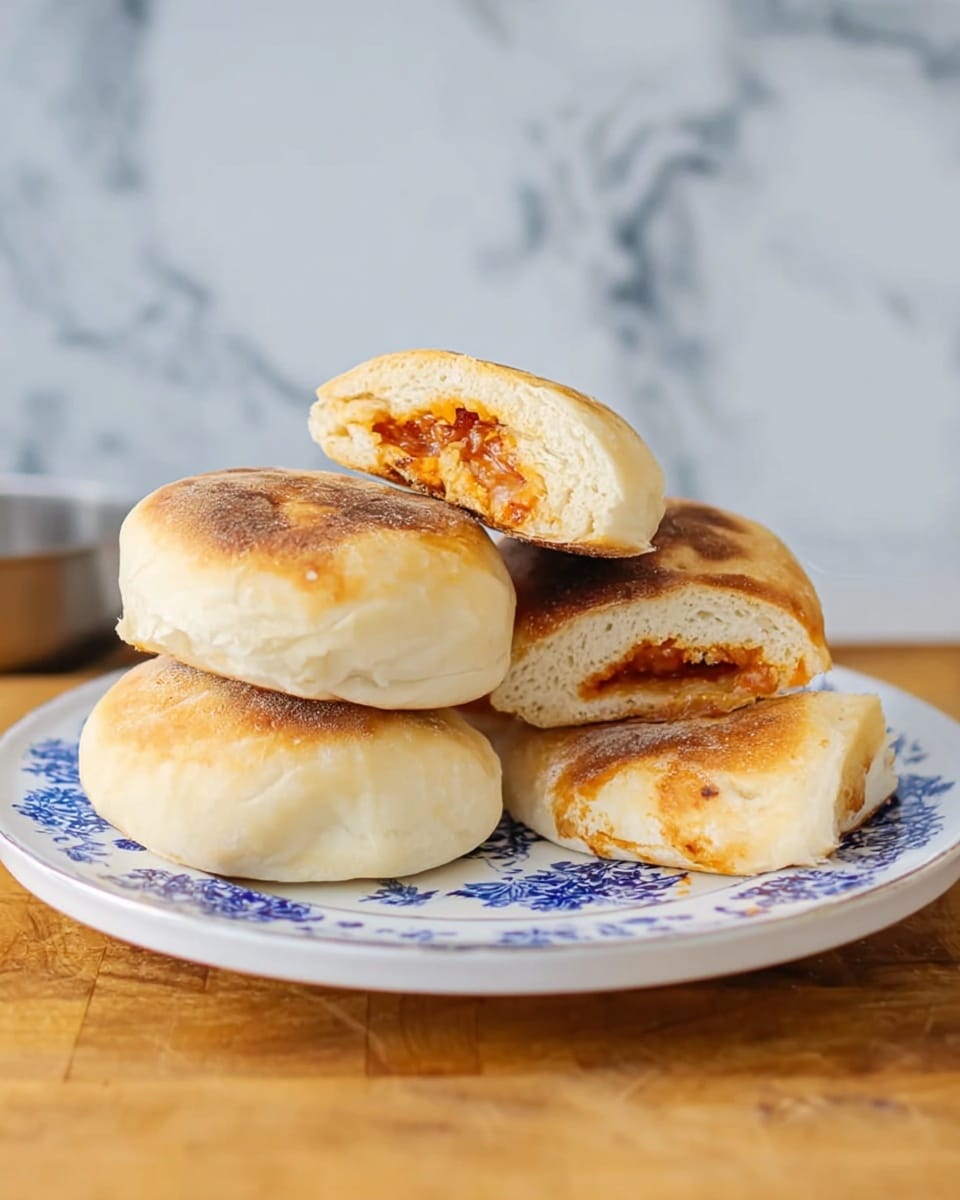
DIY Pizza Pockets Recipe
I’ve got a little secret for you that’s going to make your snack or casual dinner game so much better: my DIY Pizza Pockets Recipe. These pockets are like little homemade treasure chests filled with melty cheese, savory pepperoni, and tangy tomato sauce. They’re perfect for when you want that delicious pizza vibe but without the fuss of making or ordering an entire pie.
Honestly, I love whipping these up when friends drop by unexpectedly or for an easy weekday dinner that everyone enjoys. Plus, making pizza pockets at home lets you control what goes inside—fresh ingredients, no mystery preservatives, and endless ways to play with flavors. Once you try this DIY Pizza Pockets Recipe, I bet you’ll find yourself reaching for it again and again.
Ingredients You’ll Need
The beauty of this DIY Pizza Pockets Recipe lies in its simplicity and the way the ingredients come together. Using Greek yogurt for the dough not only keeps things healthier but also gives the pockets a tender, slightly tangy crust that’s a dream to bite into.
- Flour: I use all-purpose flour for that perfect balance of chew and structure—3 cups usually does the trick.
- Greek Yogurt: Full-fat Greek yogurt works best here; it adds moisture and a little tang to the dough which I love.
- Baking Powder: This is the secret to a nice rise and lightness in the dough, making sure it’s not dense or tough.
- Kosher Salt: Just enough to season the dough and bring out all the other flavors.
- Shredded Mozzarella: Nothing beats mozzarella for that melty, gooey goodness inside your pizza pockets.
- Pepperoni Slices: I like sliced pepperoni, but you can swap with any cured meats or even veggies!
- Tomato Sauce: A good quality tomato sauce makes all the difference—choose one that’s flavorful but not watery.

Variations
I’m often changing up the fillings for this DIY Pizza Pockets Recipe depending on what’s in the fridge or what mood I’m in. You can really make it your own!
- Vegetarian Option: Swap pepperoni for sautéed mushrooms, spinach, or roasted peppers. I love this switch when I want something lighter but still flavorful.
- Spicy Kick: Add some sliced jalapeños or a sprinkle of red pepper flakes to the filling for an extra zing—my husband can’t get enough of it this way.
- Cheese Lovers: Mix mozzarella with cheddar or parmesan for a richer cheese experience.
- Gluten-Free: I haven’t tried it myself yet, but swapping regular flour for a gluten-free blend might work if you adjust the yogurt amount slightly.
How to Make DIY Pizza Pockets Recipe
Step 1: Whip Up the Dough
Start by mixing your dry ingredients—flour, baking powder, and kosher salt—in a large bowl. Then, add the Greek yogurt and stir until the dough comes together. It’ll be a bit sticky but don’t worry—that’s what you want. Turn it out onto a floured surface and knead it gently for about 5 minutes until smooth and elastic. The dough should feel soft but not too wet. If it sticks to your hands too much, sprinkle a bit more flour.
Step 2: Roll and Fill
Divide the dough into equal portions—usually, I get about 6 or 8 pockets depending on size. Roll each portion into a circle about 6 inches across. Spoon a couple of tablespoons of tomato sauce, a handful of shredded mozzarella, and some pepperoni on one half of the dough circle. Don’t overstuff it, or you risk leaks! Leave a little edge so you can seal it nicely.
Step 3: Seal and Bake
Fold the dough over the filling to make a half-moon shape. Press the edges firmly and crimp with a fork to seal everything in (this helps prevent those delicious pockets from bursting open in the oven). Place them on a parchment-lined baking sheet. I like to brush the tops with a little olive oil or beaten egg for a golden finish. Bake in a preheated 375°F (190°C) oven for about 20-25 minutes, or until golden and puffed up. Keep an eye toward the end so they don’t get too dark!
How to Serve DIY Pizza Pockets Recipe

Garnishes
I love serving these with a sprinkle of fresh basil or oregano on top—adds a fresh aroma that complements the rich cheese and sauce. Sometimes I toss a little Parmesan on after baking for an extra savory touch.
Side Dishes
Pair these pizza pockets with a simple green salad dressed in balsamic vinaigrette or crunchy carrot sticks for a lighter side. For a heartier spread, garlic roasted potatoes or a cup of minestrone soup hit the spot.
Creative Ways to Present
For party fun, I once arranged mini pizza pockets on a platter with colorful dipping bowls of marinara, ranch, and spicy mayo. They make such adorable finger foods for game nights or movie marathons. You can even cut them into smaller bite-sized pieces if you want to make a tapas-style snack station.
Make Ahead and Storage
Storing Leftovers
I store leftover pizza pockets in an airtight container in the fridge—good for up to 3 days. Just make sure they’re fully cooled before sealing, or they can get soggy. Reheating is a breeze and doesn’t sacrifice much quality.
Freezing
I’ve frozen these a few times—perfect for meal prep! After baking and cooling, I wrap each pocket individually in plastic wrap then place them in a freezer bag. This way, I can grab one or two whenever I need a quick bite. They freeze beautifully for up to 2 months.
Reheating
To reheat, I prefer popping them in a preheated oven at 350°F (175°C) for about 10 minutes, which keeps the crust crisp and melts the cheese again. Microwaving works in a pinch but can lead to gummy dough, so I save that for when I’m in a real rush.
FAQs
-
Can I make the dough in advance for this DIY Pizza Pockets Recipe?
Absolutely! You can prepare the dough a day ahead and refrigerate it, tightly wrapped in plastic wrap. When ready, let it come to room temperature before rolling and filling. This actually helps the flavors develop a bit more.
-
What if I don’t have Greek yogurt—can I substitute it?
You can try sour cream or even buttermilk as a substitute, but the texture and flavor might be a bit different. Greek yogurt offers the perfect tang and moisture balance I love, so if possible, stick to it for best results.
-
Can I make these pizza pockets vegan?
Definitely! Swap the mozzarella for a plant-based cheese and use a dairy-free yogurt for the dough. Vegan pepperoni or roasted veggies make great fillings too. It’s a fun way to customize this DIY Pizza Pockets Recipe while keeping it plant-powered.
-
How do I keep the pockets from leaking sauce while baking?
Make sure not to overfill them, and always seal the edges really well—crimping with a fork helps a lot. Also, slightly thickening your tomato sauce or draining excess moisture from any wet fillings prevents leaks and soggy dough.
-
Can I use pre-made pizza sauce or should I make it from scratch?
Both work fine! I usually keep a good-quality store-bought sauce on hand for convenience, but homemade sauce adds a personal touch if you have the time. Just make sure it’s not too watery, whichever you choose.
Final Thoughts
This DIY Pizza Pockets Recipe has become a little kitchen staple for me because it’s easy, flexible, and truly satisfying. More than once, friends have asked for seconds or the recipe itself, which is always a good sign! If you’re looking for a fun way to enjoy pizza flavors without the mess or waiting time, give these pockets a go—you’ll love how they bring comfort food into your home with such a homemade touch.
PrintDIY Pizza Pockets Recipe

These DIY Pizza Pockets are a quick, delicious homemade snack combining a soft, tangy yogurt-based dough with a classic pepperoni and mozzarella filling, all baked to golden perfection. Perfect for lunch, dinner, or a savory treat anytime.
- Prep Time: 15 minutes
- Cook Time: 20 minutes
- Total Time: 35 minutes
- Yield: 8–10 pizza pockets 1x
- Category: Snack
- Method: Baking
- Cuisine: Italian-American
Ingredients
For the Dough
- 3 cups Flour
- 3 cups Greek Yogurt
- 3 tablespoons Baking Powder
- 2 teaspoons Kosher Salt
For the Filling
- 1 cup Shredded Mozzarella Cheese
- 1 cup Pepperoni, sliced
- 1 cup Tomato Sauce
Instructions
- Prepare the Dough: In a large mixing bowl, combine 3 cups of flour, 3 tablespoons of baking powder, and 2 teaspoons of kosher salt. Stir until evenly mixed. Add 3 cups of Greek yogurt and mix until a dough forms. Knead gently until smooth.
- Divide the Dough: Roll the dough out on a floured surface to about 1/4 inch thickness. Cut into large circles or squares suitable for folding into pockets.
- Add the Filling: Spoon approximately 2 tablespoons of tomato sauce onto each dough piece, then add a handful of shredded mozzarella and several slices of pepperoni on top of the sauce.
- Seal the Pockets: Fold the dough over the filling to form a pocket. Press the edges firmly with a fork to seal tightly, ensuring the filling does not leak during baking.
- Bake: Preheat the oven to 400°F (200°C). Place the pockets on a baking sheet lined with parchment paper. Bake for 15-20 minutes or until the dough is golden brown and the cheese inside has melted.
- Cool and Serve: Let the pizza pockets cool for a few minutes before serving to allow the filling to set slightly and avoid burns.
Notes
- For extra flavor, sprinkle dried Italian herbs on the dough before sealing the pockets.
- You can substitute pepperoni with other fillings like cooked sausage, vegetables, or different cheeses.
- Use non-fat Greek yogurt for a lower-fat version, but the dough may be less tender.
- Ensure pockets are well sealed to prevent cheese and sauce from leaking during baking.
Keywords: pizza pockets, homemade pizza, snack recipe, easy pizza pockets, baked pockets, pepperoni pockets